Requirements
- Requirements
Getting Started
- Log in to your Ringover account
- Test the headset and microphone
Install the browser extension
- Install the browser extension
Making and Receiving a Call
- Making a call
- Localized Numbers (1)
- Localized Numbers (2)
- Receiving a Call
Managing a Call
- Features during a call
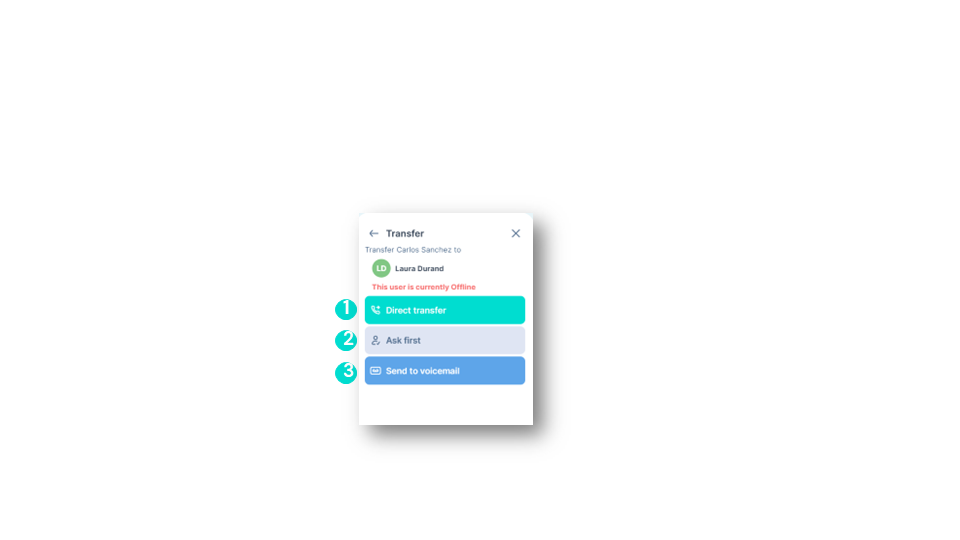
- Transferring a call (1)
- Transferring a call (2)
Ending a Call
- After-call feature
- After-call - Notes & Tags
Finding a Call
- Filters
- Types of Calls - Incoming Calls
- Types of Calls - Outgoing Calls
- Processed and unprocessed calls
Call details
- Call logs (1)
- Call logs (2)
- Call logs (3)
- Call logs (4)
Tasking
- Tasking
Using Video Conferencing
- Meet
Using Omnichannel Messaging
- Requirements
- Activating the Omnichannel Add-On
- Integrating WhatsApp
- Facebook Messenger (1)
- Facebook Messenger (2)
- Instagram (1)
- Instagram (2)
- Instagram (3)
- Google Review (1)
- Google Review (2)
- Outlook
- WebApp
- Internal Notes for Omnichannel Messaging (except email)
Viewing your activity
- Where to find the analytics page?
- Your statistics (1)
- Your statistics (2)
Power Dialer
- Enable the Power Dialer
- Creating & Importing a List
Settings
- General settings
- Language and region
- General options
- Call Forwarding
- Working hours
- Outgoing Calls
- Incoming Calls
- Voicemail
- Notifications
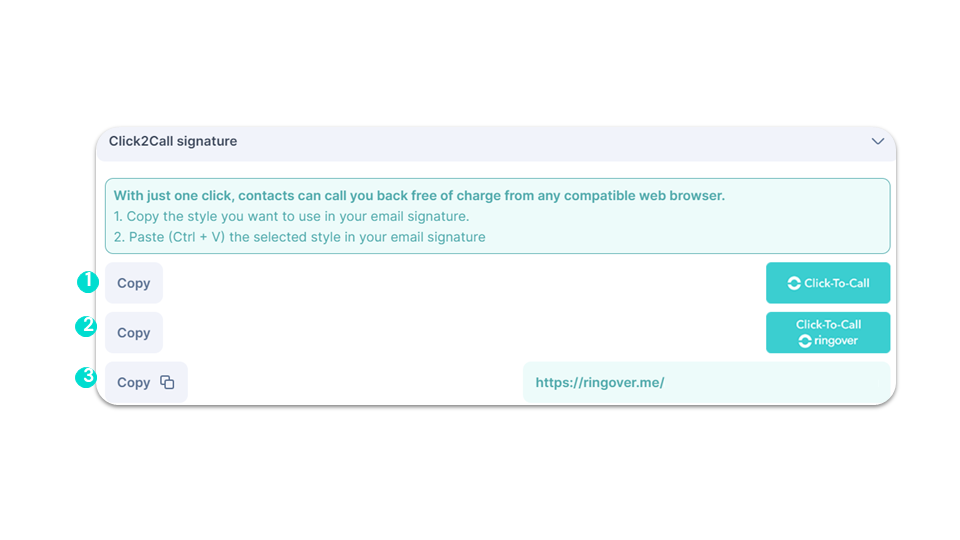
- Click2Call Signature
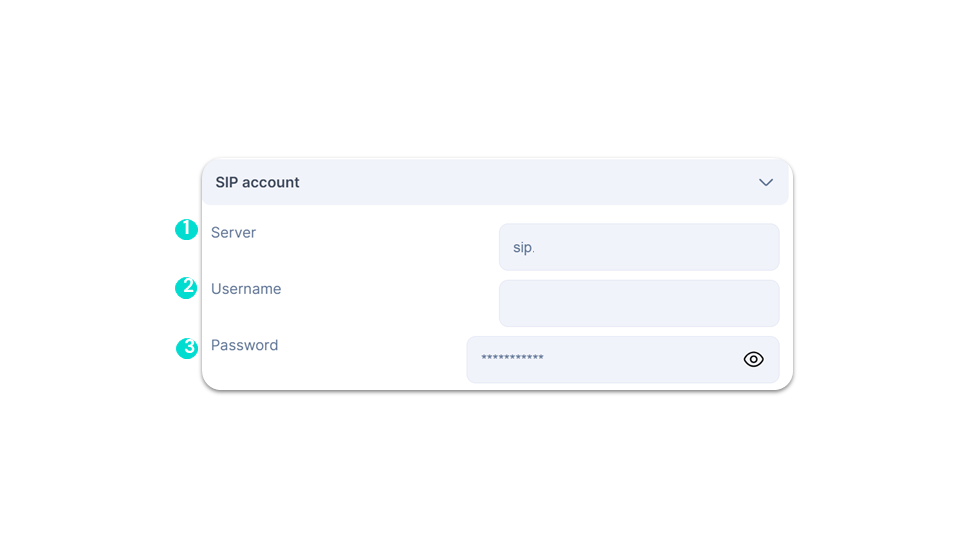
- SIP Account
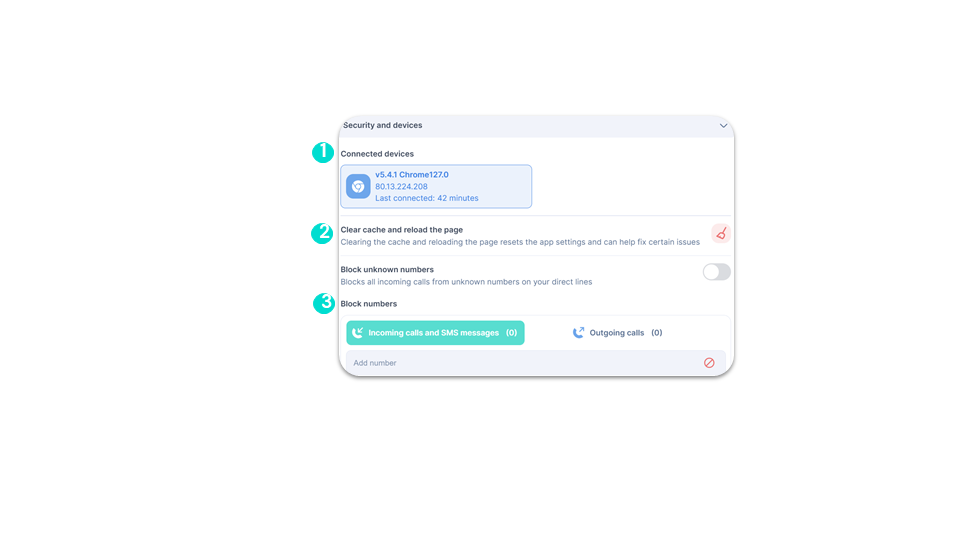
- Security & Devices
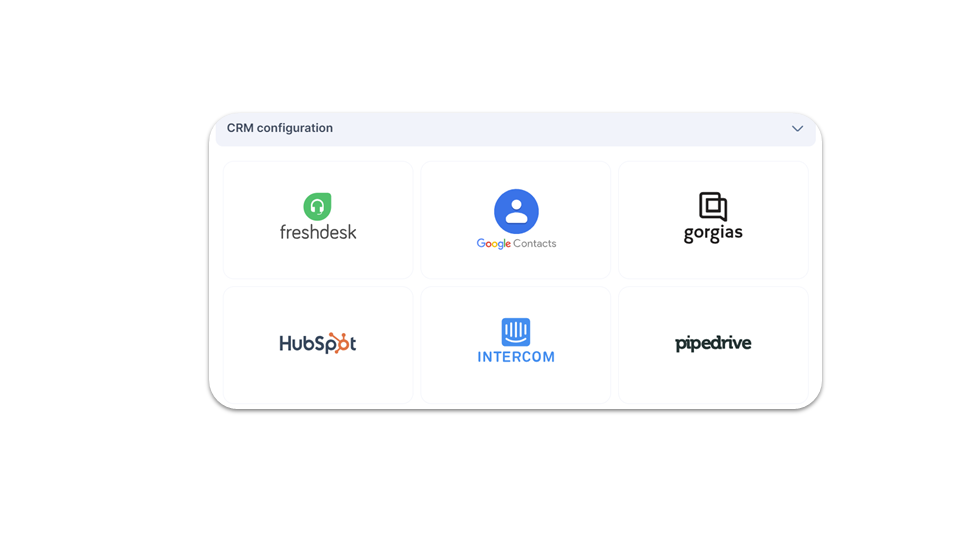
- CRM Configuration
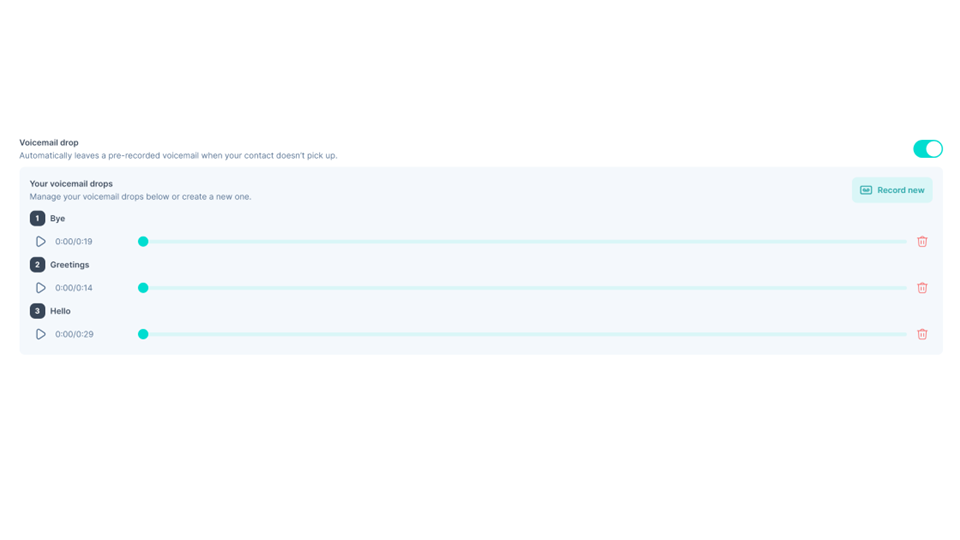
- Creating Multiple Voicemail Messages (1)
- Creating Multiple Voicemail Messages (2)
Requirements
Requirements
Important: Ensure your computer has at least 6 GB of RAM for optimal call quality.
💡You can download and install the Ringover Chrome extension in order to make calls even easier.
Important: Avoid Bluetooth headsets or earphones as they may disconnect and reduce call quality.
Getting Started
Log in to your Ringover account
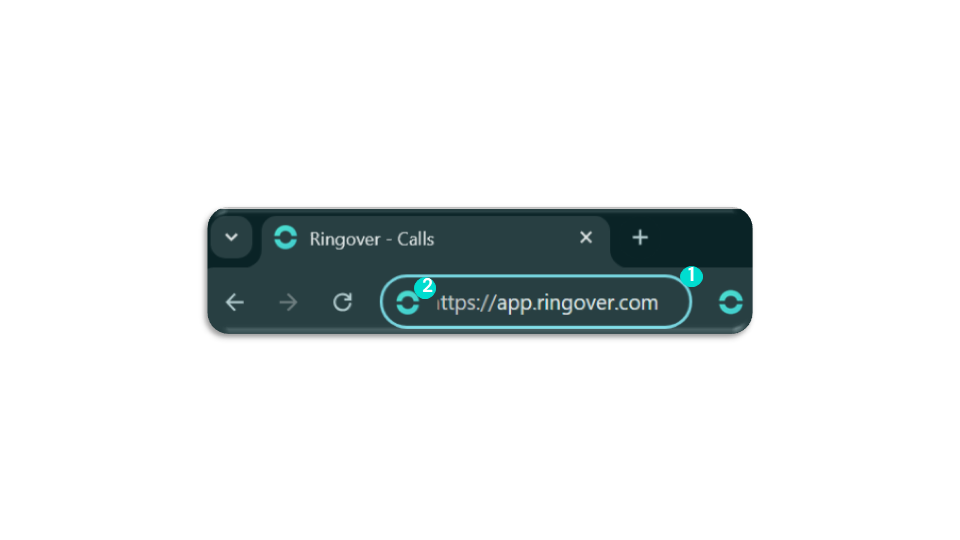
There are two ways to access app.ringover.com from your web browser.
OR
Getting Started
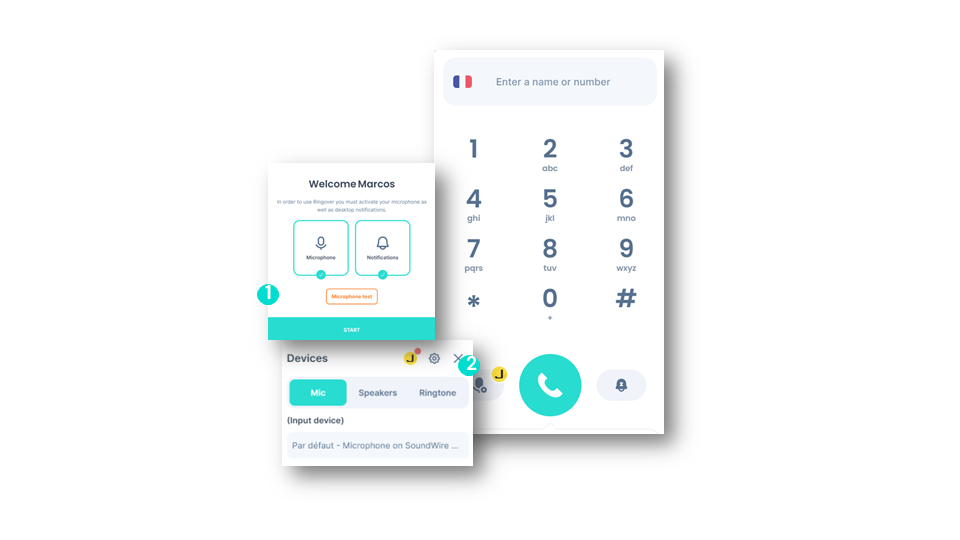
Test the headset and microphone
- Microphone Tab: Check that the sound input is good.
- Speakers Tab: Ensure you can hear well and that the correct device is selected.
- Ringtone Tab: Select and check the ringtone output device.
To go further, please visit our help center: Setting up your ringer for incoming calls
Install the browser extension
Install the browser extension
To guide you in video
Install the browser extension
Making and Receiving a Call
Making a call
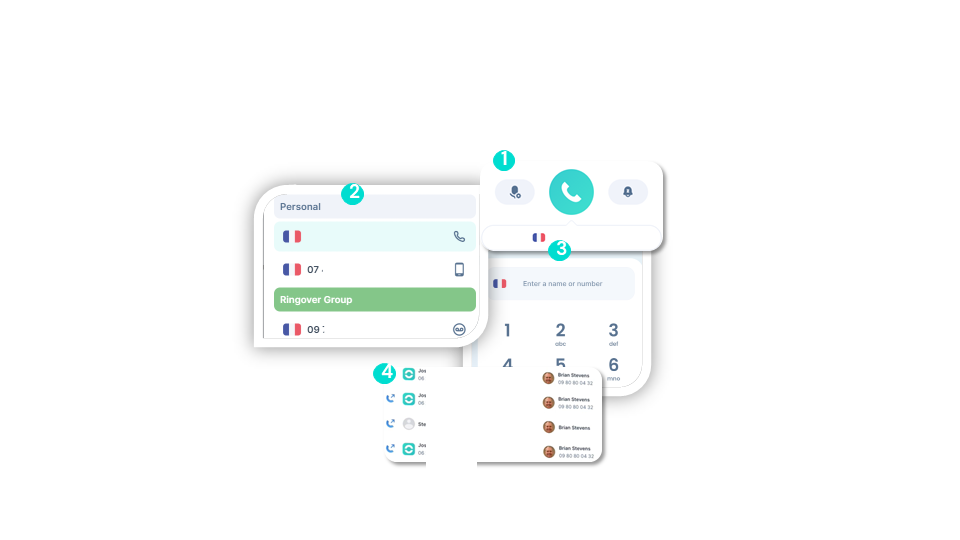
To go further, please visit our help center: Making and receiving calls
Making and Receiving a Call
Localized Numbers (1)
advancedLocalized numbers: this Ringover feature automatically selects a specific local phone number based on your travels. In other words, the closest local number to your geographical location will be selected the next time you make a call. Ringover’s localized numbers help establish a local presence in your calls, which can improve the effectiveness of your communication.
Notes:
- You can purchase our “Local Number Packs” add-on, which gives you access to 100 numbers from the 100 major U.S. cities.
- Available for outgoing calls only.
- We do not offer SMS service with local number plans.
Making and Receiving a Call
Localized Numbers (2)
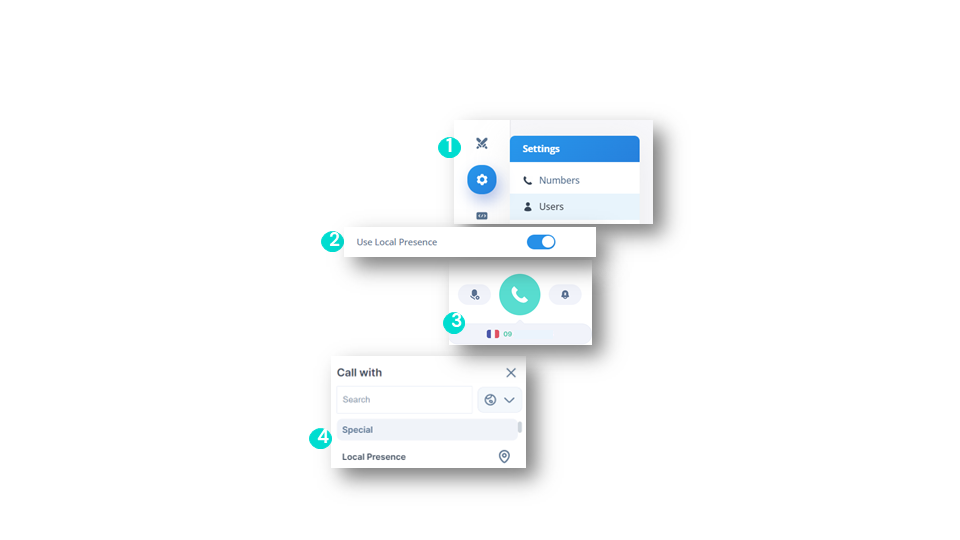
advancedWhen you make a call with the “local presence” feature, Ringover will choose the geographically closest number to the recipient.
How to use the feature ?
Making and Receiving a Call
Receiving a Call
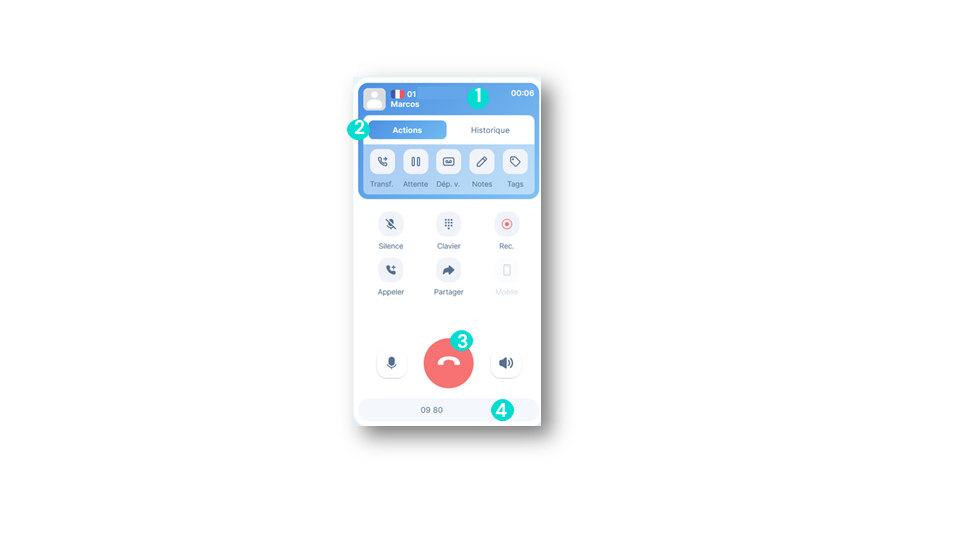
smart business advancedHere’s the information displayed on your dialer:
To go further, please visit our help center: Making and receiving calls
Managing a Call
Features during a call
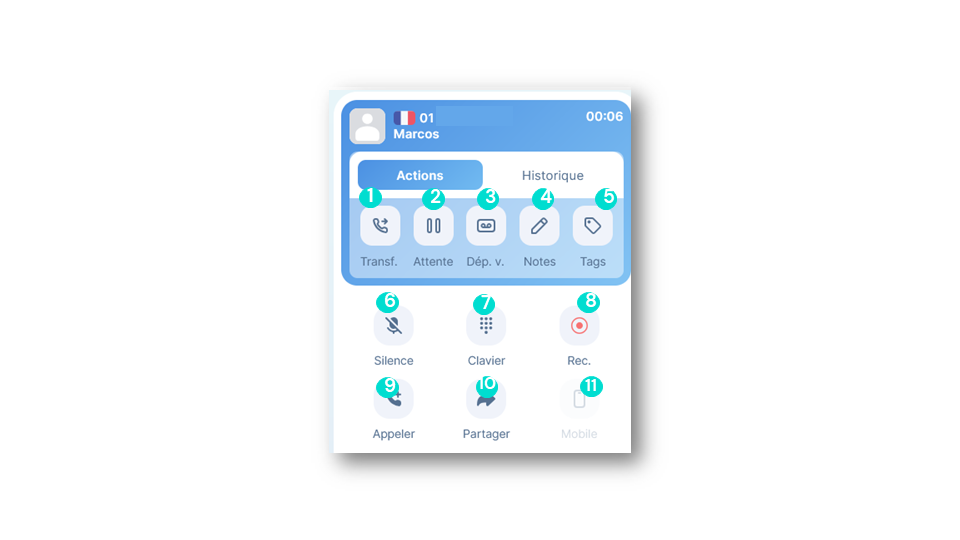
smart business advancedOnce on a call, the user can access several buttons to manage the call:
Managing a Call
Transferring a call (1)
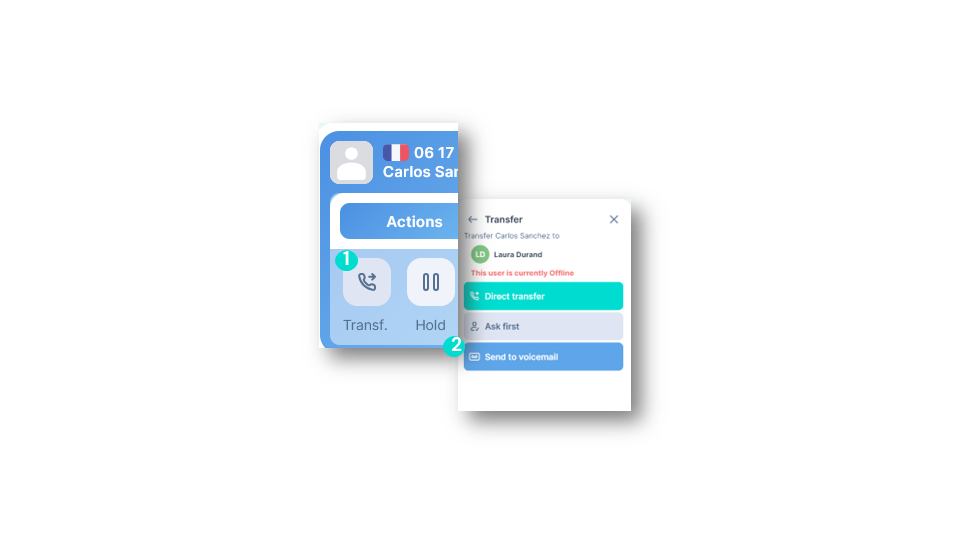
smart business advancedTransferring a call
Your call will be transferred according to the chosen method and will automatically end.
To go further, please visit our help center: Transferring a call
Managing a Call
Transferring a call (2)
smart business advancedTypes of call transfers: You can choose between three types of transfers:
Ending a Call
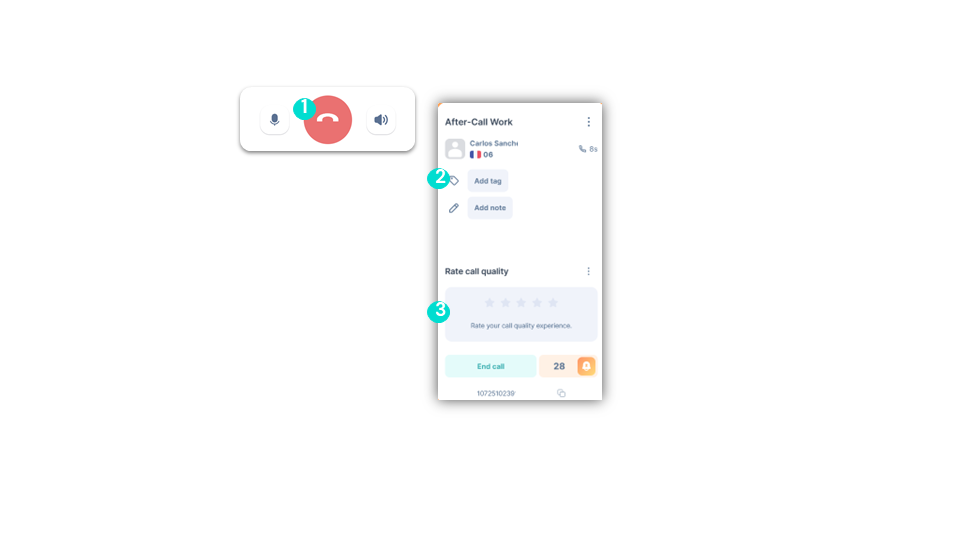
After-call feature
business advancedYou will be directed to the After-Call function, where you can:
To go further, please visit our help center: Enable the After-Call Work feature
Ending a Call
After-call - Notes & Tags
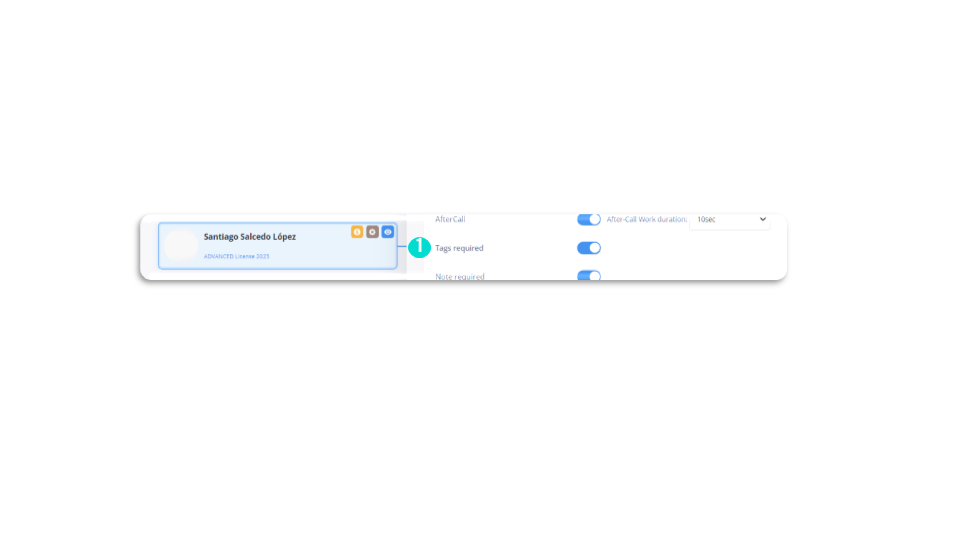
business advancedEnable the mandatory notes and tags
💡You can enable this feature if you want your teams to enter notes and tags mandatorily after each call.
💡This ensures that important details are recorded and information is organized consistently, making it easier to manage and track customer interactions and projects.
Finding a Call
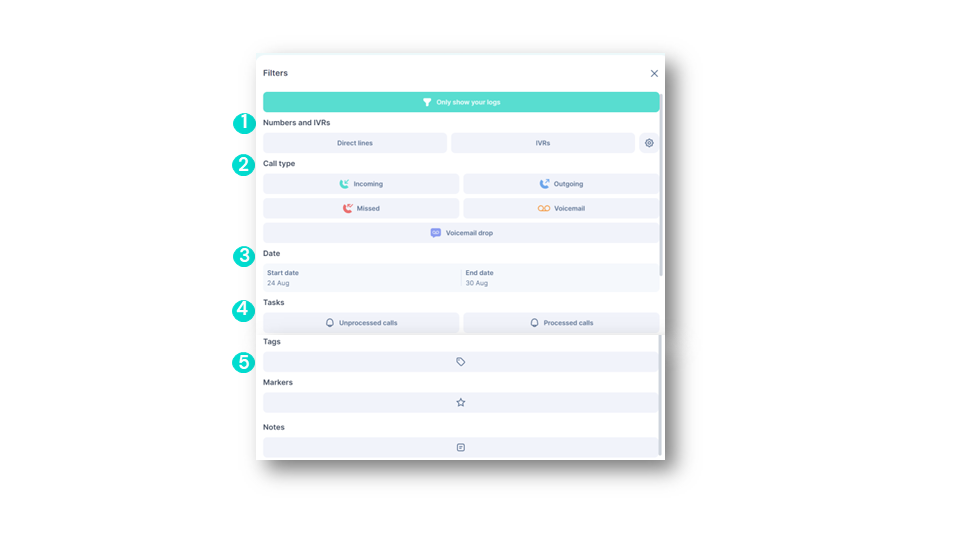
Filters
smart business advancedYou can filter calls by:
You can also:
Finding a Call
Types of Calls - Incoming Calls
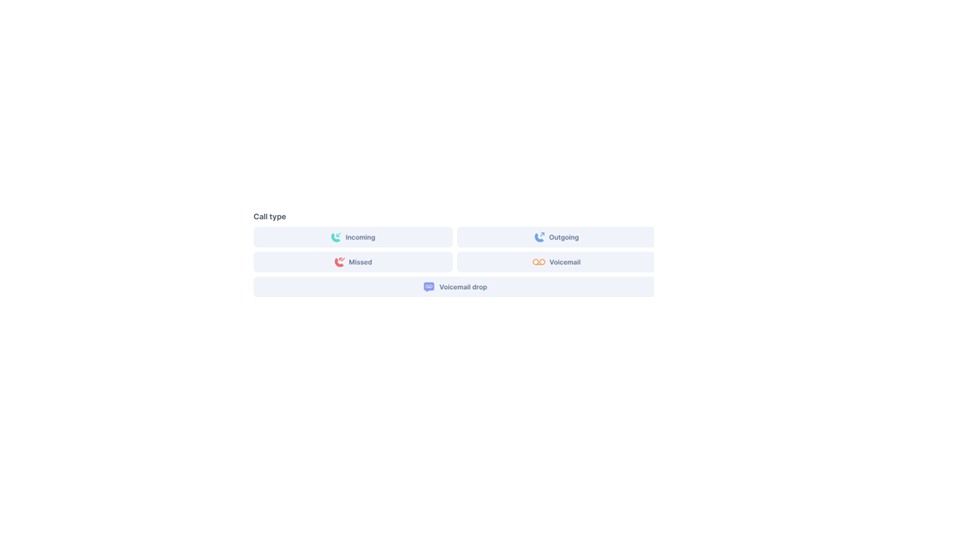
smart business advancedGenerally, all call types are enabled by default, but you can customize them. At Ringover, two main categories of calls are distinguished: Incoming & Outgoing. To view all “Incoming Calls,” select both incoming and missed calls.
Incoming Calls
Finding a Call
Types of Calls - Outgoing Calls
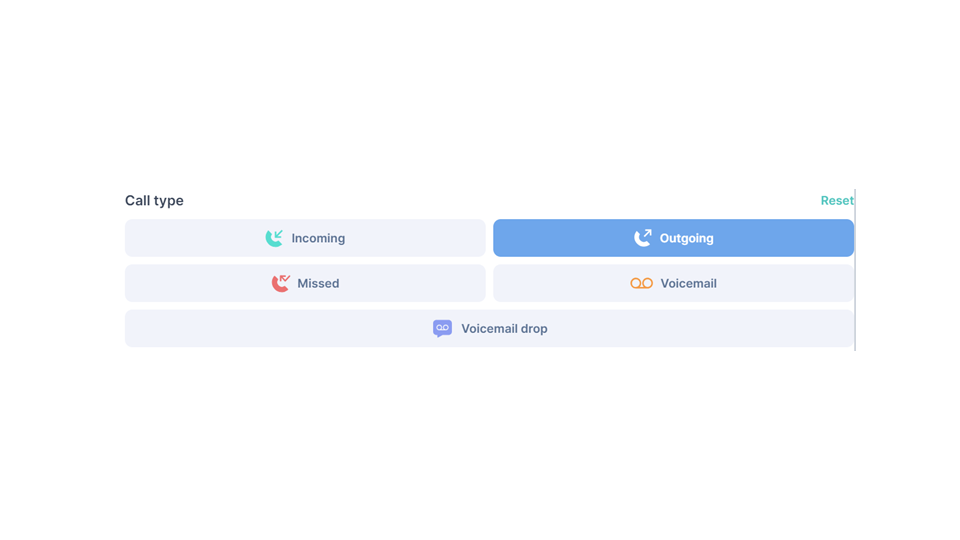
smart business advancedOutgoing Calls
These are calls that have been successfully made, meaning they were established and completed with a connection between the caller and the recipient.
To go further, please visit our help center: Call types
Finding a Call
Processed and unprocessed calls
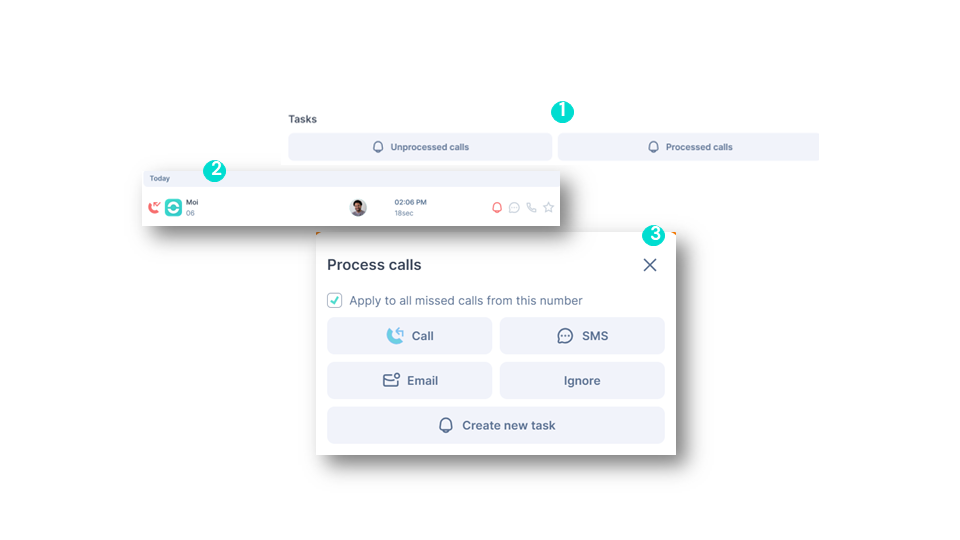
smart business advancedMissed calls that are not handled are represented by a small bell next to your call logs. It shows next to a missed call and helps you identify missed calls that need to be addressed.
Handling missed calls
Call details
Call logs (1)
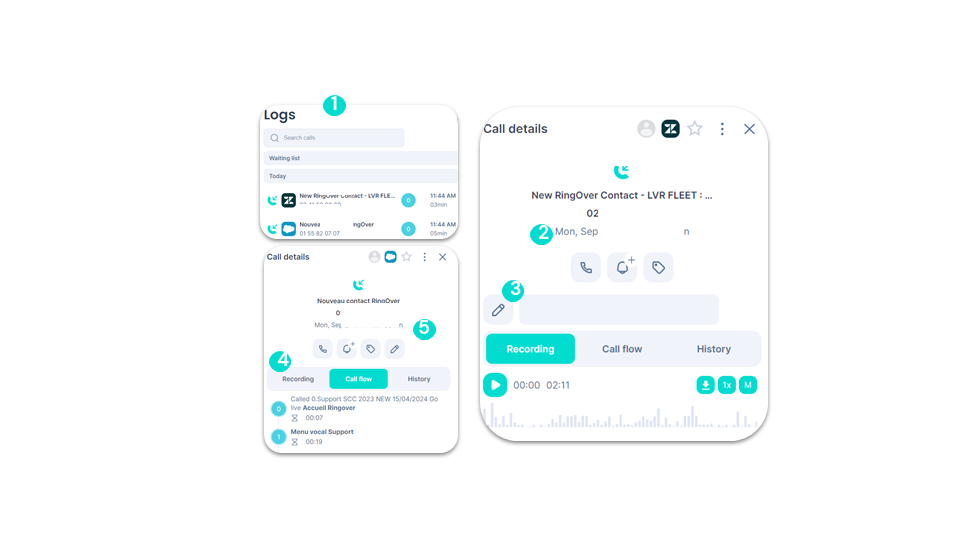
smart business advancedYou can:
Call flow:
Call details
Call logs (2)
smart business advancedYou can:
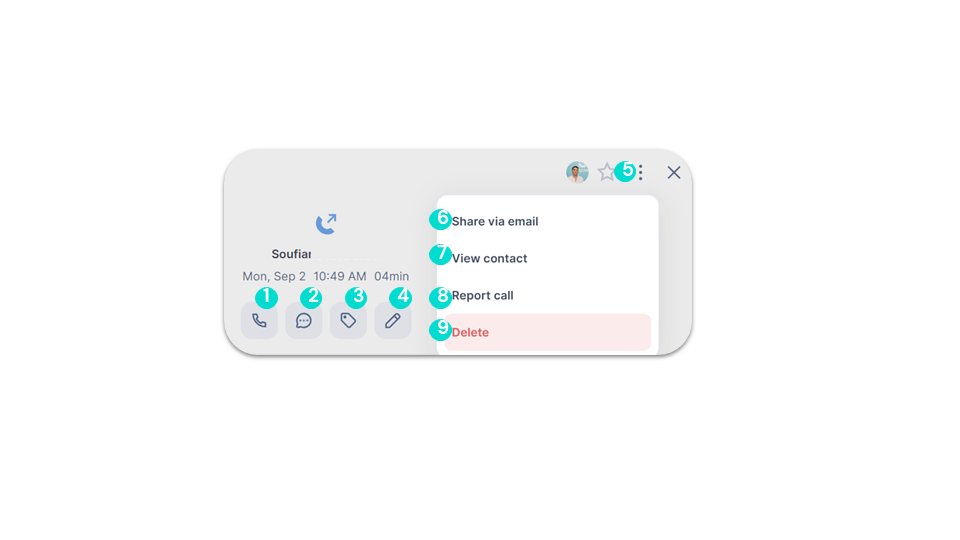
Call details
Call logs (3)
smart business advancedYou can:
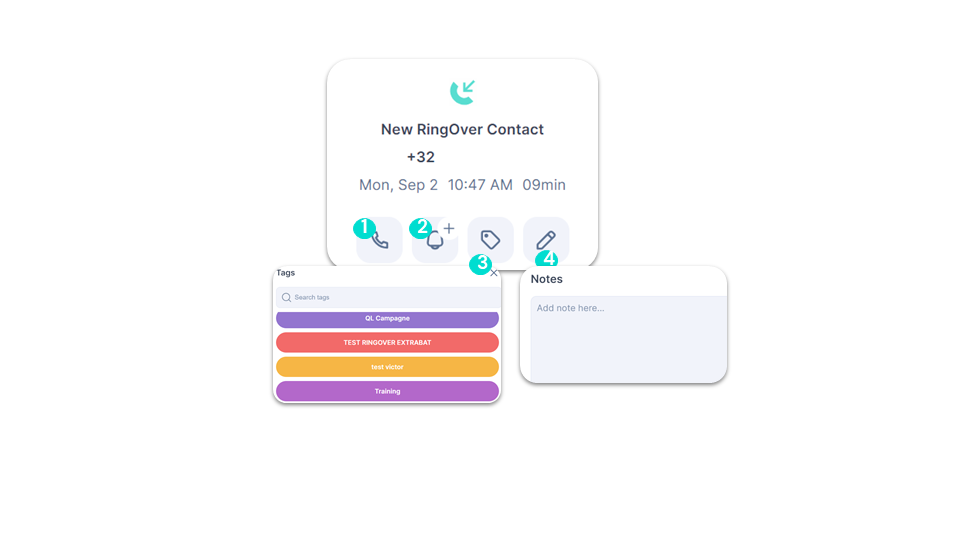
Call details
Call logs (4)
smart business advancedAt the top, you can:
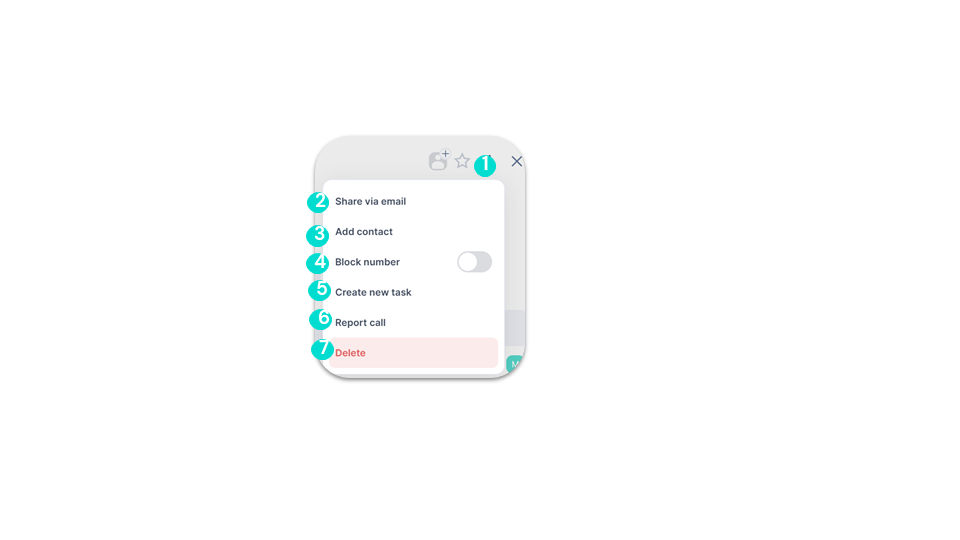
Tasking
Tasking
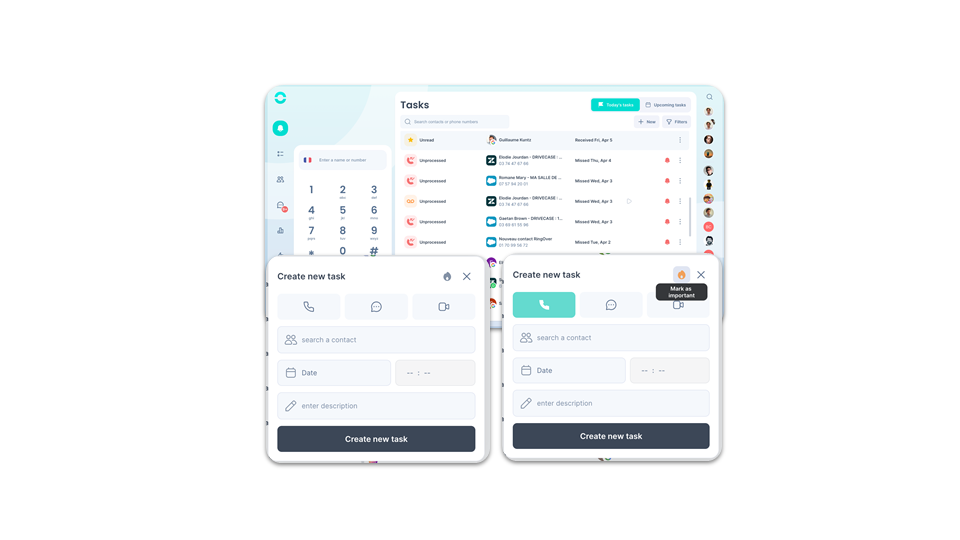
smart business advancedThe task page includes:
- Your tasks for the day / Your upcoming tasks.
- Reminders for missed calls.
- Reminders manually created by agents.
- Reminders for SMS and video conferences.
- Filters to find your tasks.
Using Video Conferencing
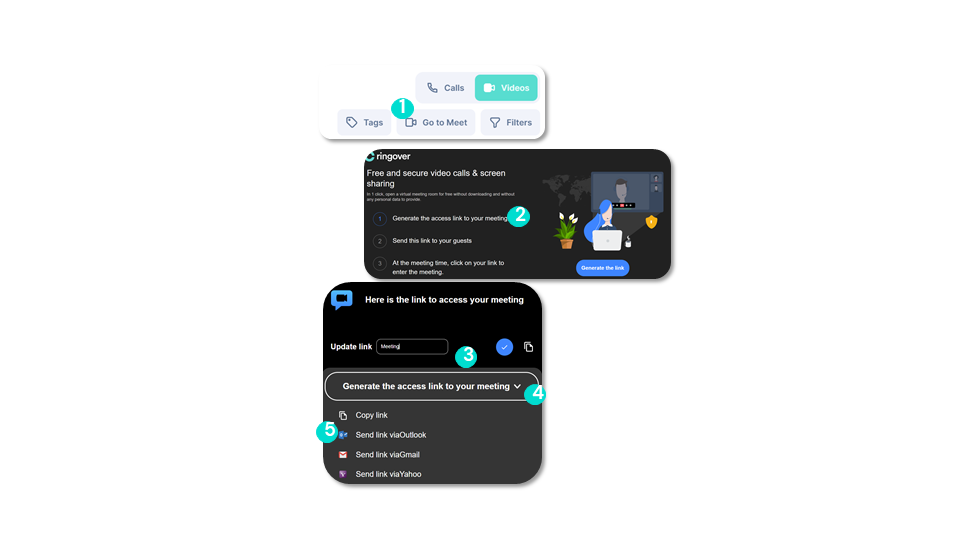
Meet
smart business advancedYou can directly create a video meeting and share the link by:
💡You can organize video conferences even with people who don’t use Ringover, simply by having an internet connection and the Ringover Meet link.
Using Omnichannel Messaging
Requirements
add-on business advanced💡An Add-on is an extension designed for Ringover that extends its capabilities beyond the basic features, allowing for a wider variety of features and options.
💡This Add-on allows you to connect different communication channels to Ringover, saving time as everything is centralized on a single platform.
Requirements:
✅ This Add-on can only be activated by account administrators and/or super administrators.
Using Omnichannel Messaging
Activating the Omnichannel Add-On
add-on business advancedTo activate this Add-on, the administrator or superadministrator should:
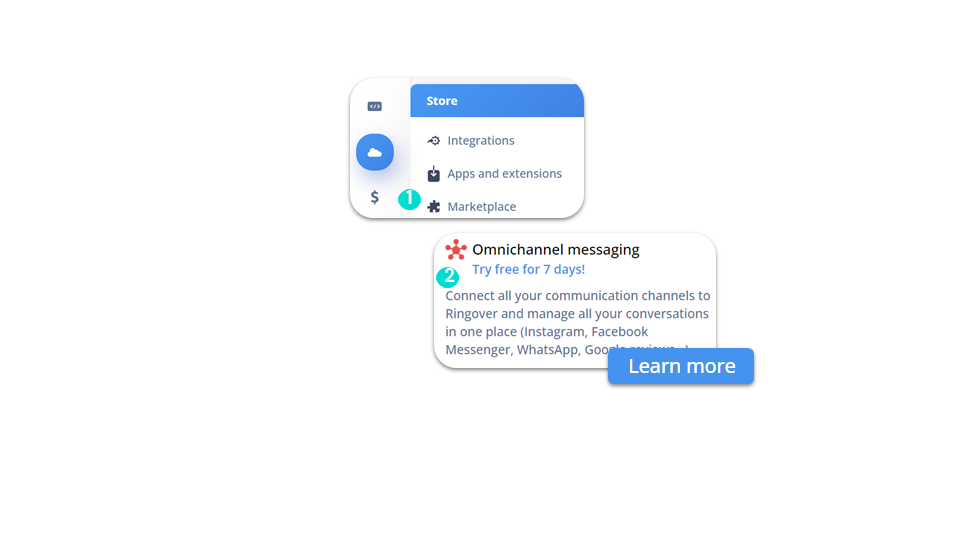
To go further, please visit our help center: How to connect and use your Omnichannel Add-on
Using Omnichannel Messaging
Integrating WhatsApp
add-on business advancedAfter subscribing to our “Omnichannel Communication” Add-on, the administrator or superadministrator should be able to:
- Go to the Ringover Dashboard under Integrations.
- Search for WhatsApp.
- Select a verified Meta account.
- Create a WhatsApp Business account.
- Select or create a user.
- Verify numbers via call.
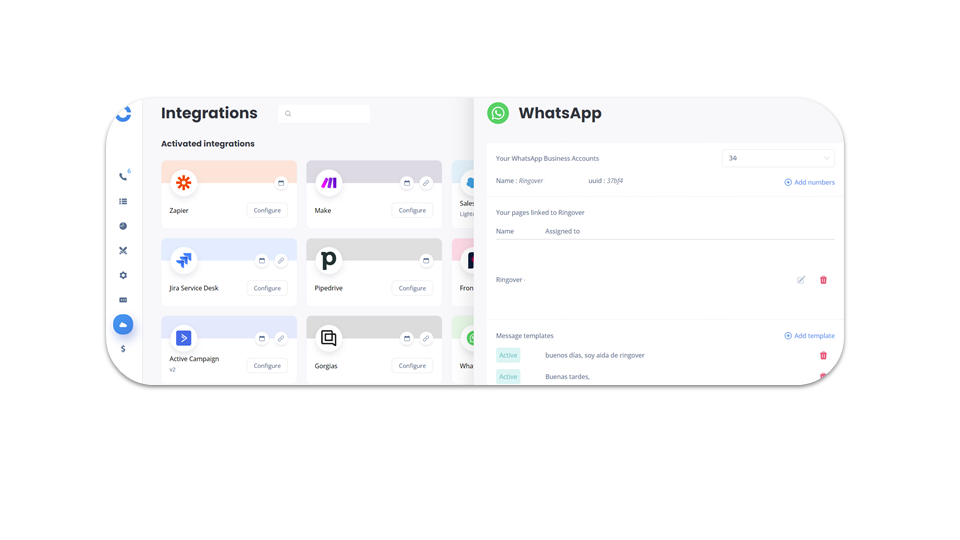
To go further, please visit our help center: How to connect and use your Omnichannel Add-on
Using Omnichannel Messaging
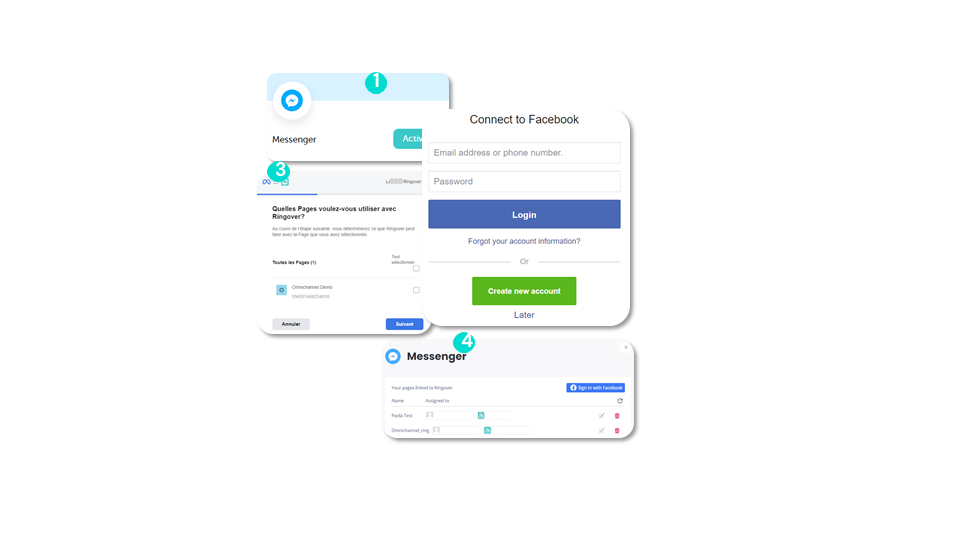
Facebook Messenger (1)
add-on business advancedTo complete this integration, go to your Dashboard.
Using Omnichannel Messaging
Facebook Messenger (2)
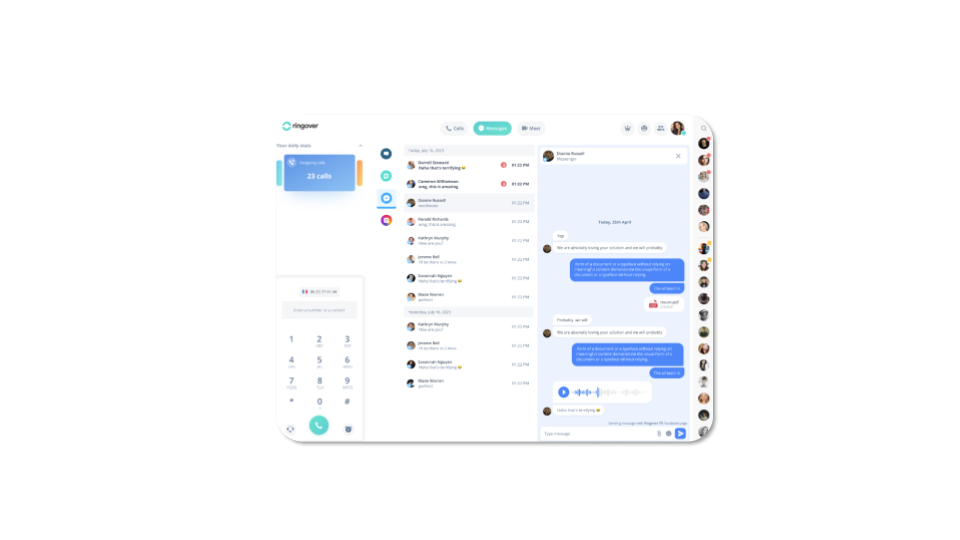
add-on business advancedUsing Messenger:
- Once the assignments are made, all messages sent to the connected pages will be received on your Web app in the messages section.
- Click on the Messenger icon and select the conversation.
Using Omnichannel Messaging
Instagram (1)
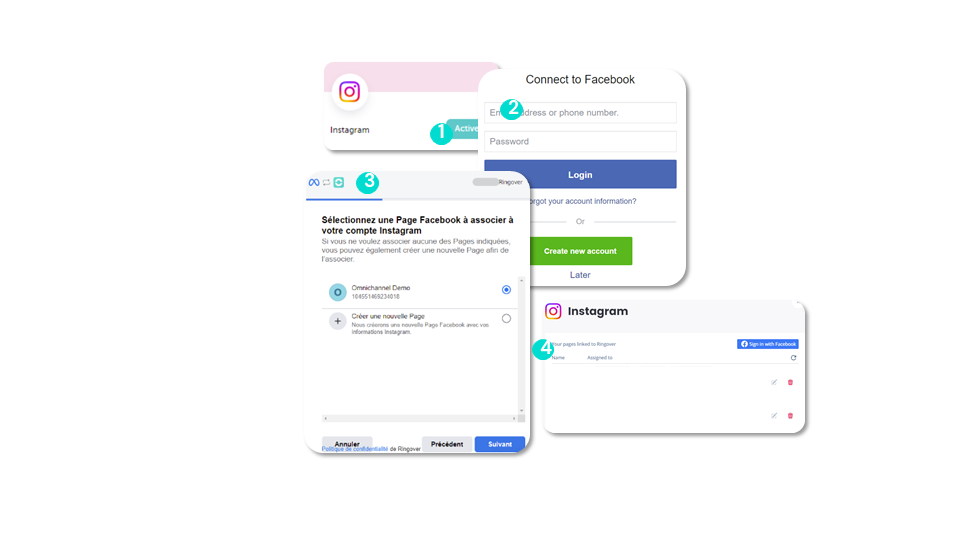
add-on business advancedRequirements:
✅ Have a professional Facebook page and ensure you have switched your Instagram account to a professional account.
✅ Link your professional Instagram account to your Facebook page.
✅ Go through a simple authentication process without a code.
Using Omnichannel Messaging
Instagram (2)
add-on business advancedTo complete this integration, go to your Dashboard:
Using Omnichannel Messaging
Instagram (3)
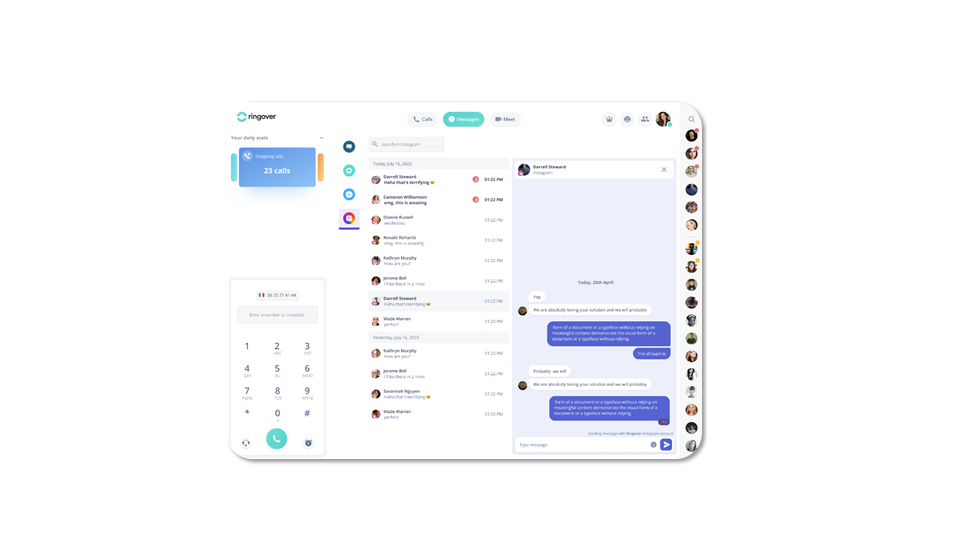
add-on business advancedUsing Instagram:
Just like on Messenger, when a user sends a message to your configured Instagram page, the assigned agent will receive the message on their Web app in Instagram and can start responding.
Using Omnichannel Messaging
Google Review (1)
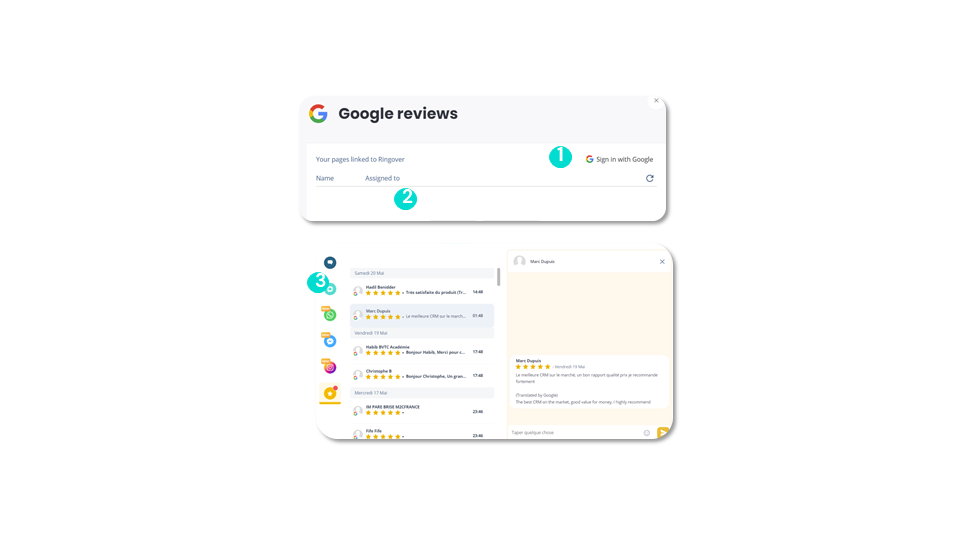
add-on business advancedRequirements:
✅ You need a certified Google Business account.
✅ To complete this integration: go to the Ringover Dashboard under Integrations and click on Activate in Google Review.
Using Omnichannel Messaging
Google Review (2)
add-on business advancedResponding to reviews:
Using Omnichannel Messaging
Outlook
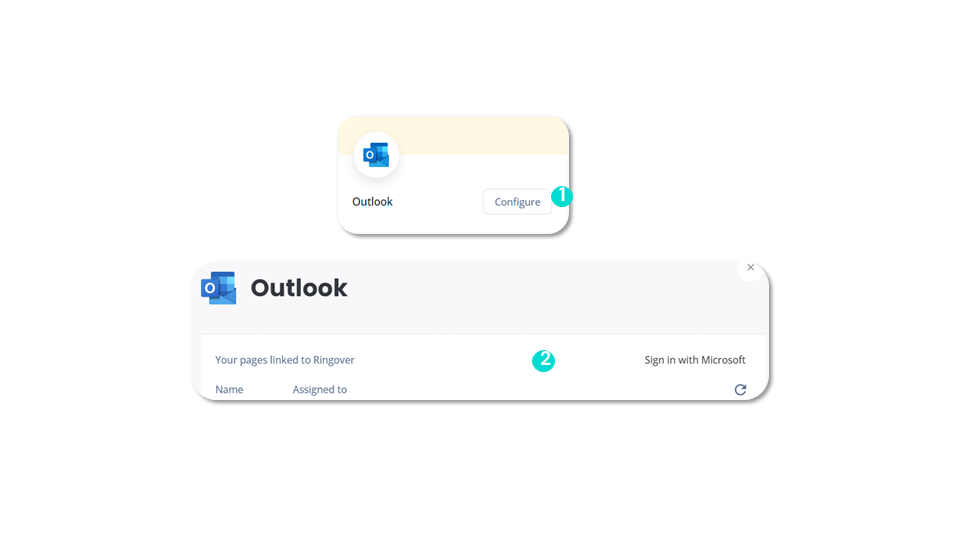
add-on business advancedTo complete this integration, go to your Dashboard. Then click on Integrations. Next, search for the Outlook integration and click Activate. Finally, confirm the activation.
Outlook is now active. To configure it:
Using Omnichannel Messaging
WebApp
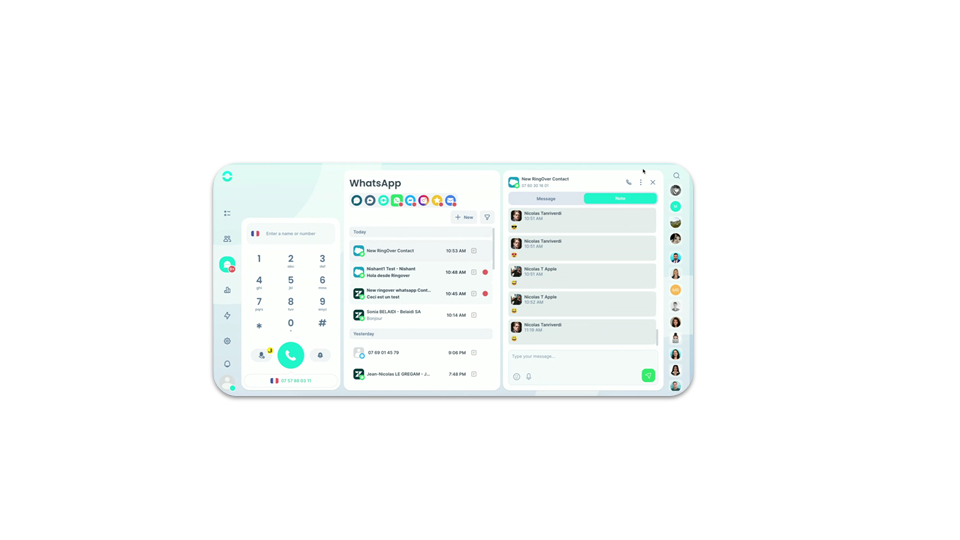
add-on business advanced✅ Available in all channels (SMS, WhatsApp, etc.).
⛔ Not available for one-way messages.
Using Omnichannel Messaging
Internal Notes for Omnichannel Messaging (except email)
add-on business advancedThe internal note is the same feature available for chat.
You can add a note visible only to other internal users.
Viewing your activity
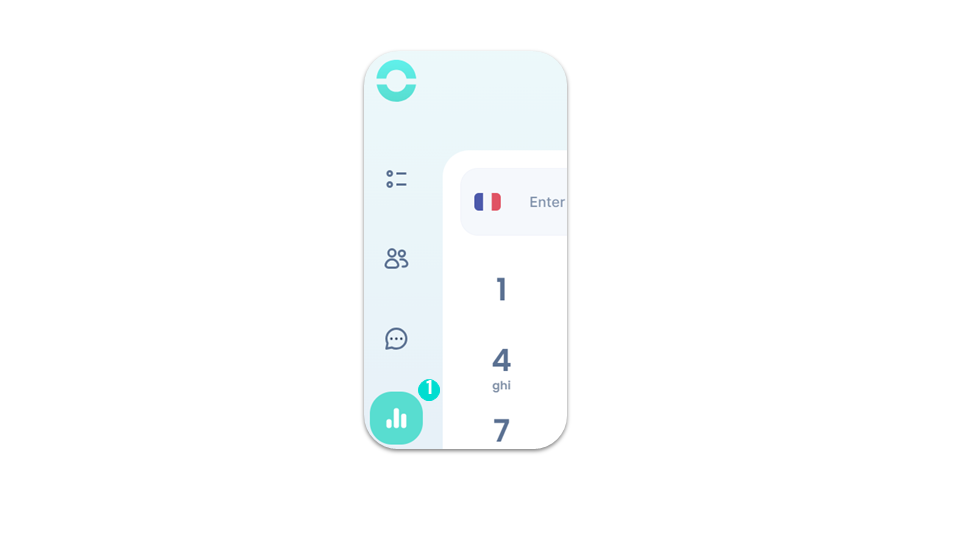
Where to find the analytics page?
business advancedRingover provides you with a multitude of analyses related to your phone calls and the different platforms you interact with through Ringover.
Viewing your activity
Your statistics (1)
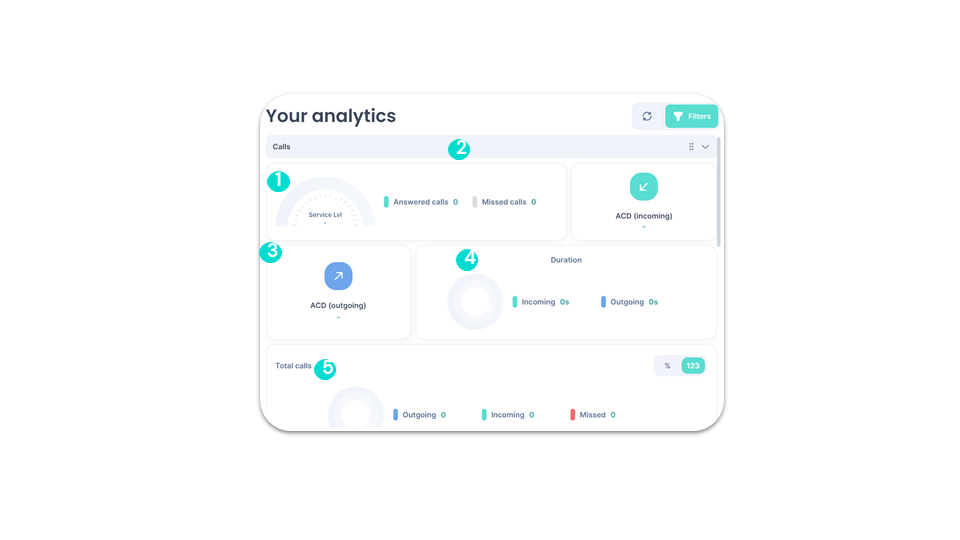
business advancedIn the “Calls” tab, you can view:
Viewing your activity
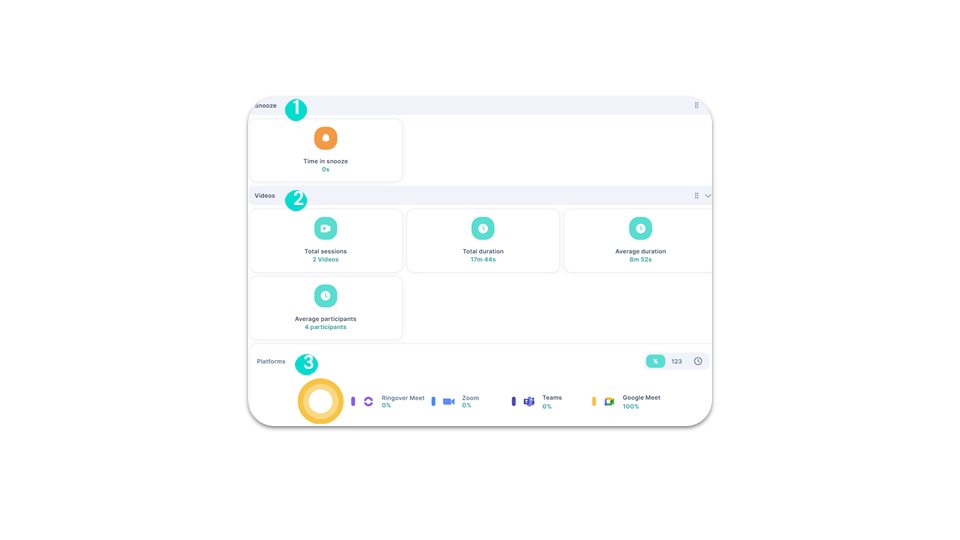
Your statistics (2)
business advancedIn the “Snooze” tab, you can view:
In the “Visio” tab, you can view:
Power Dialer
Enable the Power Dialer
advancedThe Power Dialer is a powerful tool for commercial productivity. It allows you to receive a list of phone numbers or import your own and call these numbers one after the other to maximize your outreach.
From your WebApp:
Power Dialer
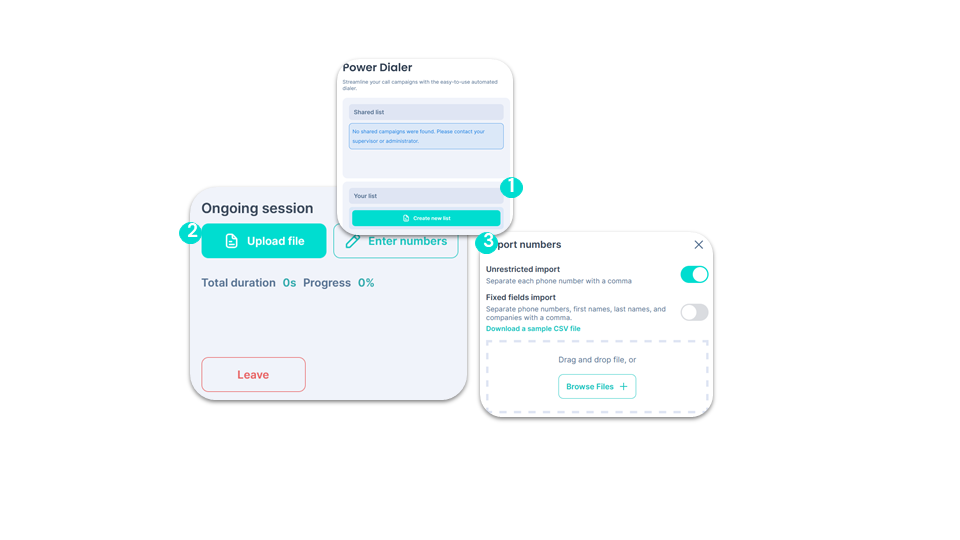
Creating & Importing a List
advancedYou can create a list by:
OR
⚠️ There is a limit of 1,000 contacts per import. However, you can purchase our “Call Campaign Expansion” add-on to add another 1,000 numbers to the same campaign.
Settings
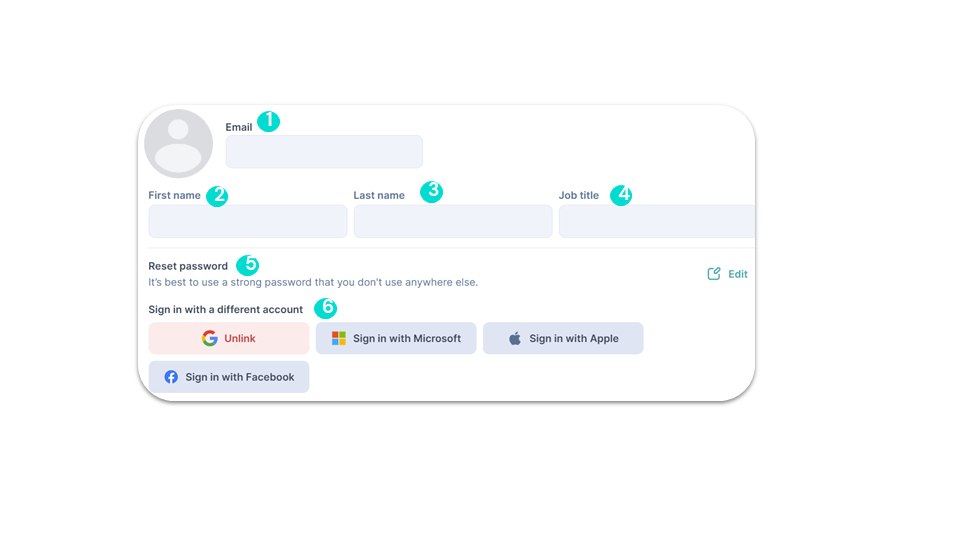
General settings
smart business advancedYou can:
Settings
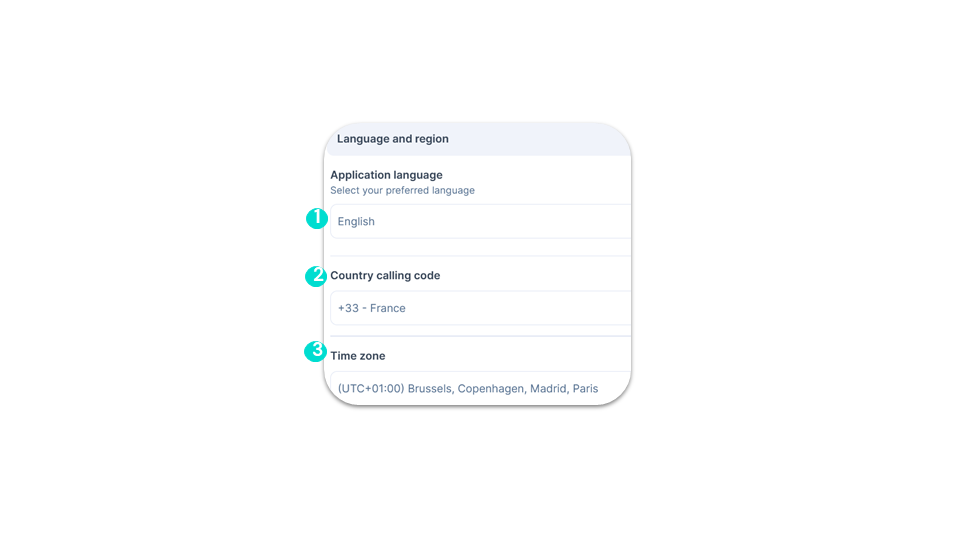
Language and region
smart business advancedYou can change:
Settings
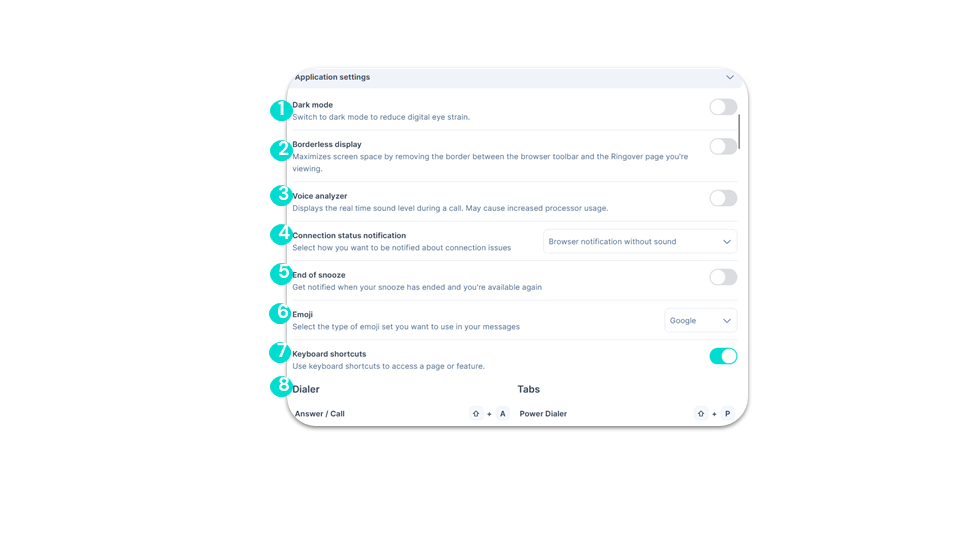
General options
smart business advancedYou can activate:
Settings
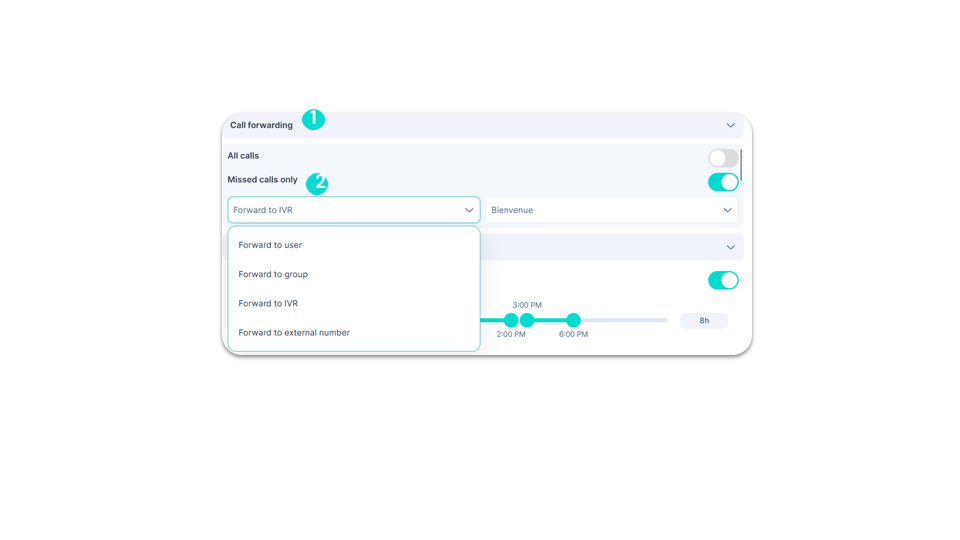
Call Forwarding
smart business advanced- “All missed calls.”
- “Only missed calls.”
To go further, please visit our help center: Transferring a call
Settings
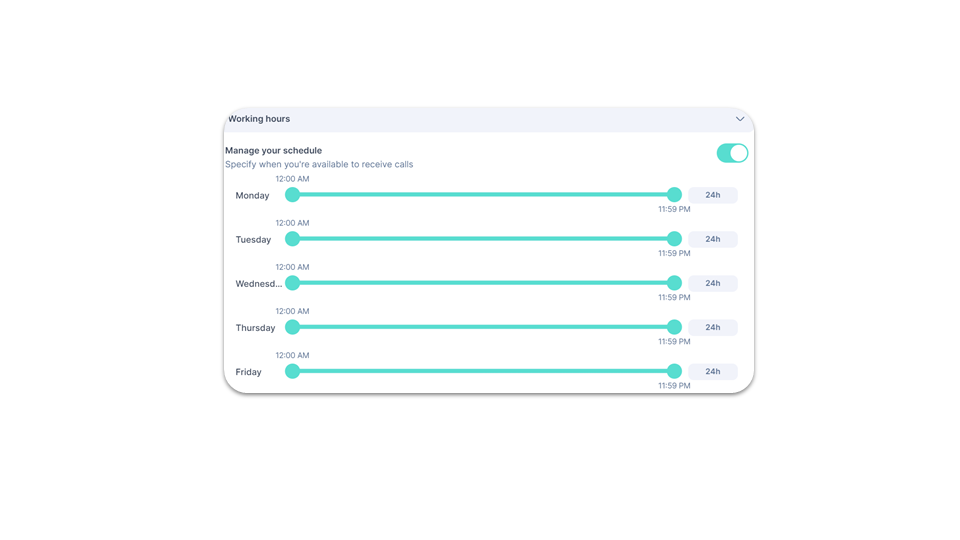
Working hours
smart business advancedIn the “Working Hours” section, you can manage your schedule by defining time slots according to your availability.
Settings
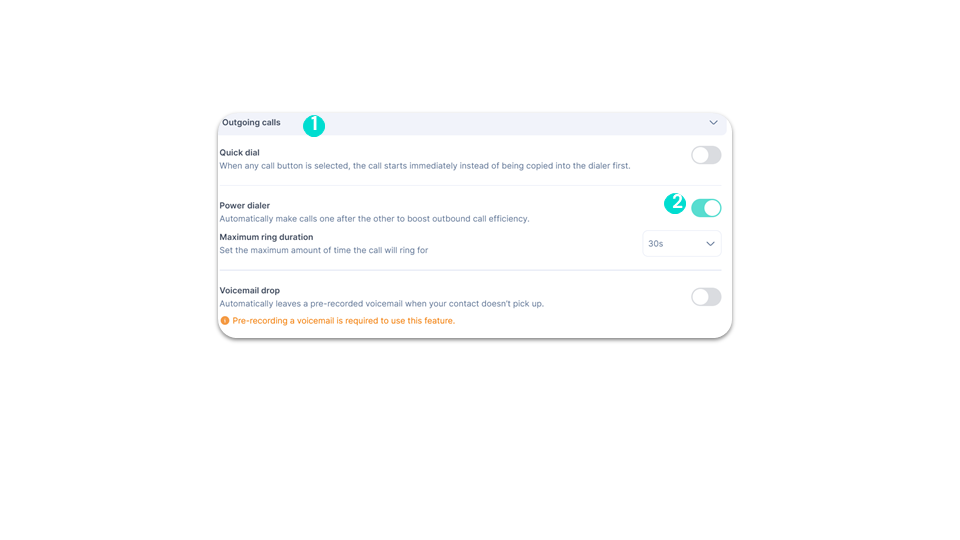
Outgoing Calls
smart business advancedIn the “Outgoing Calls” section, you can:
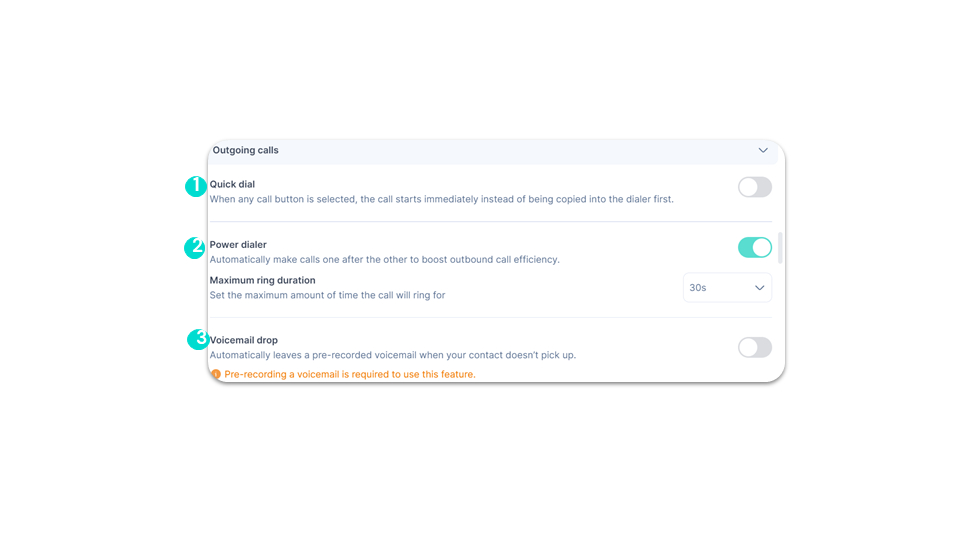
Settings
Incoming Calls
smart business advancedIn the “Incoming Calls” section, you can:
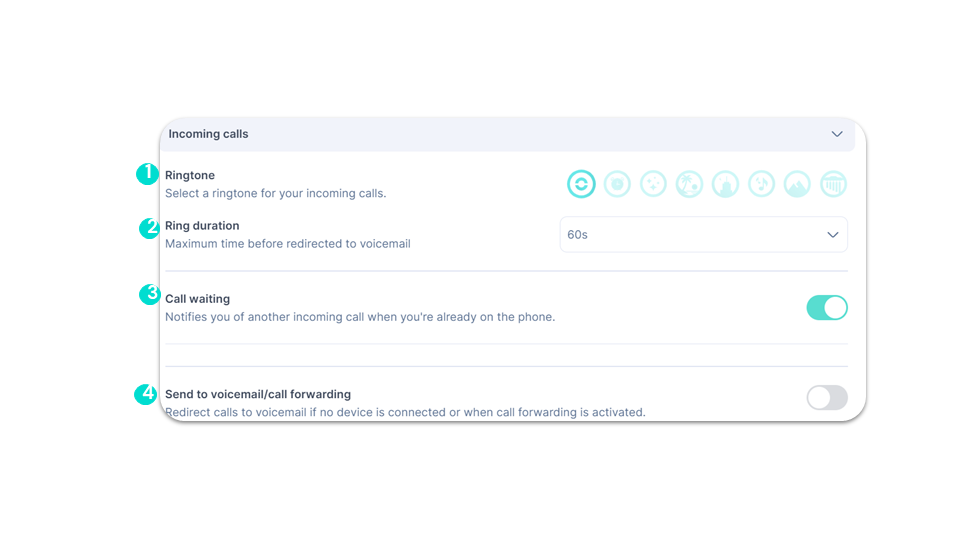
Settings
Voicemail
smart business advancedIn the “Voicemail” section, you can:
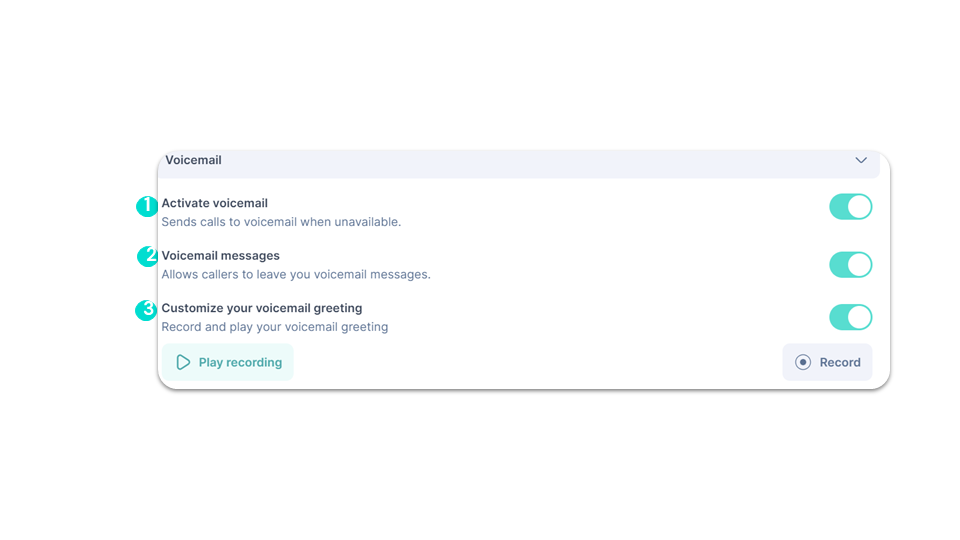
Settings
Notifications
smart business advancedIn the “Notifications” section, you can:
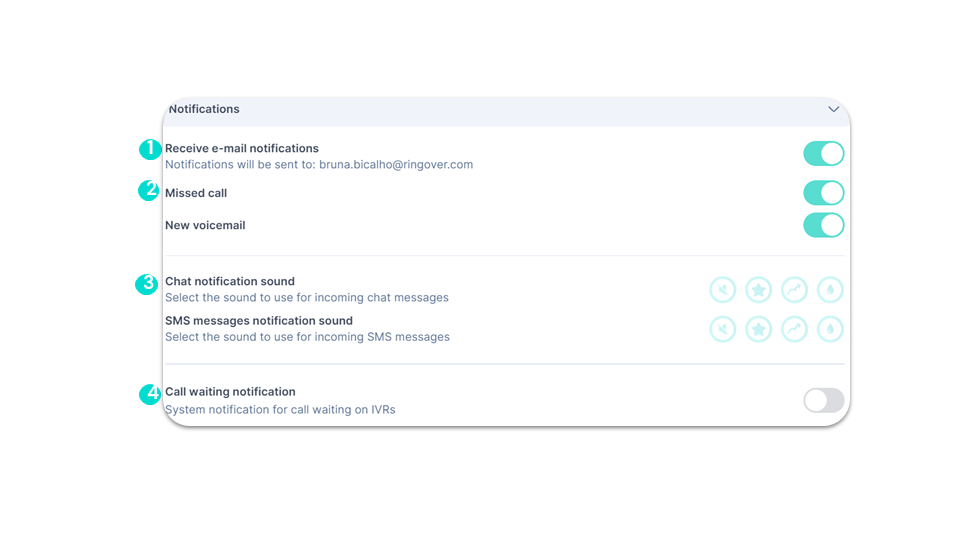
Settings
Click2Call Signature
smart business advancedIn the “Click2Call” section, you can:
Settings
SIP Account
smart business advancedIn the “SIP Account” section, you can:
Settings
Security & Devices
smart business advancedIn the “Security & Devices” section, you can:
Settings
CRM Configuration
smart business advancedIn the “CRM Configuration” section, you can access your integrations directly.
Settings
Creating Multiple Voicemail Messages (1)
advanced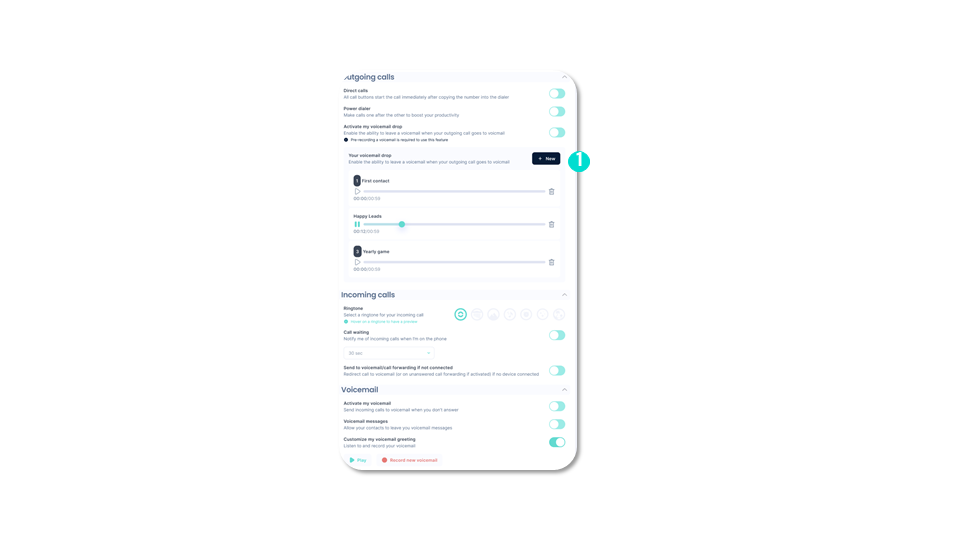
Settings
Creating Multiple Voicemail Messages (2)
advancedEach voicemail message must have a name.
In the dialer during the call, the agent can choose which voicemail message to send (Option: Have a default voicemail message for quick sending or allow time to select).
