logo-line-color Created with Sketch.
Get started
Hide menu

Requirements

  • Requirements

Getting Started

  • Log in to your Ringover account
  • Test the headset and microphone

Install the browser extension

  • Install the browser extension

Making and Receiving a Call

  • Making a call
  • Localized Numbers (1)
  • Localized Numbers (2)
  • Receiving a Call

Managing a Call

  • Features during a call
  • Transferring a call (1)
  • Transferring a call (2)

Ending a Call

  • After-call feature
  • After-call - Notes & Tags

Finding a Call

  • Filters
  • Types of Calls - Incoming Calls
  • Types of Calls - Outgoing Calls
  • Processed and unprocessed calls

Call details

  • Call logs (1)
  • Call logs (2)
  • Call logs (3)
  • Call logs (4)

Tasking

  • Tasking

Using Video Conferencing

  • Meet

Using Omnichannel Messaging

  • Requirements
  • Activating the Omnichannel Add-On
  • Integrating WhatsApp
  • Facebook Messenger (1)
  • Facebook Messenger (2)
  • Instagram (1)
  • Instagram (2)
  • Instagram (3)
  • Google Review (1)
  • Google Review (2)
  • Outlook
  • WebApp
  • Internal Notes for Omnichannel Messaging (except email)

Viewing your activity

  • Where to find the analytics page?
  • Your statistics (1)
  • Your statistics (2)

Power Dialer

  • Enable the Power Dialer
  • Creating & Importing a List

Settings

  • General settings
  • Language and region
  • General options
  • Call Forwarding
  • Working hours
  • Outgoing Calls
  • Incoming Calls
  • Voicemail
  • Notifications
  • Click2Call Signature
  • SIP Account
  • Security & Devices
  • CRM Configuration
  • Creating Multiple Voicemail Messages (1)
  • Creating Multiple Voicemail Messages (2)
Home Onboarding / User Guide / Requirements / Requirements
Show menu

Requirements

Requirements

Progress - 2%
Connect your computer to the network or box using an Ethernet/RJ45 cable. If unavailable, use Wi-Fi while staying close to the box.

Important: Ensure your computer has at least 6 GB of RAM for optimal call quality.

Finalize registration by clicking on the link in the invitation.
Click on the extension and enter your username and password.
Connect a USB headset to your computer.

💡You can download and install the Ringover Chrome extension in order to make calls even easier.

Important: Avoid Bluetooth headsets or earphones as they may disconnect and reduce call quality.

Home Onboarding / User Guide / Getting Started / Log in to your Ringover account
Show menu

Getting Started

Log in to your Ringover account

Progress - 4%

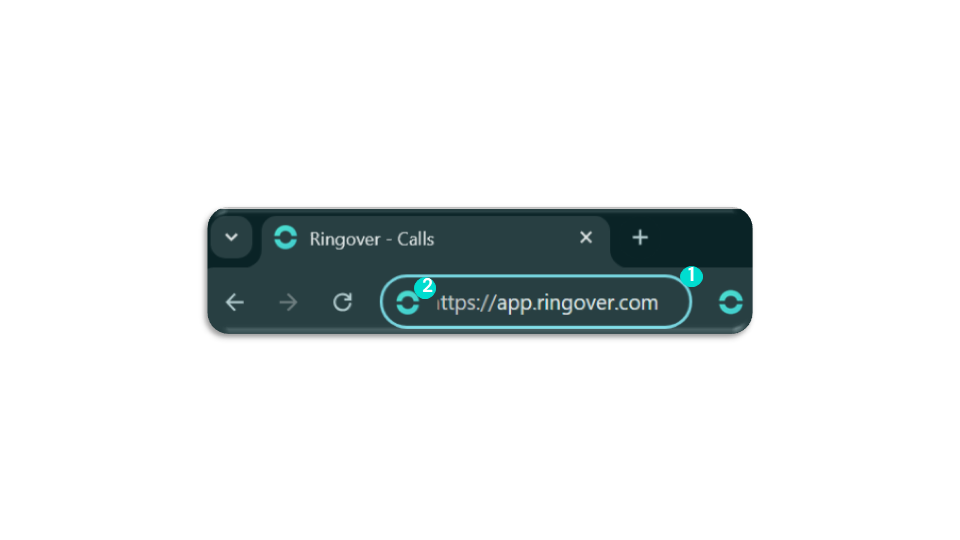
There are two ways to access app.ringover.com from your web browser.

By clicking on the Ringover Chrome extension icon to the right of the search bar.

OR

By entering the URL directly into the search bar.
Log in to your Ringover account
Home Onboarding / User Guide / Getting Started / Test the headset and microphone
Show menu

Getting Started

Test the headset and microphone

Progress - 5%
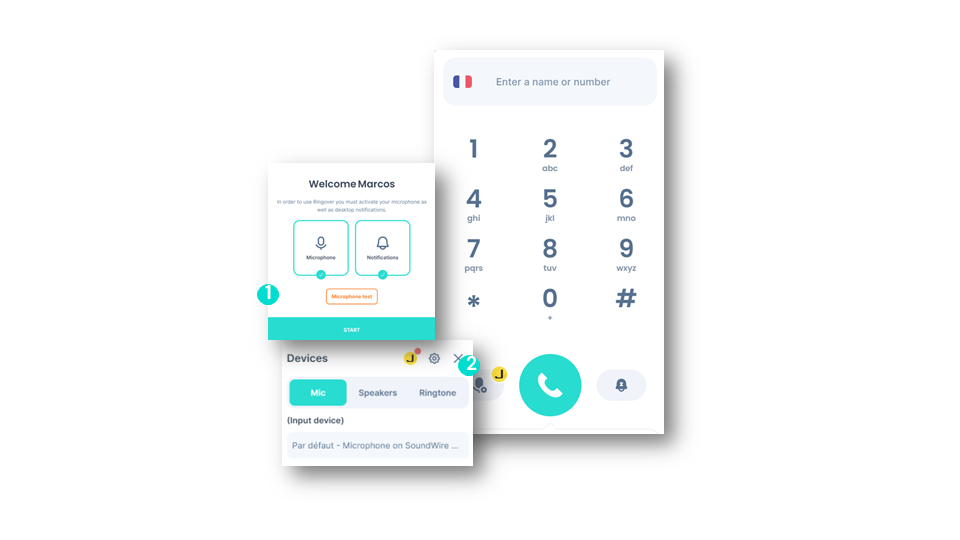
Authorize access to your microphone and notifications, then click “Start.”
Check that your devices are working properly by clicking on the “Devices” icon:
  • Microphone Tab: Check that the sound input is good.
  • Speakers Tab: Ensure you can hear well and that the correct device is selected.
  • Ringtone Tab: Select and check the ringtone output device.
Test the headset and microphone

To go further, please visit our help center: Setting up your ringer for incoming calls

Home Onboarding / User Guide / Install the browser extension / Install the browser extension
Show menu

Install the browser extension

Install the browser extension

Progress - 7%

To guide you in video

Install the browser extension

Home Onboarding / User Guide / Making and Receiving a Call / Making a call
Show menu

Making and Receiving a Call

Making a call
Progress - 9%
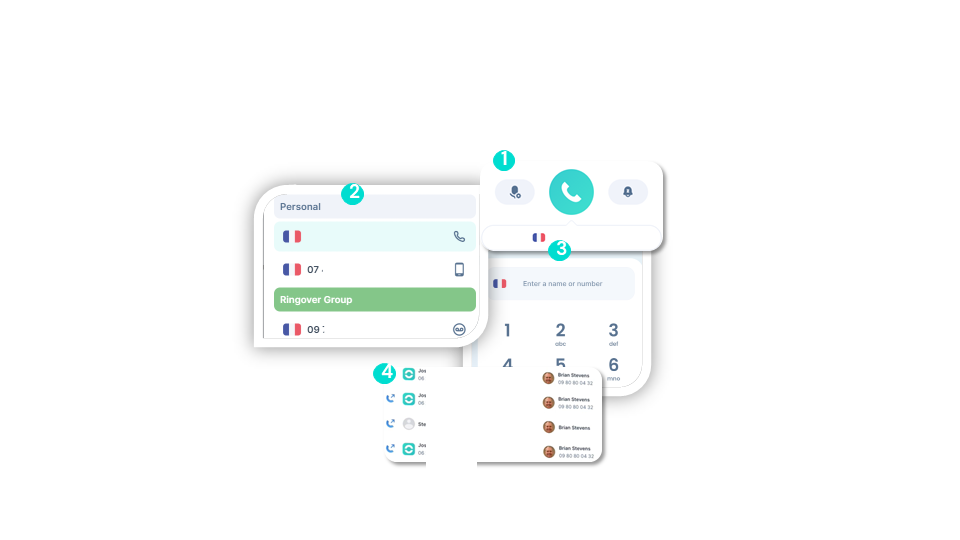
Click on the box containing the flag and your outgoing number.
Choose the number you have on your account to make your call.
You can type the number or search for the contact’s name from the dialer.
You can also choose the contact from your call history and your network.
Making a call

To go further, please visit our help center: Making and receiving calls

Home Onboarding / User Guide / Making and Receiving a Call / Localized Numbers (1)
Show menu

Making and Receiving a Call

Localized Numbers (1)

advanced
Progress - 11%

Localized numbers: this Ringover feature automatically selects a specific local phone number based on your travels. In other words, the closest local number to your geographical location will be selected the next time you make a call. Ringover’s localized numbers help establish a local presence in your calls, which can improve the effectiveness of your communication.

Notes:

  • You can purchase our “Local Number Packs” add-on, which gives you access to 100 numbers from the 100 major U.S. cities.
  • Available for outgoing calls only.
  • We do not offer SMS service with local number plans.
Home Onboarding / User Guide / Making and Receiving a Call / Localized Numbers (2)
Show menu

Making and Receiving a Call

Localized Numbers (2)

advanced
Progress - 13%

When you make a call with the “local presence” feature, Ringover will choose the geographically closest number to the recipient.

How to use the feature ?
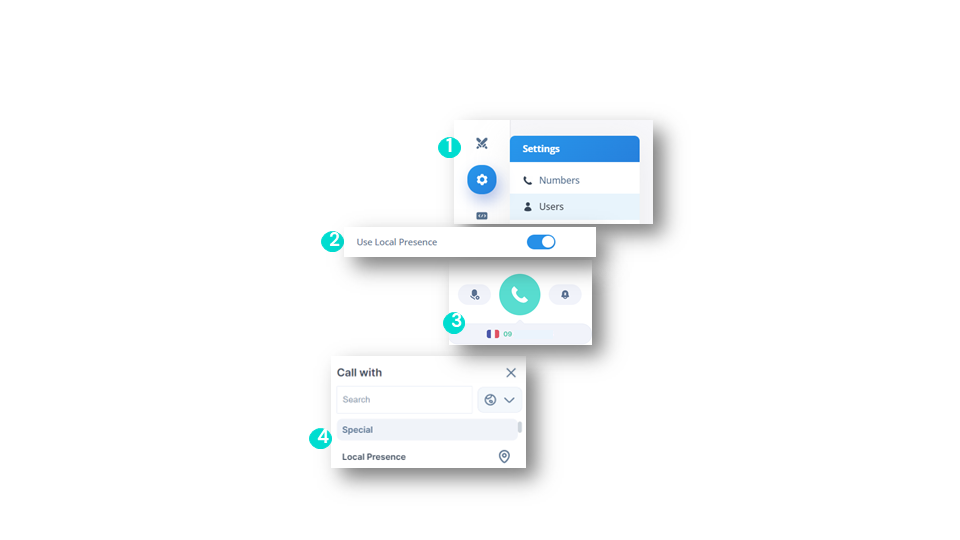
The administrator must go to the “Settings” section and then “Users” of the Ringover Dashboard.
Find the user to whom you want to grant this feature and click “Edit.” In the “Feature Access” section, enable the “Use localized numbers” option under Calls.
Then, open the Ringover app and click on the outgoing call number in your Dialer.
Select “Localized number.”
Localized Numbers (2)
Home Onboarding / User Guide / Making and Receiving a Call / Receiving a Call
Show menu

Making and Receiving a Call

Receiving a Call

smart business advanced
Progress - 14%

Here’s the information displayed on your dialer:
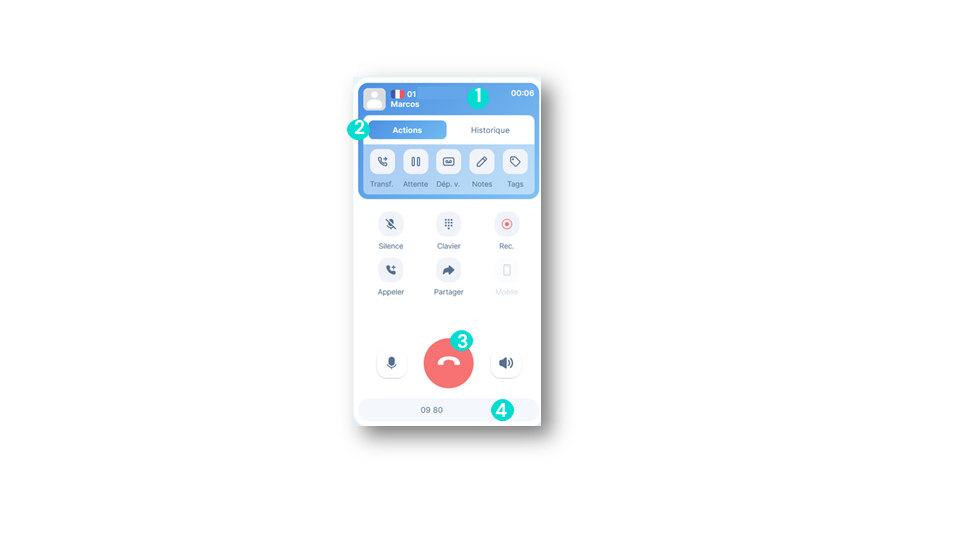
The caller’s name and phone number.
Actions and call history.
The “Hang up” button to decline the call.
The number the contact is calling you on.
Receiving a Call

To go further, please visit our help center: Making and receiving calls

Home Onboarding / User Guide / Managing a Call / Features during a call
Show menu

Managing a Call

Features during a call

smart business advanced
Progress - 16%

Once on a call, the user can access several buttons to manage the call:
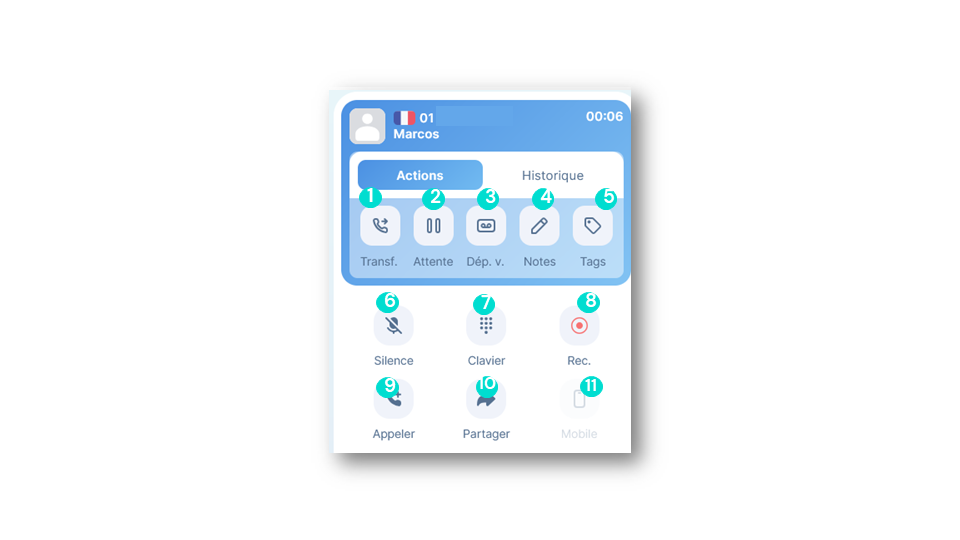
Transfer
Put on hold
Leave a voicemail
Take a note
Add a tag
Mute
Access the numeric keypad
Start/stop recording
Start another call (merge two calls)
Share the call
Transfer to the mobile app
Features during a call
Home Onboarding / User Guide / Managing a Call / Transferring a call (1)
Show menu

Managing a Call

Transferring a call (1)

smart business advanced
Progress - 18%
Transferring a call
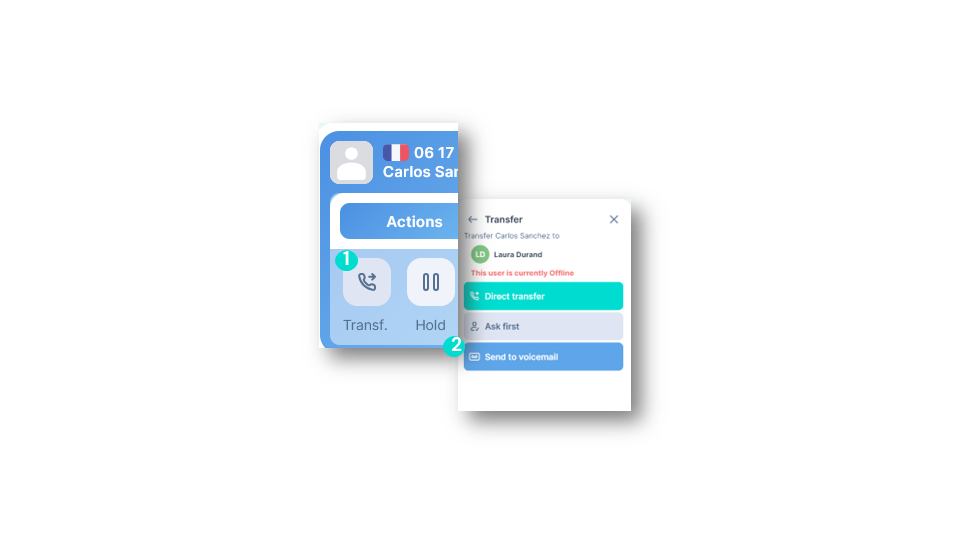
During a call, click on “Transfer” and enter the name of the person to whom you want to transfer the call.
Select the type of transfer you wish to perform: “Direct transfer,” “Ask first,” or “Send to voicemail.“.

Your call will be transferred according to the chosen method and will automatically end.
Transferring a call (1)

To go further, please visit our help center: Transferring a call

Home Onboarding / User Guide / Managing a Call / Transferring a call (2)
Show menu

Managing a Call

Transferring a call (2)

smart business advanced
Progress - 20%

Types of call transfers: You can choose between three types of transfers:
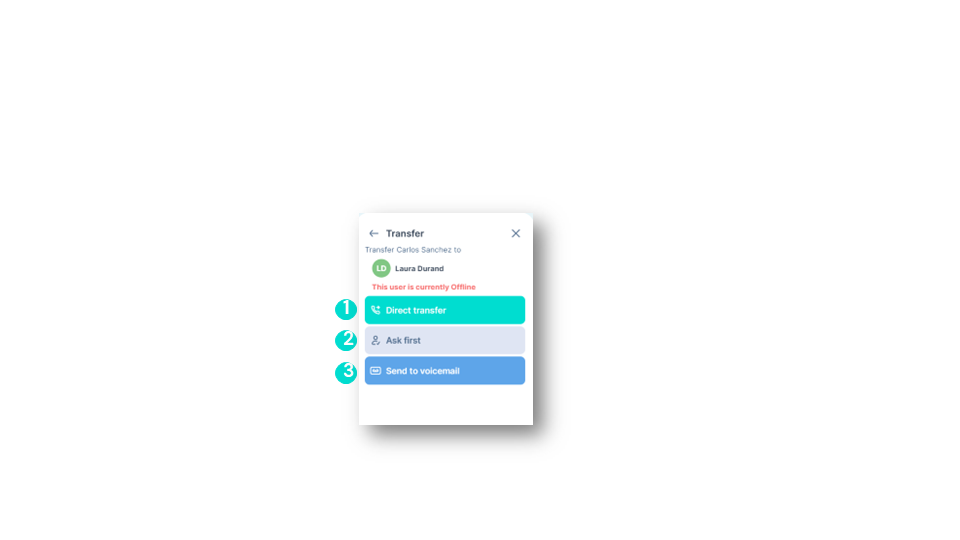
Direct transfer: With one click, you transfer the call directly to a team member. If they don’t answer, you won’t be able to retrieve the call.
Transfer with confirmation: Contact your colleague to check their availability and pass on information before transferring the call.
Transfer to voicemail: If your colleague is unavailable or doesn’t want to be disturbed, transfer the call to their voicemail so that the caller can leave a message.
Transferring a call (2)
Home Onboarding / User Guide / Ending a Call / After-call feature
Show menu

Ending a Call

After-call feature

business advanced
Progress - 21%
To end your call, simply press the red button on the dialer.

You will be directed to the After-Call function, where you can:
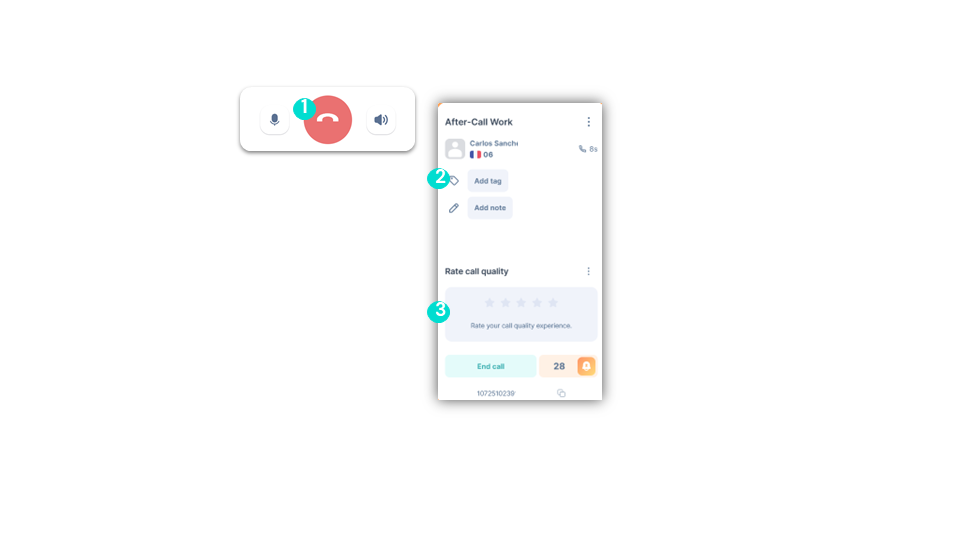
Add relevant notes or tags to the call.
Rate the call quality.
After-call feature

To go further, please visit our help center: Enable the After-Call Work feature

Home Onboarding / User Guide / Ending a Call / After-call - Notes & Tags
Show menu

Ending a Call

After-call - Notes & Tags

business advanced
Progress - 23%
Enable the mandatory notes and tags

💡You can enable this feature if you want your teams to enter notes and tags mandatorily after each call.

💡This ensures that important details are recorded and information is organized consistently, making it easier to manage and track customer interactions and projects.
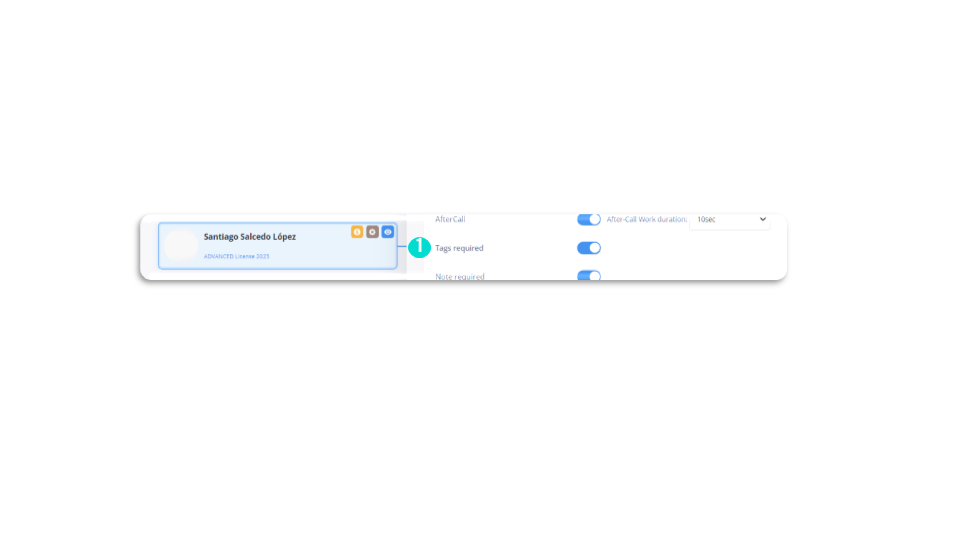
Click on a user, then go to the “After-Call Work” section. Check the boxes for “Mandatory Note” and “Mandatory Tags.”
After-call - Notes & Tags
Home Onboarding / User Guide / Finding a Call / Filters
Show menu

Finding a Call

Filters

smart business advanced
Progress - 25%

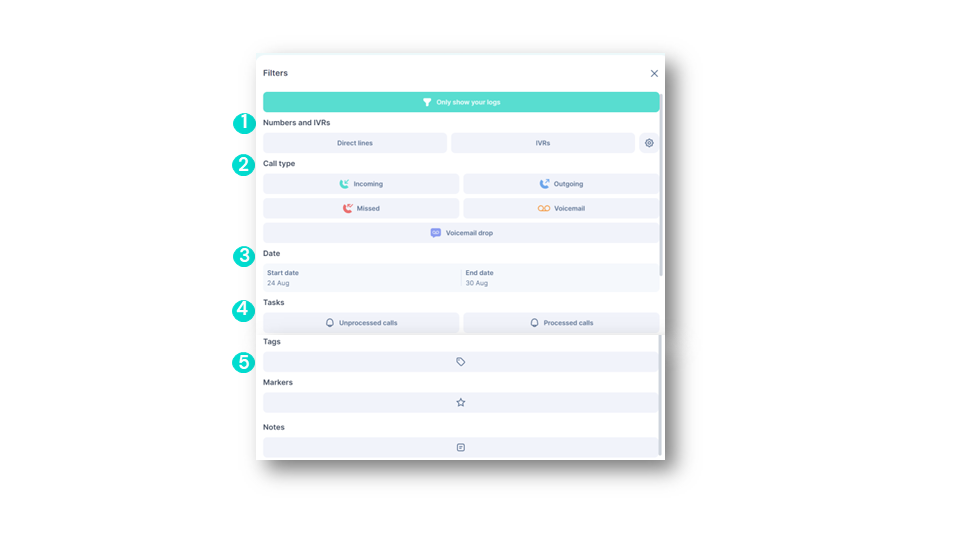
You can filter calls by:

Direct line only or calls that came through your IVR or switchboard.
Call type.
Date.

You can also:

See if calls were handled or not. Missed calls that were not handled are represented by a small bell.
Sort by specific tag, marker, or even notes.
Filters
Home Onboarding / User Guide / Finding a Call / Types of Calls - Incoming Calls
Show menu

Finding a Call

Types of Calls - Incoming Calls

smart business advanced
Progress - 27%

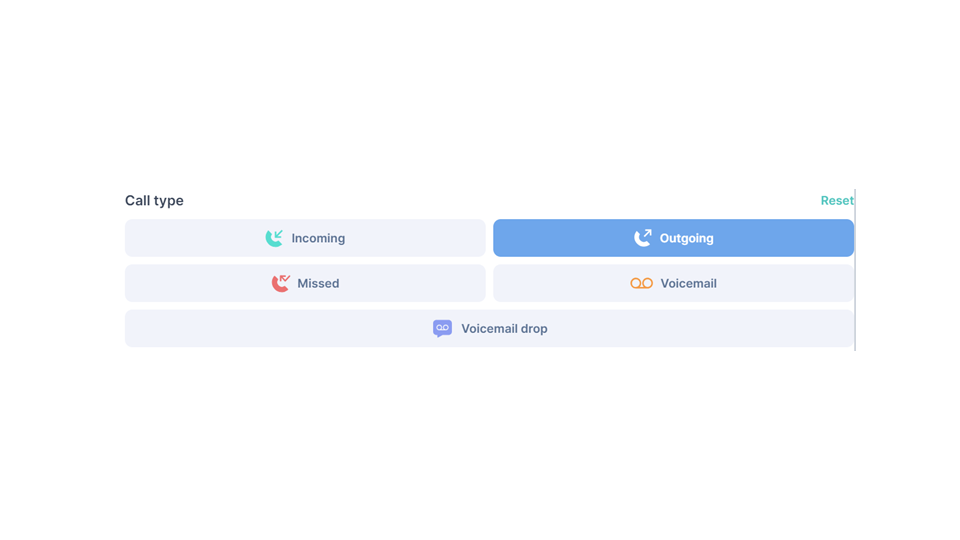
Generally, all call types are enabled by default, but you can customize them. At Ringover, two main categories of calls are distinguished: Incoming & Outgoing. To view all “Incoming Calls,” select both incoming and missed calls.

Incoming Calls
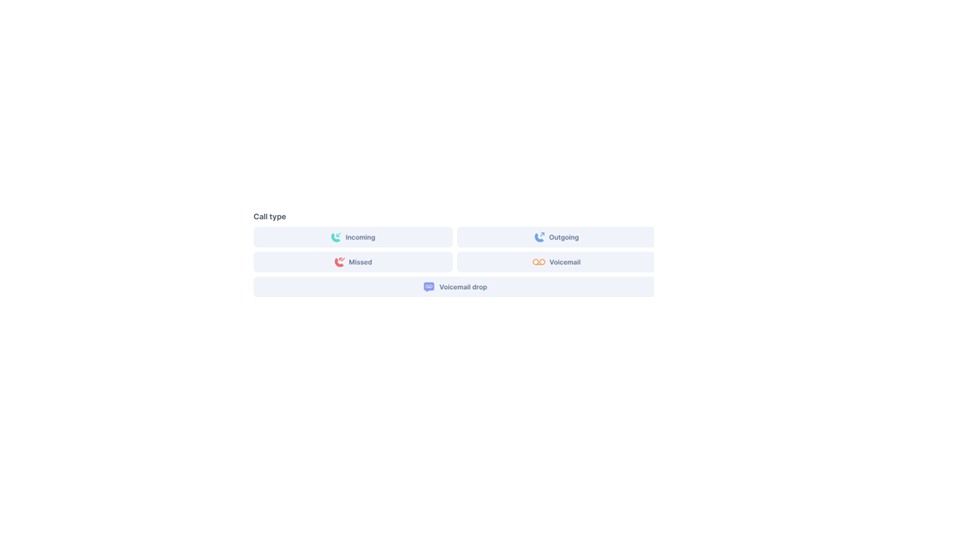
Answered calls: These are calls that were successfully connected between the caller and the recipient.
Missed calls: These are calls where the recipient does not answer or rejects the call (failed communication).
Voicemail messages: If a call is not answered after several rings or is rejected, the caller can leave a voicemail that will be stored in the recipient’s voicemail box for later listening.
Types of Calls - Incoming Calls
Home Onboarding / User Guide / Finding a Call / Types of Calls - Outgoing Calls
Show menu

Finding a Call

Types of Calls - Outgoing Calls

smart business advanced
Progress - 29%
Outgoing Calls

These are calls that have been successfully made, meaning they were established and completed with a connection between the caller and the recipient.
Types of Calls - Outgoing Calls

To go further, please visit our help center: Call types

Home Onboarding / User Guide / Finding a Call / Processed and unprocessed calls
Show menu

Finding a Call

Processed and unprocessed calls

smart business advanced
Progress - 30%

Missed calls that are not handled are represented by a small bell next to your call logs. It shows next to a missed call and helps you identify missed calls that need to be addressed.

Handling missed calls
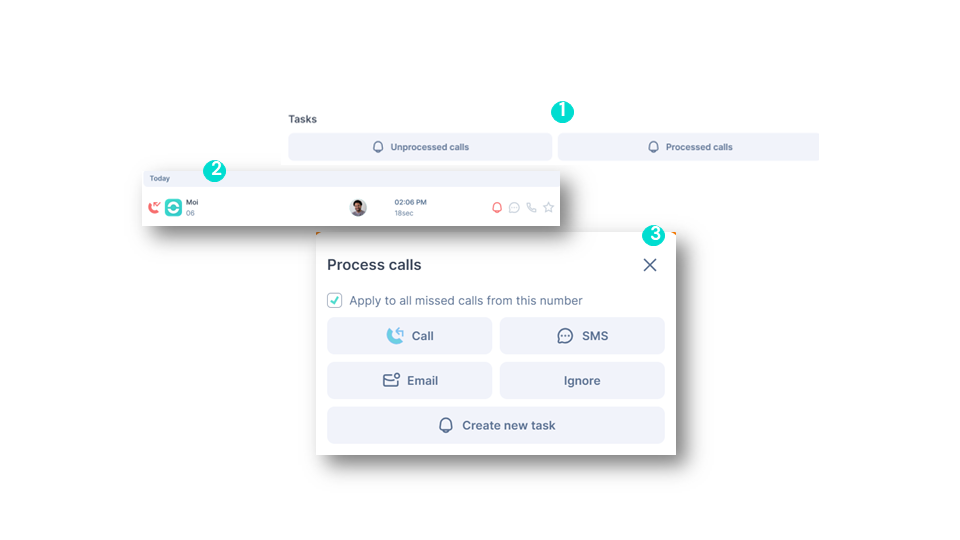
Find your unprocessed calls by using the filter Unprocessed calls.
Once the call is handled, simply indicate it by clicking on the small bell.
Select the channel used to handle the call (call, SMS, email). This will mark the call as handled.
Processed and unprocessed calls
Home Onboarding / User Guide / Call details / Call logs (1)
Show menu

Call details

Call logs (1)

smart business advanced
Progress - 32%
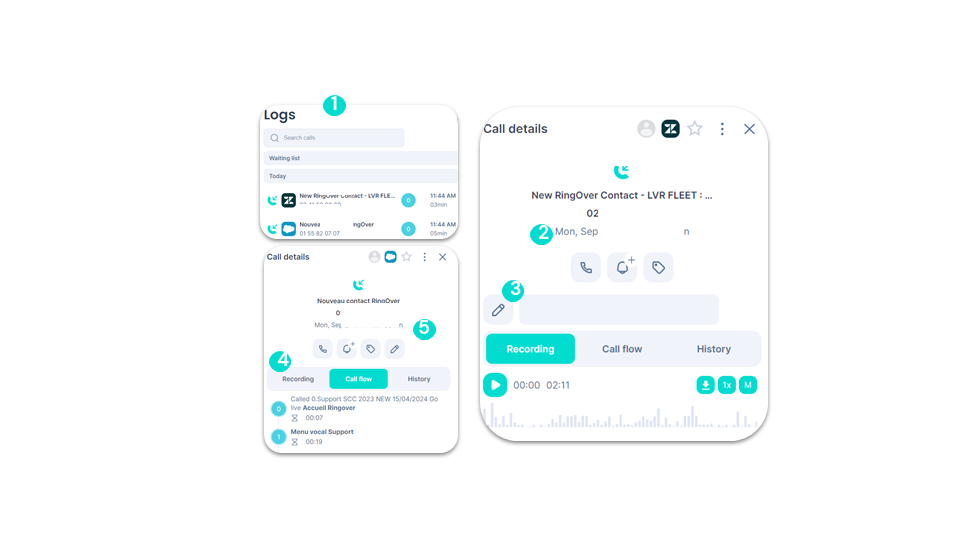
To explore your call logs in detail, first click on a call.

You can:

View all recordings or transcripts.
Search for specific words or phrases, and the recording will update in real time.

Call flow:

You can see every action that occurred during the call.
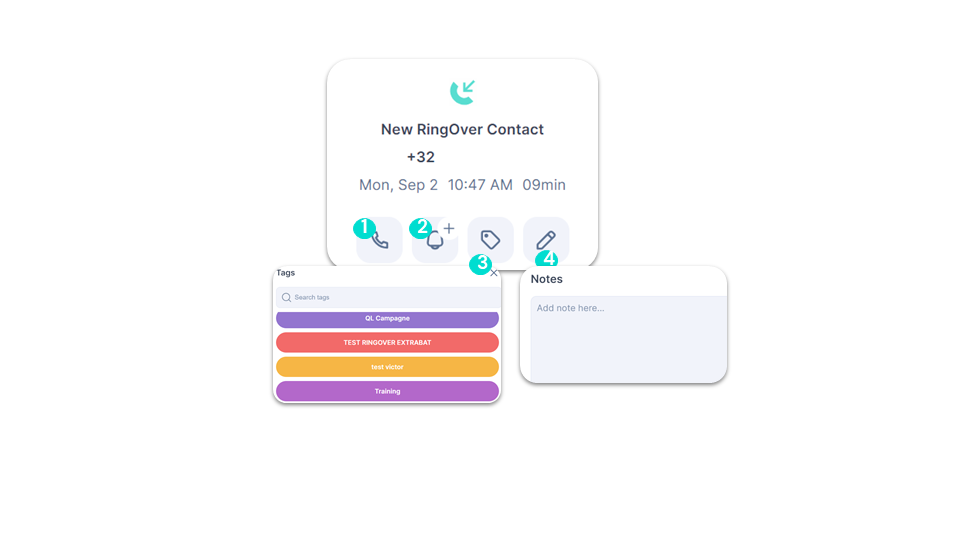
Add notes or tags to the call.
Call logs (1)
Home Onboarding / User Guide / Call details / Call logs (2)
Show menu

Call details

Call logs (2)

smart business advanced
Progress - 34%

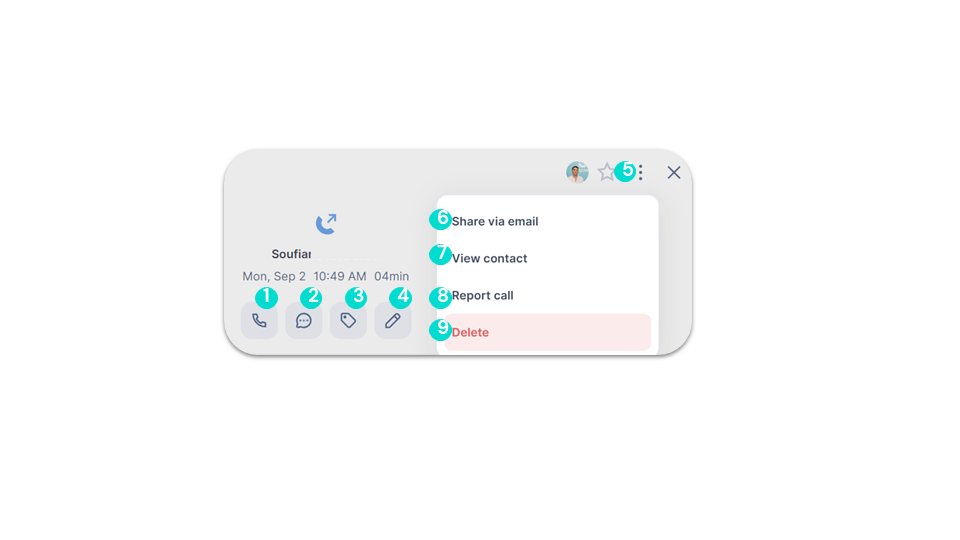
You can:

Call a person
Send a message to this person
Add tags
Add notes
Add to favorites
Share the call details via email
View contact details
Report the call
Delete the call
Call logs (2)
Home Onboarding / User Guide / Call details / Call logs (3)
Show menu

Call details

Call logs (3)

smart business advanced
Progress - 36%

You can:

Click on the icon to call back the contact.
Send a message directly to the contact.
Add tags.
Add notes detailing important points from the call.
Call logs (3)
Home Onboarding / User Guide / Call details / Call logs (4)
Show menu

Call details

Call logs (4)

smart business advanced
Progress - 38%

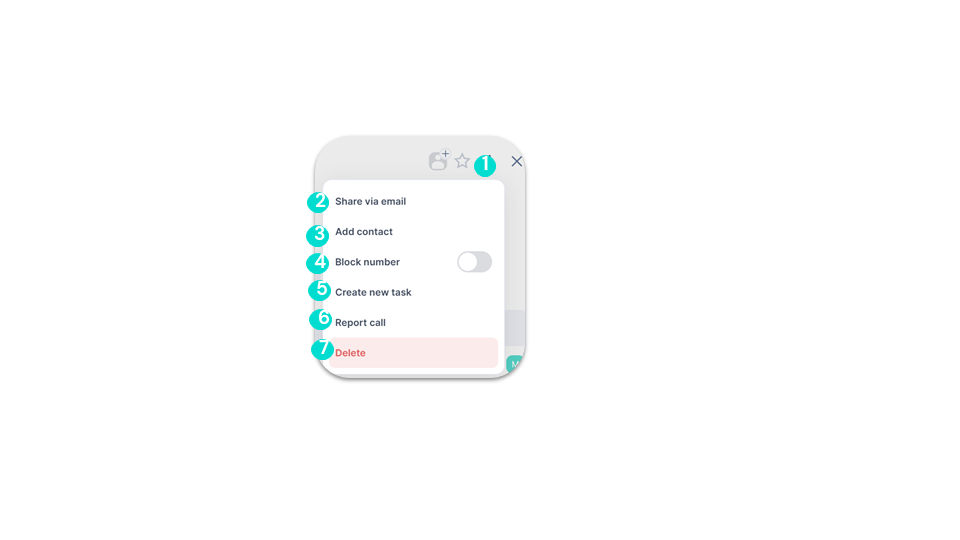
At the top, you can:

Click the star to add calls to your favorites for easier access.
Share the contact via email.
View or add numbers used by this contact.
Block a number.
Create new task.
Report a bad call.
Delete a call if needed.
Call logs (4)
Home Onboarding / User Guide / Tasking / Tasking
Show menu

Tasking

Tasking

smart business advanced
Progress - 39%

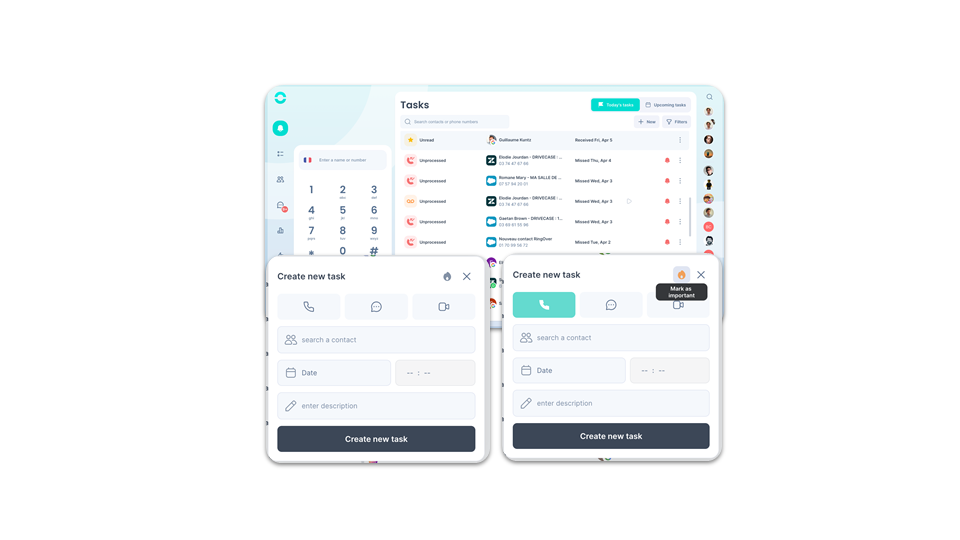
The task page includes:

  • Your tasks for the day / Your upcoming tasks.
  • Reminders for missed calls.
  • Reminders manually created by agents.
  • Reminders for SMS and video conferences.
  • Filters to find your tasks.
Tasking
Home Onboarding / User Guide / Using Video Conferencing / Meet
Show menu

Using Video Conferencing

Meet

smart business advanced
Progress - 41%
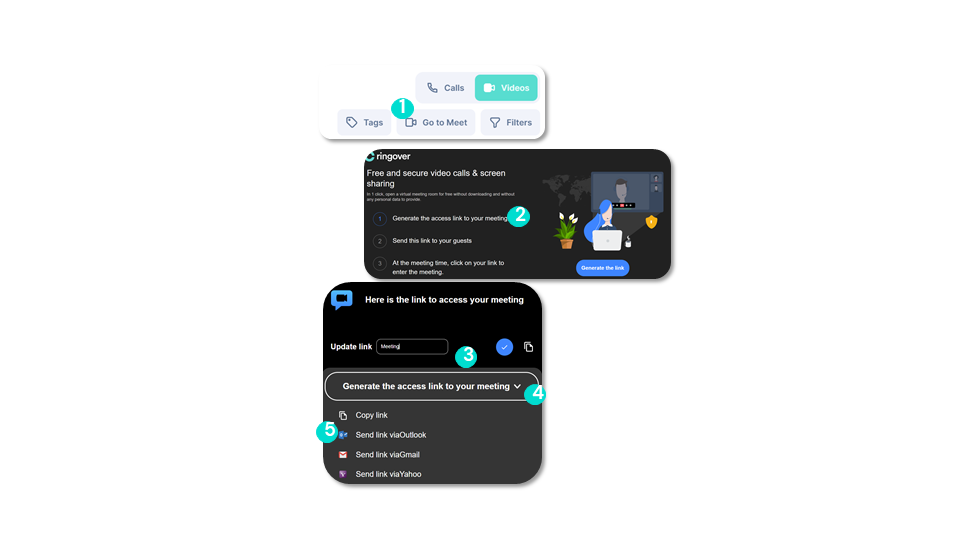
Click on “Access Meet.“.

You can directly create a video meeting and share the link by:

Click on “Generate your meeting access link.“
Edit the video name if you wish.
Generate a link to your meeting.
Share the link.

💡You can organize video conferences even with people who don’t use Ringover, simply by having an internet connection and the Ringover Meet link.
Meet
Home Onboarding / User Guide / Using Omnichannel Messaging / Requirements
Show menu

Using Omnichannel Messaging

Requirements

add-on business advanced
Progress - 43%

💡An Add-on is an extension designed for Ringover that extends its capabilities beyond the basic features, allowing for a wider variety of features and options.

💡This Add-on allows you to connect different communication channels to Ringover, saving time as everything is centralized on a single platform.

Requirements:

✅ This Add-on can only be activated by account administrators and/or super administrators.

Home Onboarding / User Guide / Using Omnichannel Messaging / Activating the Omnichannel Add-On
Show menu

Using Omnichannel Messaging

Activating the Omnichannel Add-On

add-on business advanced
Progress - 45%

To activate this Add-on, the administrator or superadministrator should:
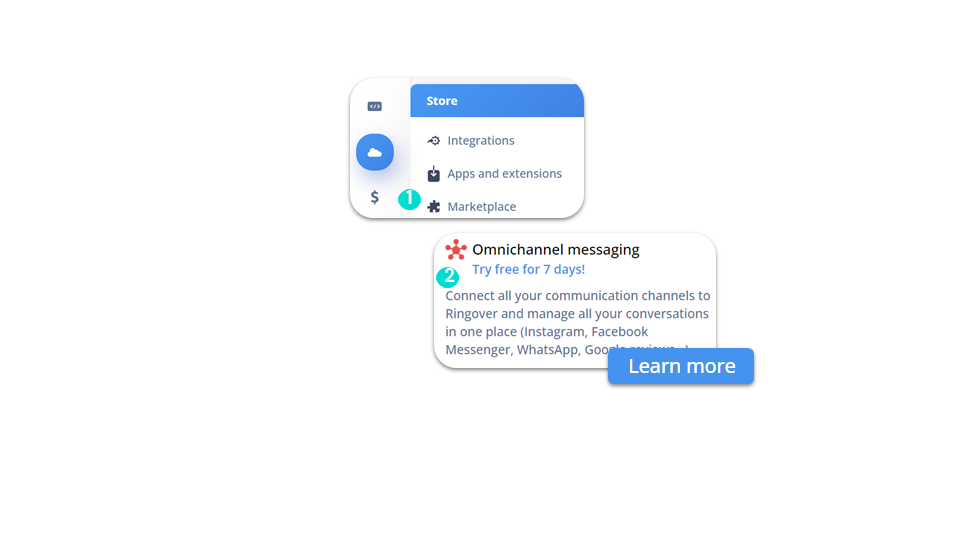
Go to the “Marketplace” section in the Ringover Dashboard.
Go to the “Add-ons” section and search for Omnichannel Communication. Click “Learn more.“
Click the “Activate” button to confirm or cancel the action.
Activating the Omnichannel Add-On

To go further, please visit our help center: How to connect and use your Omnichannel Add-on

Home Onboarding / User Guide / Using Omnichannel Messaging / Integrating WhatsApp
Show menu

Using Omnichannel Messaging

Integrating WhatsApp

add-on business advanced
Progress - 46%

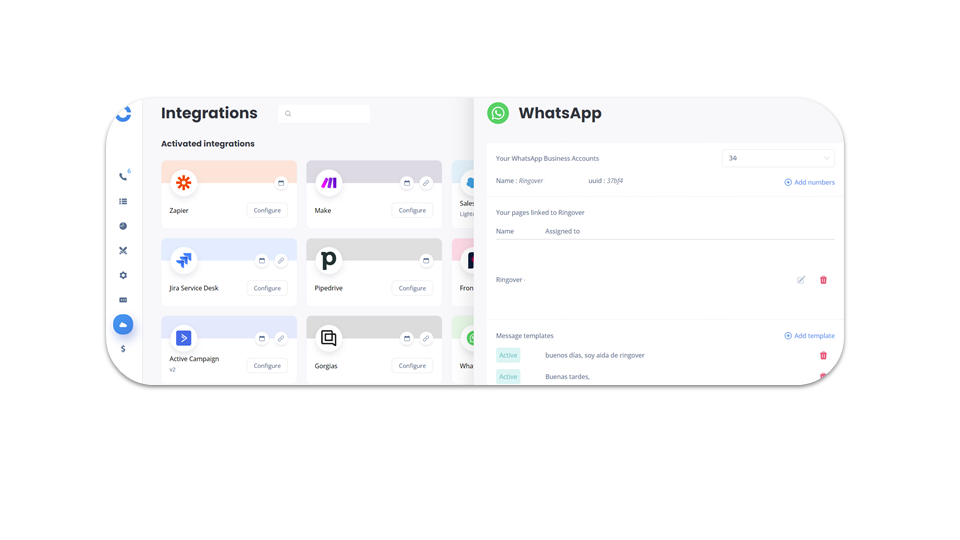
After subscribing to our “Omnichannel Communication” Add-on, the administrator or superadministrator should be able to:

  • Go to the Ringover Dashboard under Integrations.
  • Search for WhatsApp.
  • Select a verified Meta account.
  • Create a WhatsApp Business account.
  • Select or create a user.
  • Verify numbers via call.
Integrating WhatsApp

To go further, please visit our help center: How to connect and use your Omnichannel Add-on

Home Onboarding / User Guide / Using Omnichannel Messaging / Facebook Messenger (1)
Show menu

Using Omnichannel Messaging

Facebook Messenger (1)

add-on business advanced
Progress - 48%

To complete this integration, go to your Dashboard.
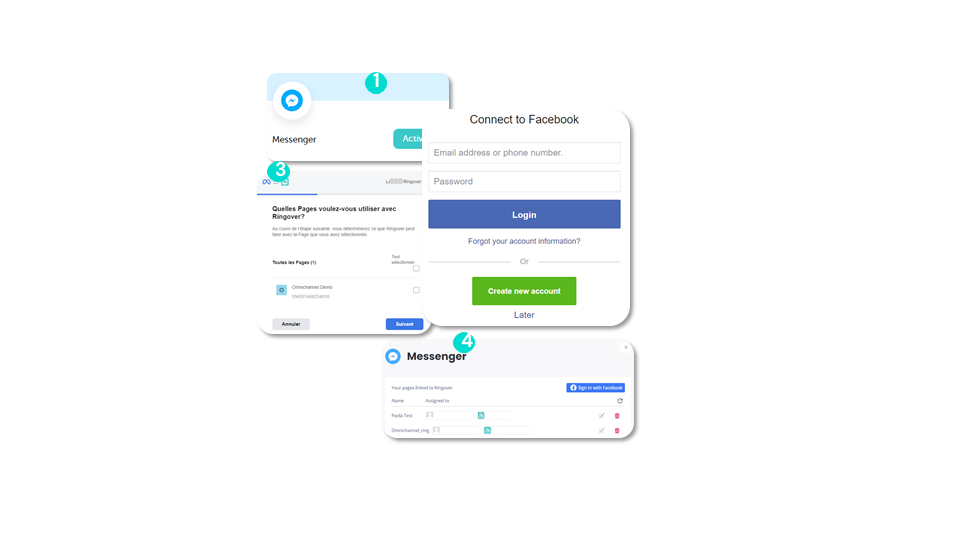
In the Integrations section, click on Activate in Messenger.
A pop-up will appear for you to log in to Facebook.
Select the page you want to connect and ensure all permissions are granted.
Select the agent or group of agents to assign this page to.
Facebook Messenger (1)
Home Onboarding / User Guide / Using Omnichannel Messaging / Facebook Messenger (2)
Show menu

Using Omnichannel Messaging

Facebook Messenger (2)

add-on business advanced
Progress - 50%

Using Messenger:

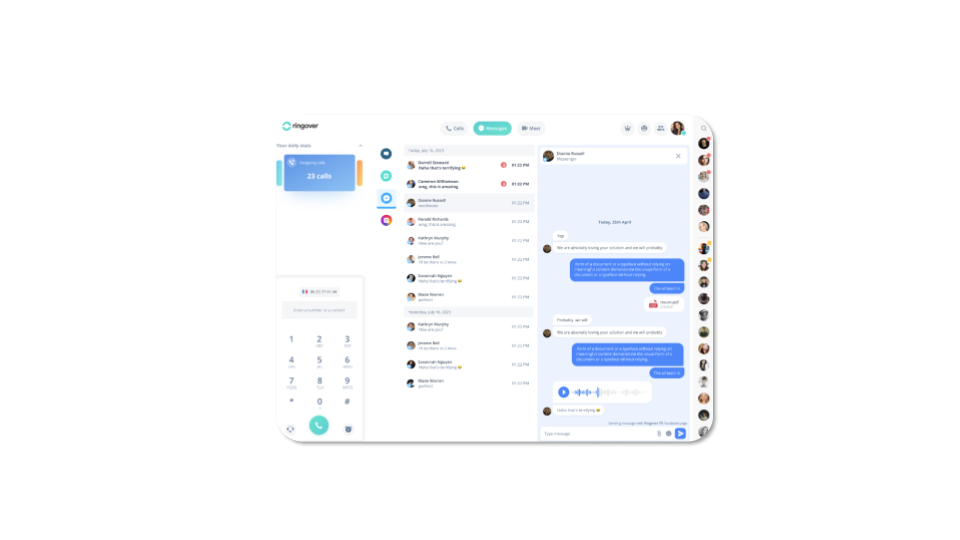
  • Once the assignments are made, all messages sent to the connected pages will be received on your Web app in the messages section.
  • Click on the Messenger icon and select the conversation.
Facebook Messenger (2)
Home Onboarding / User Guide / Using Omnichannel Messaging / Instagram (1)
Show menu

Using Omnichannel Messaging

Instagram (1)

add-on business advanced
Progress - 52%

Requirements:

✅ Have a professional Facebook page and ensure you have switched your Instagram account to a professional account.

✅ Link your professional Instagram account to your Facebook page.

✅ Go through a simple authentication process without a code.

Home Onboarding / User Guide / Using Omnichannel Messaging / Instagram (2)
Show menu

Using Omnichannel Messaging

Instagram (2)

add-on business advanced
Progress - 54%

To complete this integration, go to your Dashboard:
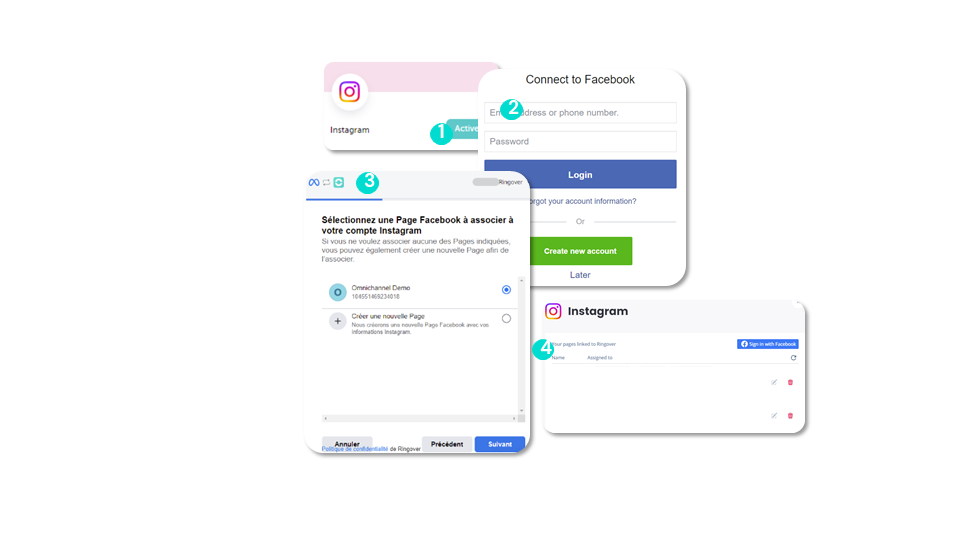
In the Integrations section, click on Activate in Instagram.
Log in to Facebook.
Select the page and account associated with the business page.
Select the agent or group of agents to assign this page to.
Instagram (2)
Home Onboarding / User Guide / Using Omnichannel Messaging / Instagram (3)
Show menu

Using Omnichannel Messaging

Instagram (3)

add-on business advanced
Progress - 55%

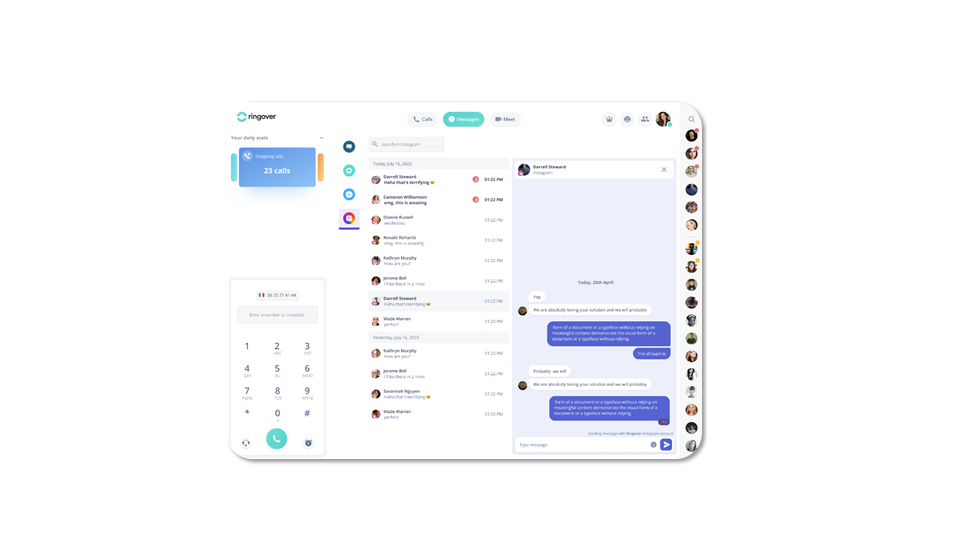
Using Instagram:

Just like on Messenger, when a user sends a message to your configured Instagram page, the assigned agent will receive the message on their Web app in Instagram and can start responding.
Instagram (3)
Home Onboarding / User Guide / Using Omnichannel Messaging / Google Review (1)
Show menu

Using Omnichannel Messaging

Google Review (1)

add-on business advanced
Progress - 57%

Requirements:

✅ You need a certified Google Business account.

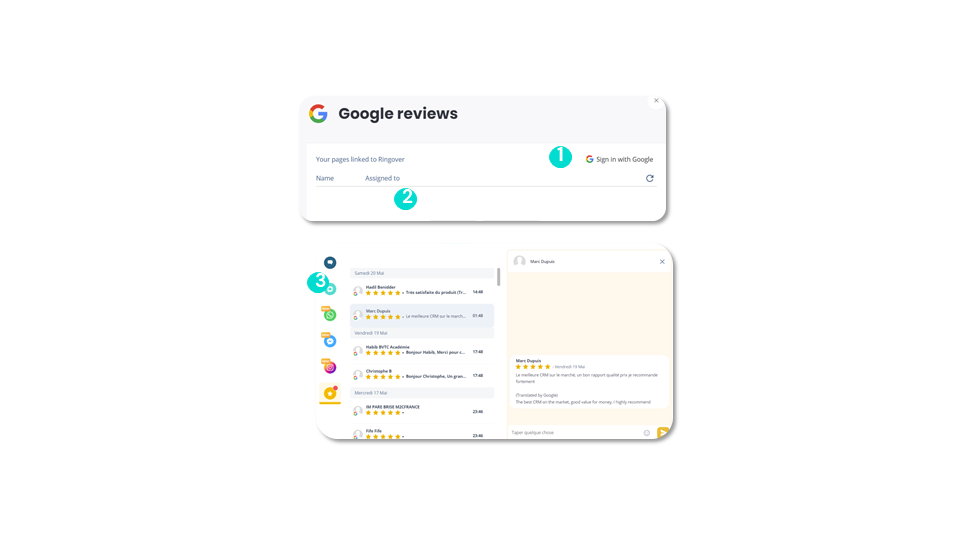
✅ To complete this integration: go to the Ringover Dashboard under Integrations and click on Activate in Google Review.

Home Onboarding / User Guide / Using Omnichannel Messaging / Google Review (2)
Show menu

Using Omnichannel Messaging

Google Review (2)

add-on business advanced
Progress - 59%
After activation, a pop-up will appear. Log in to Google.
Select the account you want to connect to Ringover. The pop-up will be confirmed, and you now need to select the agent or group of agents with the activated Add-on to assign this account to.

Responding to reviews:

When a user posts a review to the linked account, the selected agent (or group) will receive a message on the Web app and on their Android phone in the Google Review section, and the agent can start responding.
Google Review (2)
Home Onboarding / User Guide / Using Omnichannel Messaging / Outlook
Show menu

Using Omnichannel Messaging

Outlook

add-on business advanced
Progress - 61%

To complete this integration, go to your Dashboard. Then click on Integrations. Next, search for the Outlook integration and click Activate. Finally, confirm the activation.

Outlook is now active. To configure it:
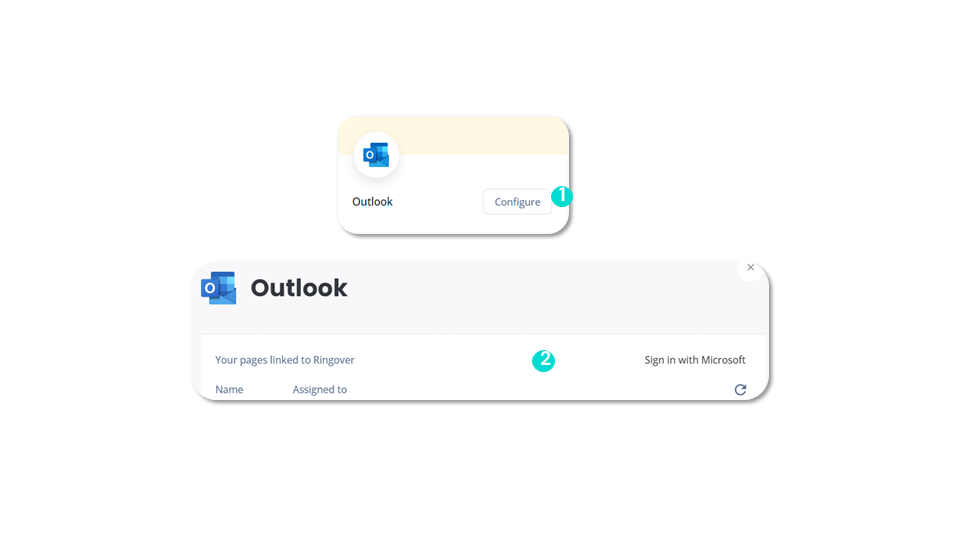
Click Configure.
Click “Sign in with Microsoft.” Enter your username and password.
Outlook
Home Onboarding / User Guide / Using Omnichannel Messaging / WebApp
Show menu

Using Omnichannel Messaging

WebApp

add-on business advanced
Progress - 63%
You can schedule a pre-written message for a specified time and date.
Multiple messages can be scheduled.
You can modify or delete a scheduled message.
A chat entry will appear (a message will notify that a scheduled message is present → dropdown menu to read the content).

✅ Available in all channels (SMS, WhatsApp, etc.).

⛔ Not available for one-way messages.

Home Onboarding / User Guide / Using Omnichannel Messaging / Internal Notes for Omnichannel Messaging (except email)
Show menu

Using Omnichannel Messaging

Internal Notes for Omnichannel Messaging (except email)

add-on business advanced
Progress - 64%

The internal note is the same feature available for chat.

You can add a note visible only to other internal users.
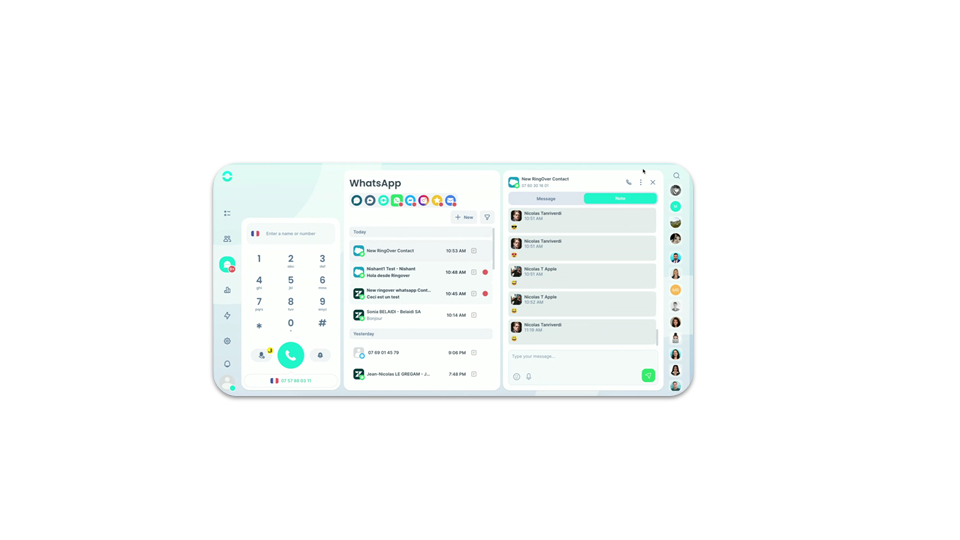
Internal Notes for Omnichannel Messaging (except email)
Home Onboarding / User Guide / Viewing your activity / Where to find the analytics page?
Show menu

Viewing your activity

Where to find the analytics page?

business advanced
Progress - 66%
From your WebApp, click on “Statistics.”.
Ringover provides you with a multitude of analyses related to your phone calls and the different platforms you interact with through Ringover.
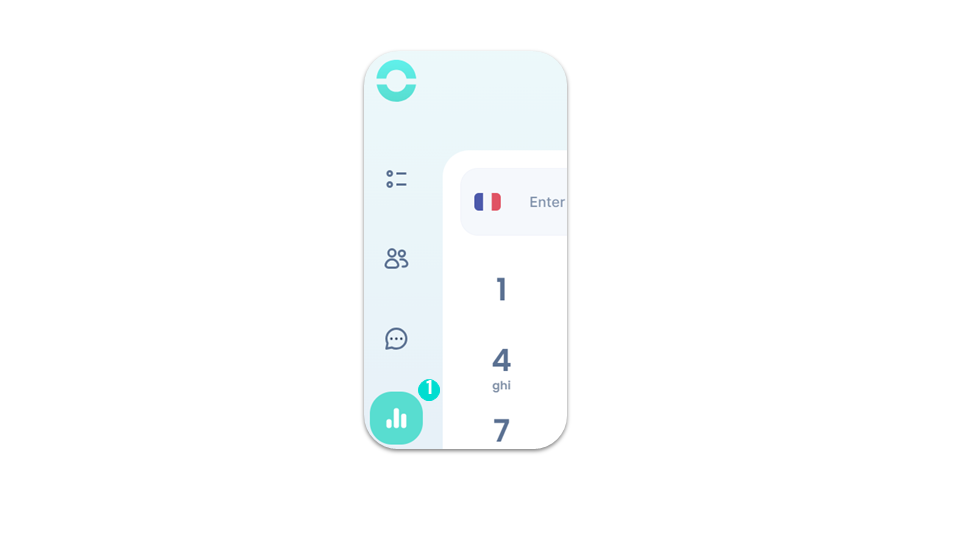
Where to find the analytics page?
Home Onboarding / User Guide / Viewing your activity / Your statistics (1)
Show menu

Viewing your activity

Your statistics (1)

business advanced
Progress - 68%

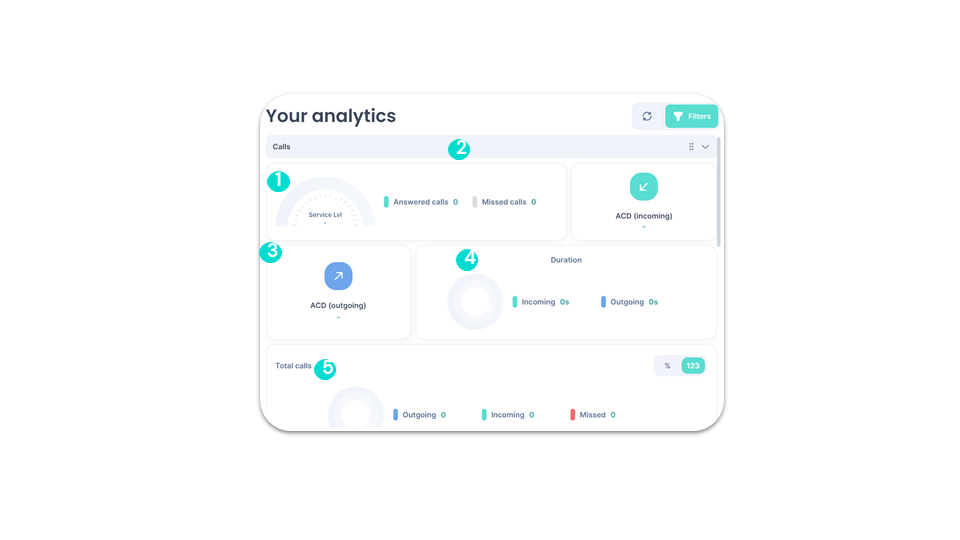
In the “Calls” tab, you can view:

Service level
Average Incoming Call Time
Average Outgoing Call Time
Total number of calls
Call duration (incoming and outgoing)
Your statistics (1)
Home Onboarding / User Guide / Viewing your activity / Your statistics (2)
Show menu

Viewing your activity

Your statistics (2)

business advanced
Progress - 70%

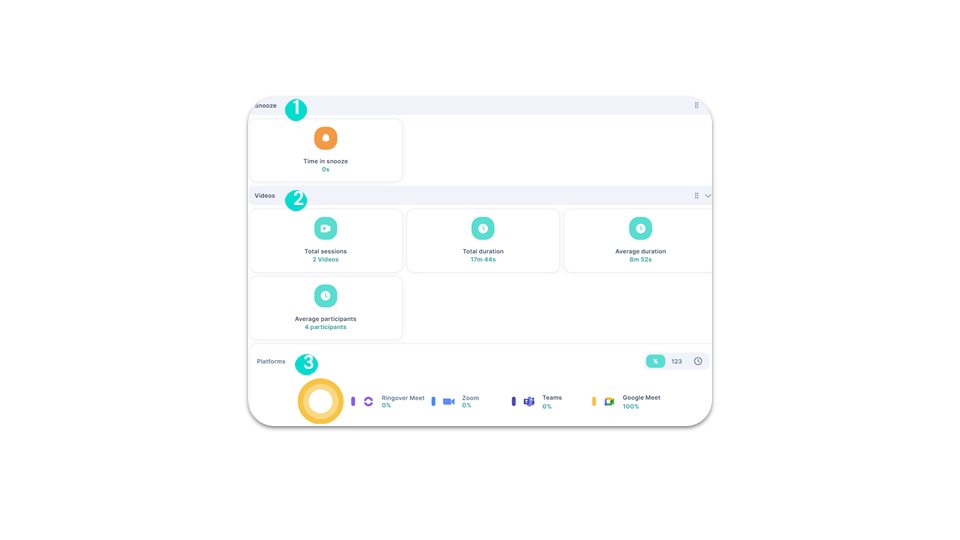
In the “Snooze” tab, you can view:

Snooze time.

In the “Visio” tab, you can view:

Total, total duration, average duration, and average number of participants.
The platforms used.
Your statistics (2)
Home Onboarding / User Guide / Power Dialer / Enable the Power Dialer
Show menu

Power Dialer

Enable the Power Dialer

advanced
Progress - 71%

The Power Dialer is a powerful tool for commercial productivity. It allows you to receive a list of phone numbers or import your own and call these numbers one after the other to maximize your outreach.

From your WebApp:
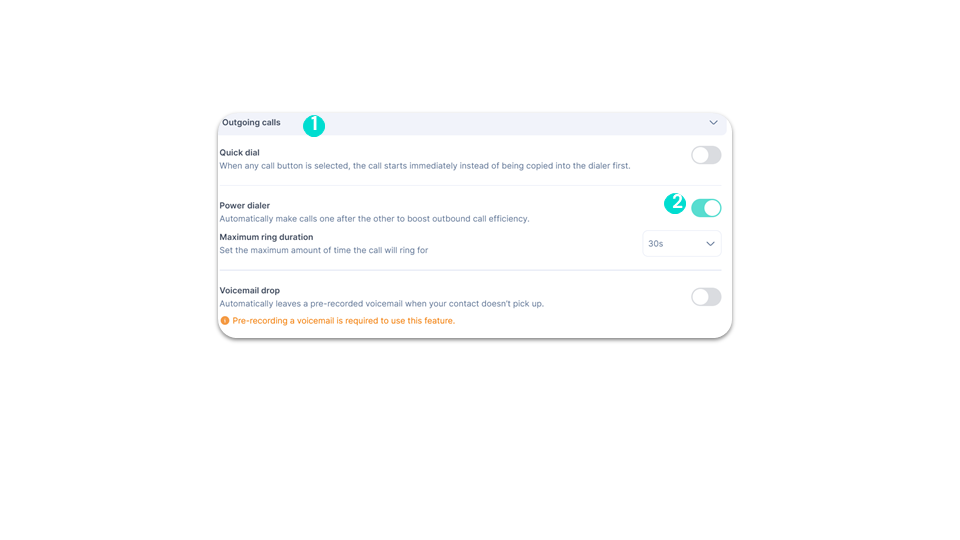
Go to the “Outgoing Calls” section”.
Activate the Power Dialer.
Enable the Power Dialer
Home Onboarding / User Guide / Power Dialer / Creating & Importing a List
Show menu

Power Dialer

Creating & Importing a List

advanced
Progress - 73%

You can create a list by:

Creating a new list.
Importing a file: Click the “Import a file” button (remember, it must be in .TXT or .CSV format).

OR

Manually entering a number.

⚠️ There is a limit of 1,000 contacts per import. However, you can purchase our “Call Campaign Expansion” add-on to add another 1,000 numbers to the same campaign.
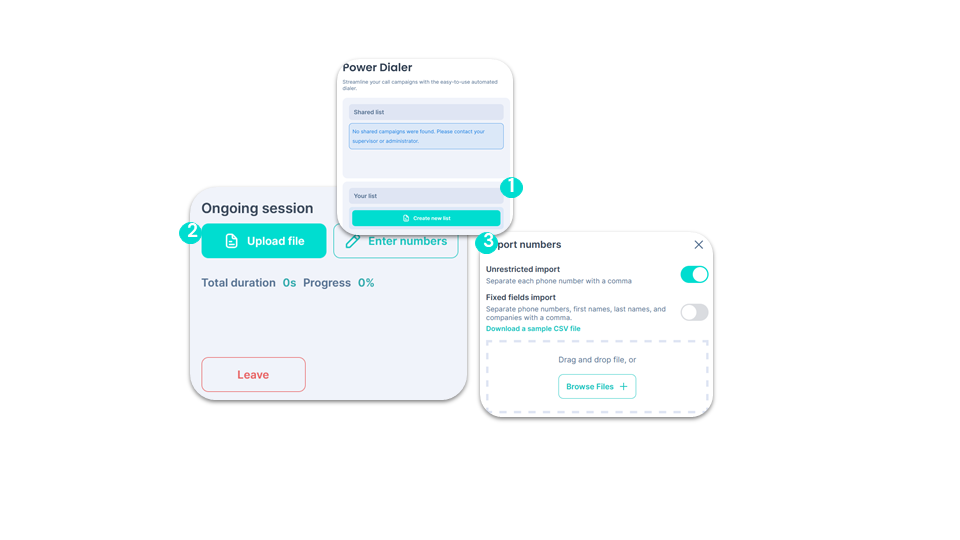
Creating & Importing a List
Home Onboarding / User Guide / Settings / General settings
Show menu

Settings

General settings

smart business advanced
Progress - 75%

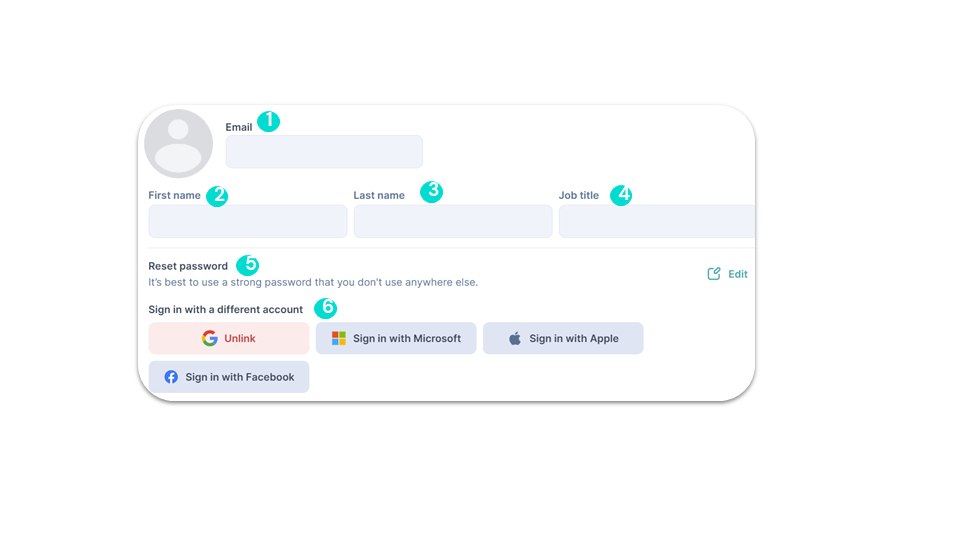
You can:

See your email adress.
Change your first name.
Change your last name.
Modify your job title.
Change your password.
Log in with another account (Google, Microsoft, Apple, Facebook).
General settings
Home Onboarding / User Guide / Settings / Language and region
Show menu

Settings

Language and region

smart business advanced
Progress - 77%

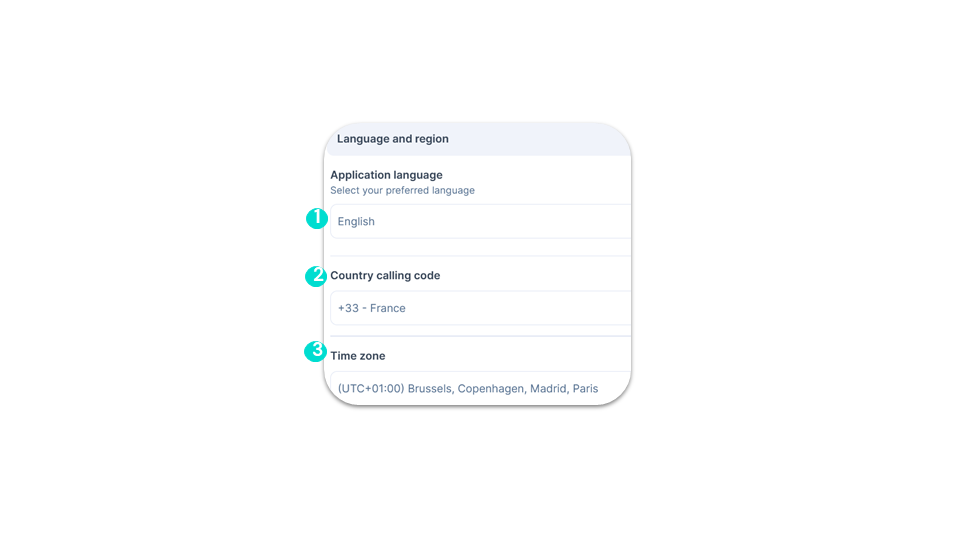
You can change:

The language of the application.
The international dialing code.
The time zone.
Language and region
Home Onboarding / User Guide / Settings / General options
Show menu

Settings

General options

smart business advanced
Progress - 79%

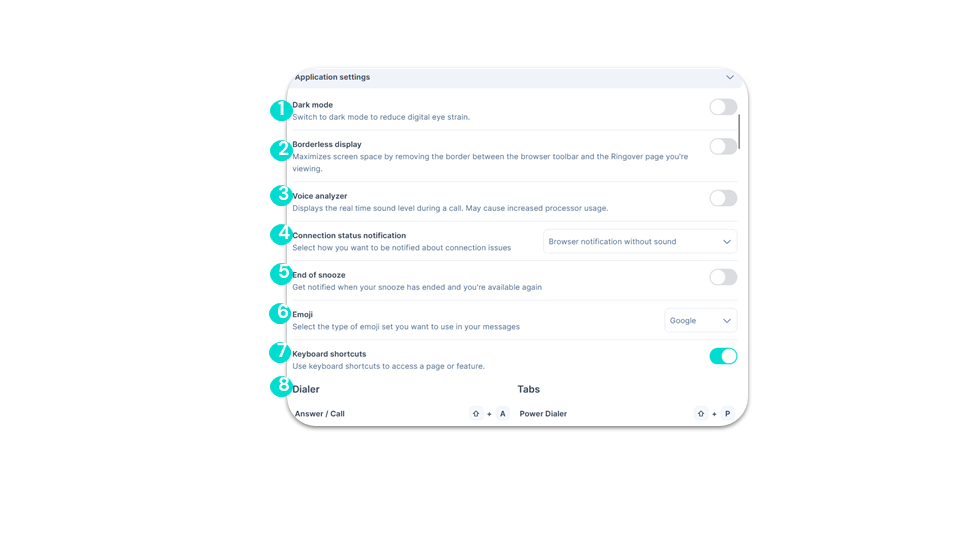
You can activate:

The dark mode
The borderless display
The voice analyzer
The connection status notification
The end of snooze
The emoji
The keyboard shortcuts
The dialer
General options
Home Onboarding / User Guide / Settings / Call Forwarding
Show menu

Settings

Call Forwarding

smart business advanced
Progress - 80%
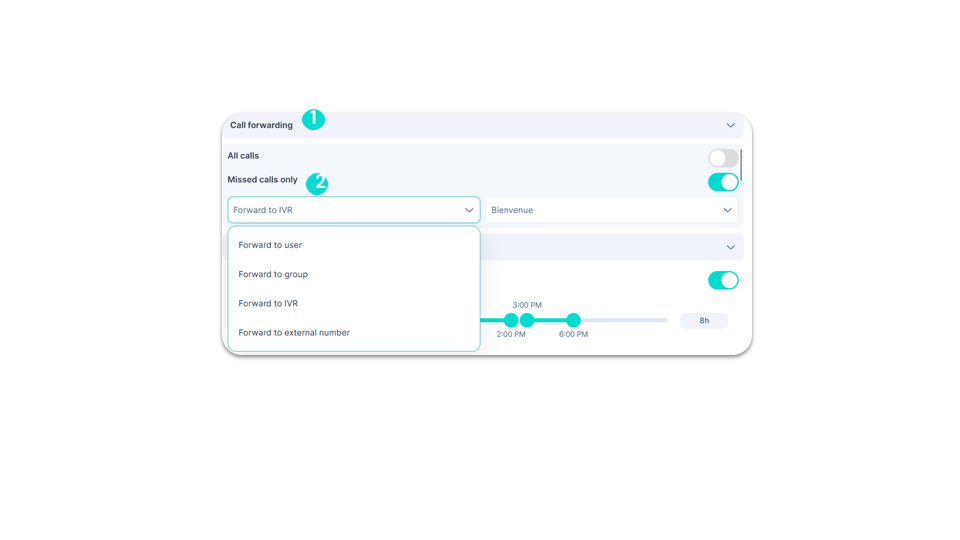
In the “Call Forwarding” section, you can choose the option that suits you best:
  • “All missed calls.”
  • “Only missed calls.”
Configure your forwarding settings in case of no response to another user, a group, a switchboard, or an external number.
Call Forwarding

To go further, please visit our help center: Transferring a call

Home Onboarding / User Guide / Settings / Working hours
Show menu

Settings

Working hours

smart business advanced
Progress - 82%

In the “Working Hours” section, you can manage your schedule by defining time slots according to your availability.
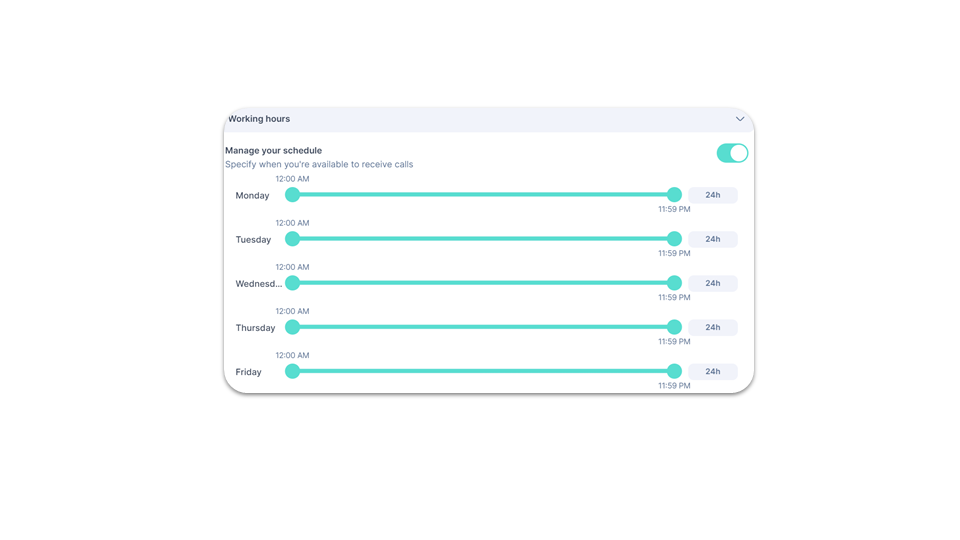
Working hours
Home Onboarding / User Guide / Settings / Outgoing Calls
Show menu

Settings

Outgoing Calls

smart business advanced
Progress - 84%

In the “Outgoing Calls” section, you can:
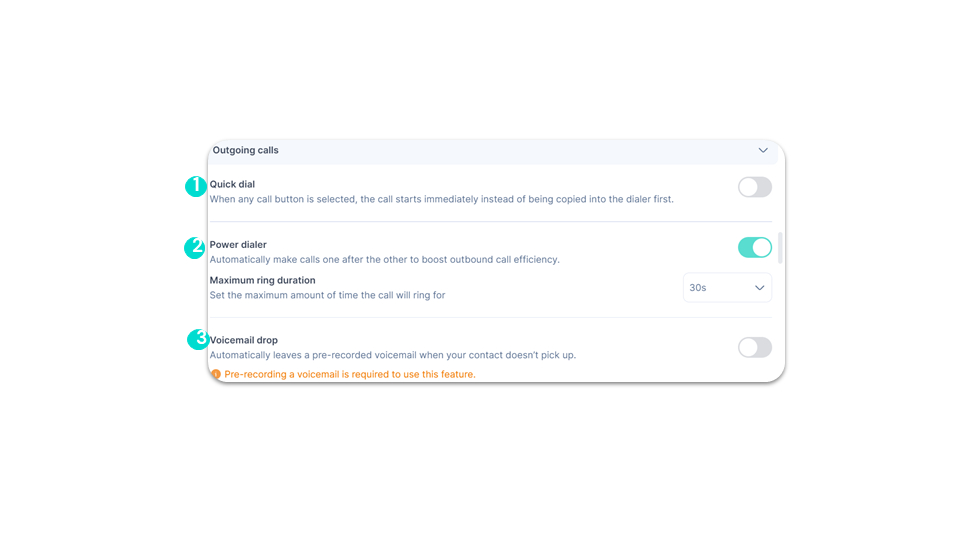
Activate immediate calling.
Activate the Power Dialer for call campaigns.
Activate a voicemail message that will automatically be left when your outgoing call goes to the contact’s voicemail.
Outgoing Calls
Home Onboarding / User Guide / Settings / Incoming Calls
Show menu

Settings

Incoming Calls

smart business advanced
Progress - 86%

In the “Incoming Calls” section, you can:
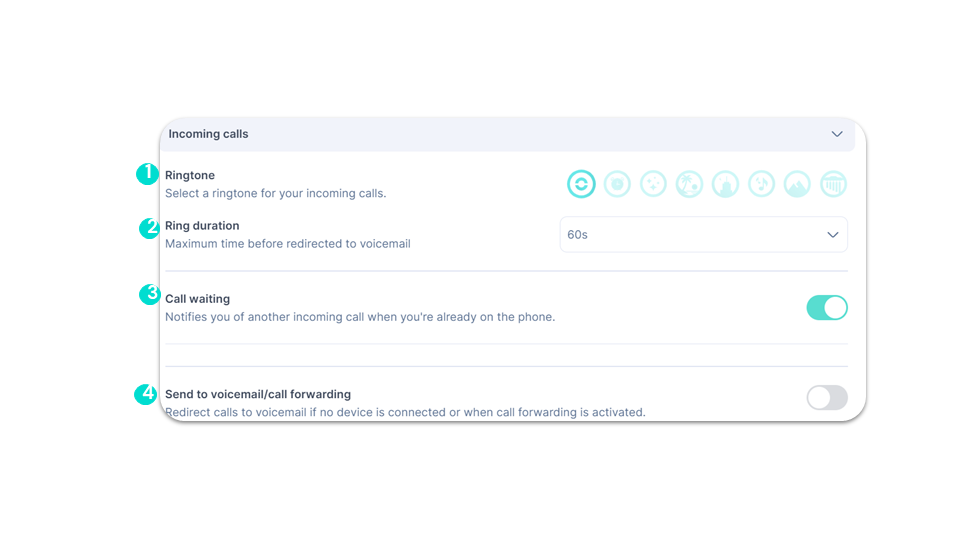
Select a ringtone.
Activate the call waiting feature.
Set the ringtone duration.
Forward calls directly to voicemail/call forwarding.
Incoming Calls
Home Onboarding / User Guide / Settings / Voicemail
Show menu

Settings

Voicemail

smart business advanced
Progress - 88%

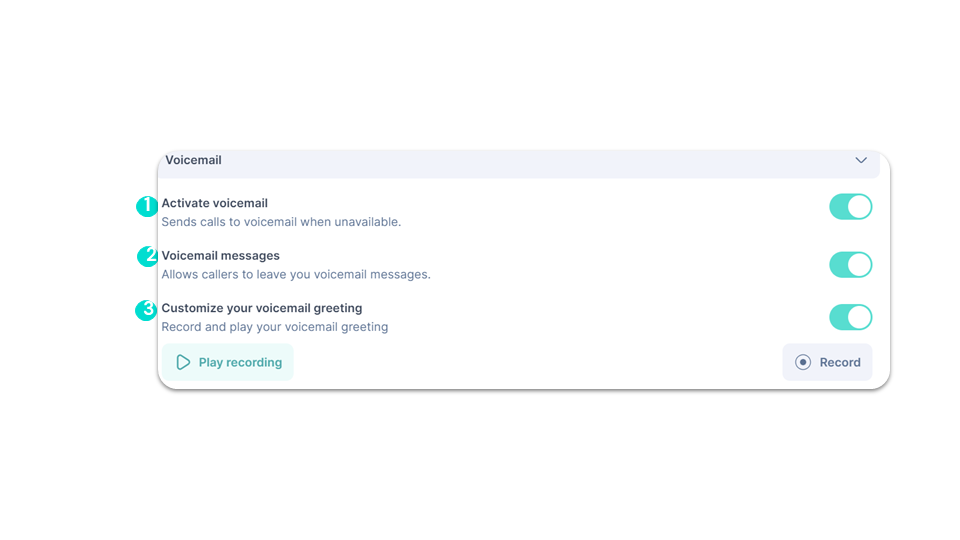
In the “Voicemail” section, you can:

Activate your voicemail.
Allow callers to leave a voicemail message.
Record and listen to your voicemail greeting.
Voicemail
Home Onboarding / User Guide / Settings / Notifications
Show menu

Settings

Notifications

smart business advanced
Progress - 89%

In the “Notifications” section, you can:
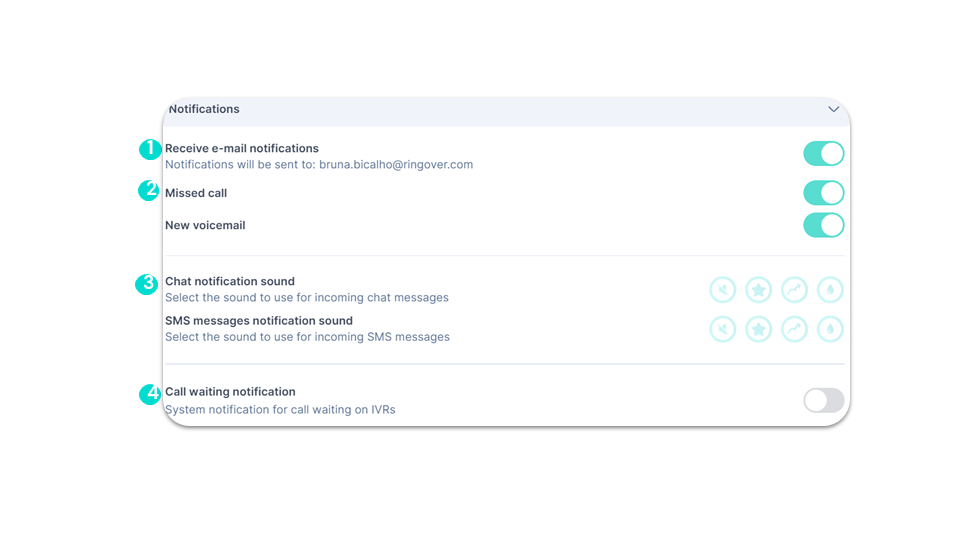
Activate the “Receive email notifications” feature.
Activate the “Missed Call” and “New Voicemail” notifications.
Activate the ringtone for the notification.
Authorize call waiting notification.
Notifications
Home Onboarding / User Guide / Settings / Click2Call Signature
Show menu

Settings

Click2Call Signature

smart business advanced
Progress - 91%

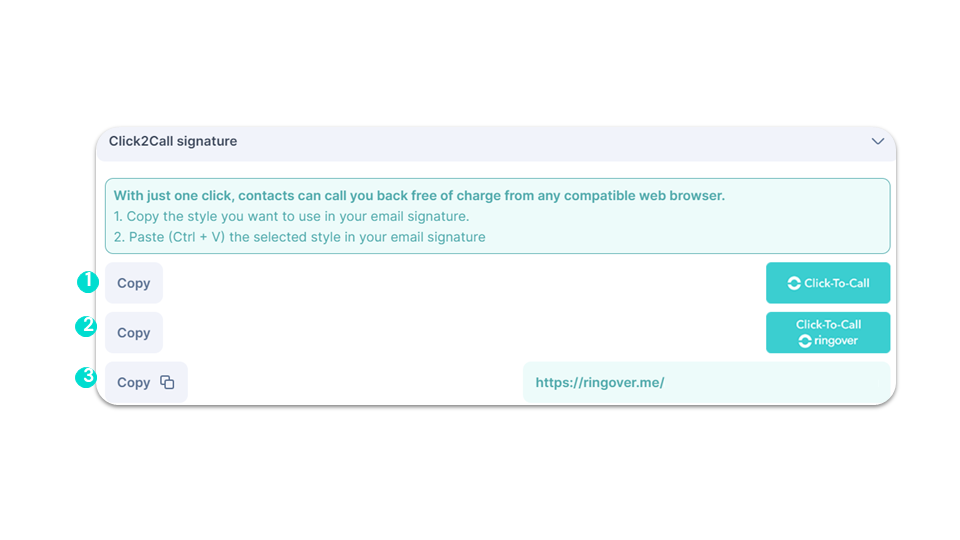
In the “Click2Call” section, you can:

Allow your contacts to call you back for free from any browser.
Copy templates to add to your email signature.
Copy the link directly.
Click2Call Signature
Home Onboarding / User Guide / Settings / SIP Account
Show menu

Settings

SIP Account

smart business advanced
Progress - 93%

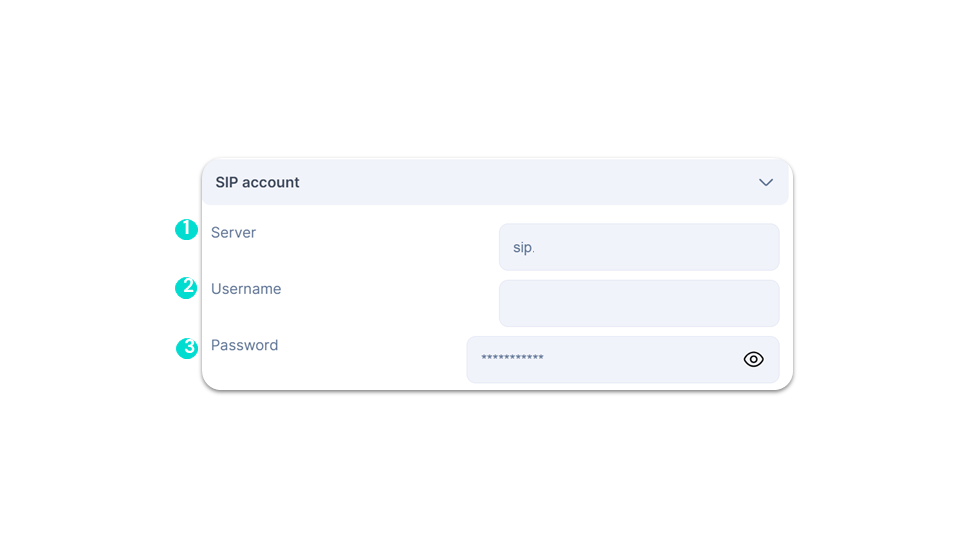
In the “SIP Account” section, you can:

See your server.
See your username.
See your password.
SIP Account
Home Onboarding / User Guide / Settings / Security & Devices
Show menu

Settings

Security & Devices

smart business advanced
Progress - 95%

In the “Security & Devices” section, you can:
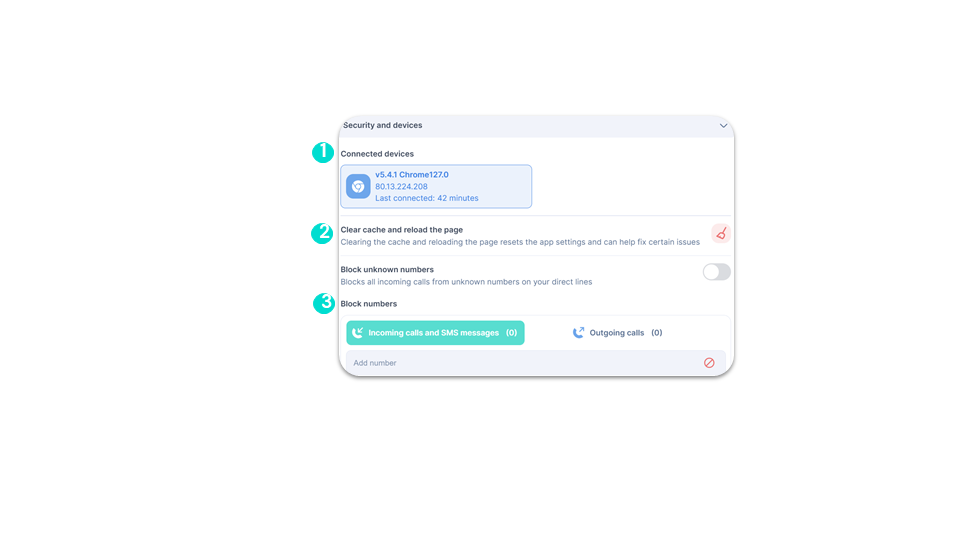
See your connected devices.
Clear your cache and reload the page.
Block all incoming anonymous calls on your direct lines.
Security & Devices
Home Onboarding / User Guide / Settings / CRM Configuration
Show menu

Settings

CRM Configuration

smart business advanced
Progress - 96%

In the “CRM Configuration” section, you can access your integrations directly.
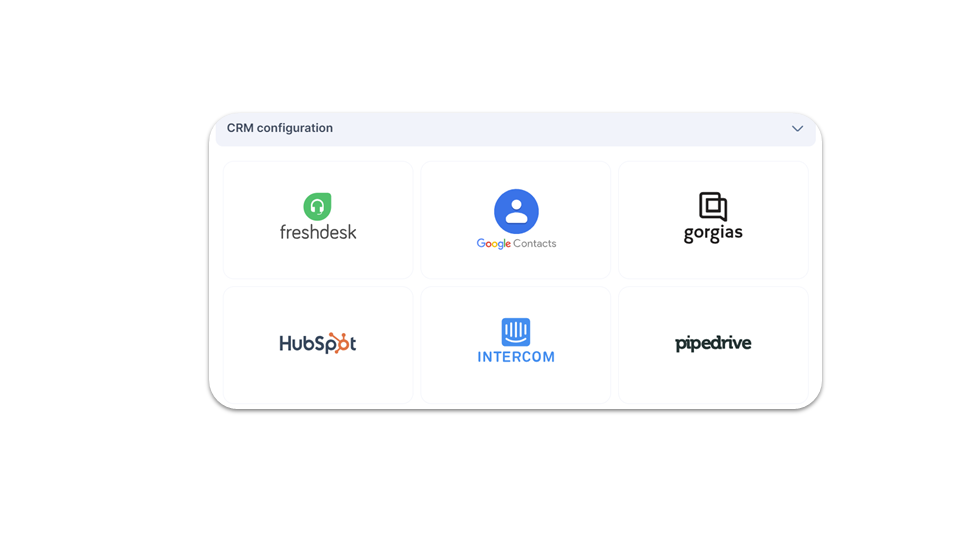
CRM Configuration
Home Onboarding / User Guide / Settings / Creating Multiple Voicemail Messages (1)
Show menu

Settings

Creating Multiple Voicemail Messages (1)

advanced
Progress - 98%
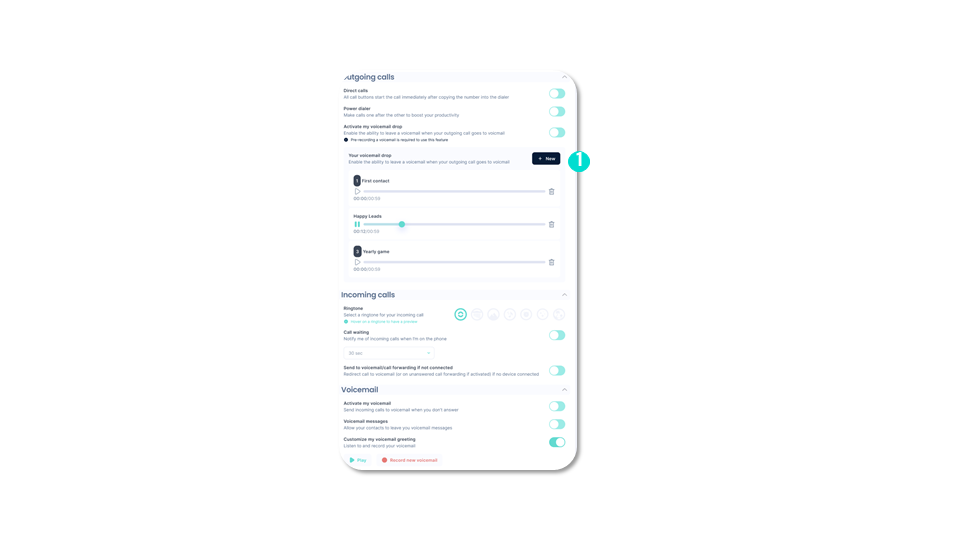
You can create multiple voicemail messages to adapt your messages to different scenarios, such as special dates, call campaigns, or out-of-office situations. In the user settings, you can create several voicemail messages.
Creating Multiple Voicemail Messages (1)
Home Onboarding / User Guide / Settings / Creating Multiple Voicemail Messages (2)
Show menu

Settings

Creating Multiple Voicemail Messages (2)

advanced
Progress - 100%

Each voicemail message must have a name.

In the dialer during the call, the agent can choose which voicemail message to send (Option: Have a default voicemail message for quick sending or allow time to select).
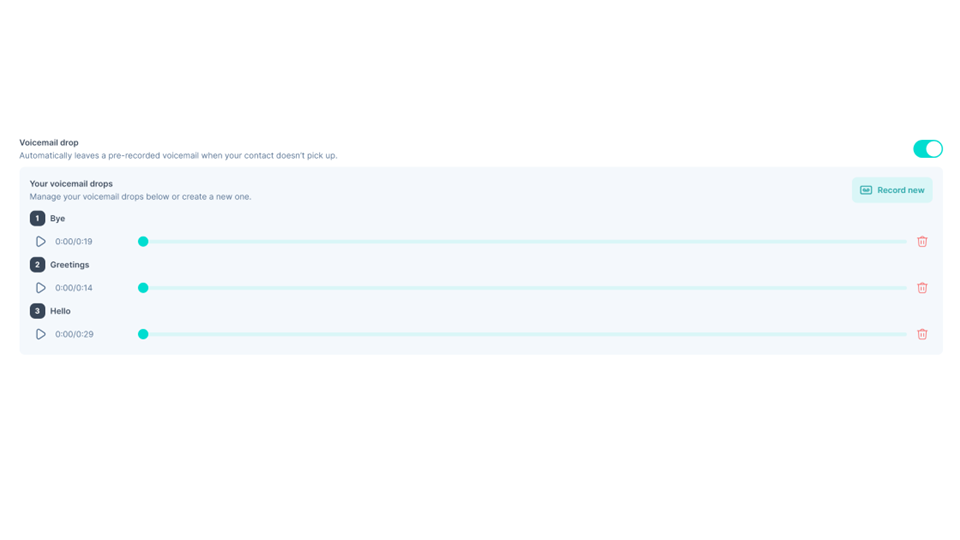
Creating Multiple Voicemail Messages (2)
photo stephane

Welcome to Ringover!

Contact our sales team

or give us a call

+1 438 448 4444

Contact our sales team
US
  • US France
  • US Spain
  • US United Kingdom
  • US USA
  • US Canada
  • US Australia

Other country?

    Contact our sales team
    Thank you !
    We are excited to connect!

    One of our product experts will be in contact as soon as possible to book your custom demo and answer any questions you may have.