Dashboard access
- Dashboard access
- Activity - Data
- Activity - Service level
- Activity - Snooze
- Activity - Agent status
- Activity - Radio coach
- Activity - IVRs
- Activity - Direct Lines
- Activity - Meet
- Call logs
- Call logs - Data
- Call logs - Call details
- Call logs - Call types
- Call logs - Outgoing calls
- Call logs - Missed calls
- Call logs - Call details
- Call logs - Call flow
- SMS logs
- SMS logs - Data
- Meet logs
- Meet logs - Data
- Export mail statistics JPG
- Call statistics - Data
- Call statistics - Call processing status
- Call statistics - History
- Call statistics - Heatmap
- Call statistics - IVR Leaderboard (1)
- Call statistics - IVR Leaderboard (2)
- Call filters
- Call filters - Call types
- Call filters - By country
- Call filters - Advanced filters, duration type & tags
- Call filters - IVR
- Call filters - IVR missed calls
- SMS statistics - Data
- SMS statistics - History
- SMS statistics - Heatmap
- SMS statistics - Leaderboard
- SMS filters
- Meet statistics – Data
- Meet statistics - Leaderboard
- Meet filters
- Meet filters - “Personalize” option
- Omnichannel statistics
- Omnichannel statistics - History
- Omnichannel statistics - Heatmap
- Omnichannel Statistics - Leaderboard
- Omnichannel filters
- Tag statistics
- Tag filters
- Tag filters - Advanced filters, duration type and tags
- Survey statistics
- Survey statistics - History
- Survey filters
- Statistics - Snooze
- Filters - Snooze
- Statistics - Incoming call
- Statistics - Geographic
Login and use: Omnichannel
- Requirements
- Activating the Omnichannel Add-On
- Integrating WhatsApp
- Facebook Messenger (1)
- Facebook Messenger (2)
- Instagram (1)
- Instagram (2)
- Instagram (3)
- Google Review (1)
- Google Review (2)
- Outlook
- WebApp
- Internal Notes for Omnichannel Messaging (except email)
Add and configure a number
- Add a number
- How to choose a number
- Assign a number
Keep your existing number
- Portability
Managing users
- Add a user
- Create a user group
- Configure an user
- Managing permissions
- Managing permissions
Software customization - 1/4 - Managing permissions
Software customization - 2/4 - Managing permissions
Software customization - 3/4 - Managing permissions
Software customization - 4/4 - Managing permissions
Calls - 1/3 - Managing permissions
Calls - 2/3 - Managing permissions
Calls - 3/3 - Managing permissions
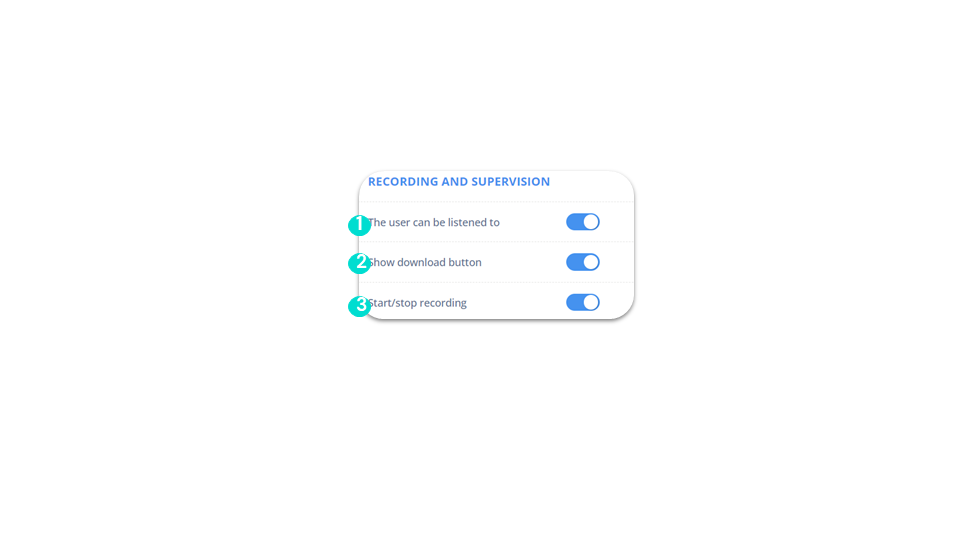
Recording & supervision - 1/2 - Managing permissions
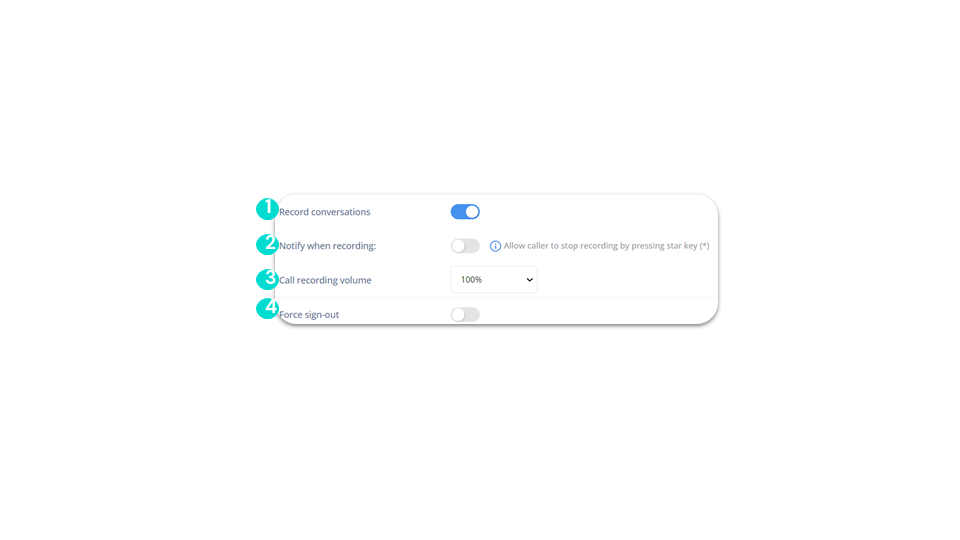
Recording & supervision - 2/2 - Set up a user’s phone
- Configure direct line announcements and sounds
- Configure direct line announcements and sounds
- Groups
- Handle missed calls from your IVR
- Dashboard access rights (1)
- Dashboard access rights (2)
Configure an IVR
- Create an IVR
- Go to scenario modification
- Configure call forwarding according to agent status (1)
- Configure call forwarding according to agent status (2)
- Creating a greeting with voice synthesis and background music
- Creating a greeting with an mp3 file
Using call tags
- Create and modify tags
- Allow your users to tag their calls
- WebApp & Dashboard
Create your network
- WebApp
- Dashboard
- Find and call a contact
Add a number to the blacklist
- Dashboard
- Webapp
Send SMS campaigns
- Set access to “SMS Campaigns” functionality (1)
- Set access to “SMS Campaigns” functionality (2)
- Send an SMS campaign
Launch call campaigns
- Configure access to functionality
- Create a call list (1)
- Create a call list (2)
- Add numbers
- Launch campaign
Send voicemail campaigns
- Configure access to functionality
- Launch voicemail campaigns
Billing
- Go to billing tab
- Buy your credits
- Manage your licenses
- Manage your point of contacts
- Manage your billing addresses
- Access your documents
- Credit card
- Download and filter your invoices
- Filter your invoices
- View your next invoices
- Understanding your billing (1)
- Understanding your billing (2)
Set the duration of your data storage
- Set the duration of your data storage
Marketplace
- Marketplace
- Products
- Add-ons
- Additional outgoing channel
- Call campaign extension
- Omnichannel Communication
Integrate Ringover with your business tools
- Integrate Ringover with your business tools
- Use our API
- API & Webhook
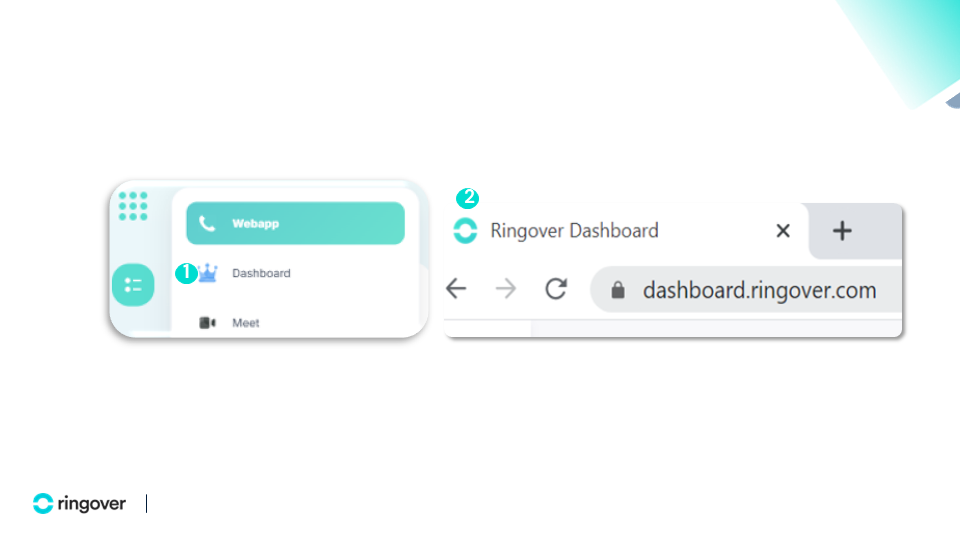
Dashboard access
Dashboard access
OR
Dashboard access
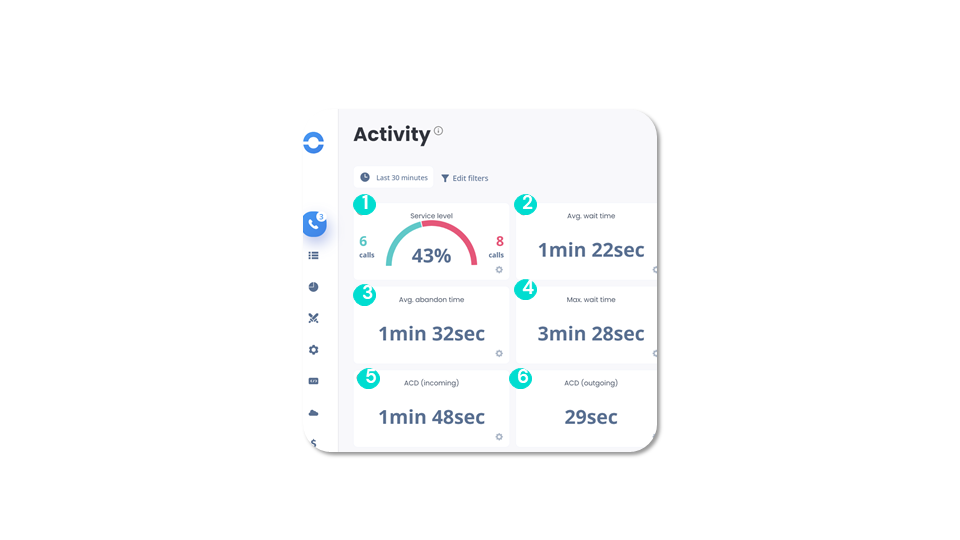
Activity - Data
business advancedGo to your Dashboard.
Dashboard access
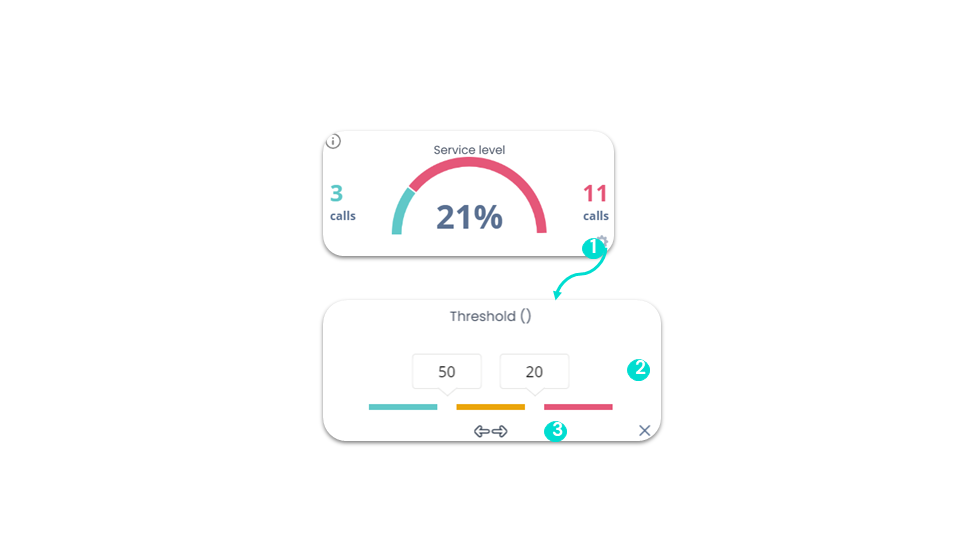
Activity - Service level
business advancedYou can set color alerts for each indicator. This will enable you to better visualize your performance in real time:
Dashboard access
Activity - Snooze
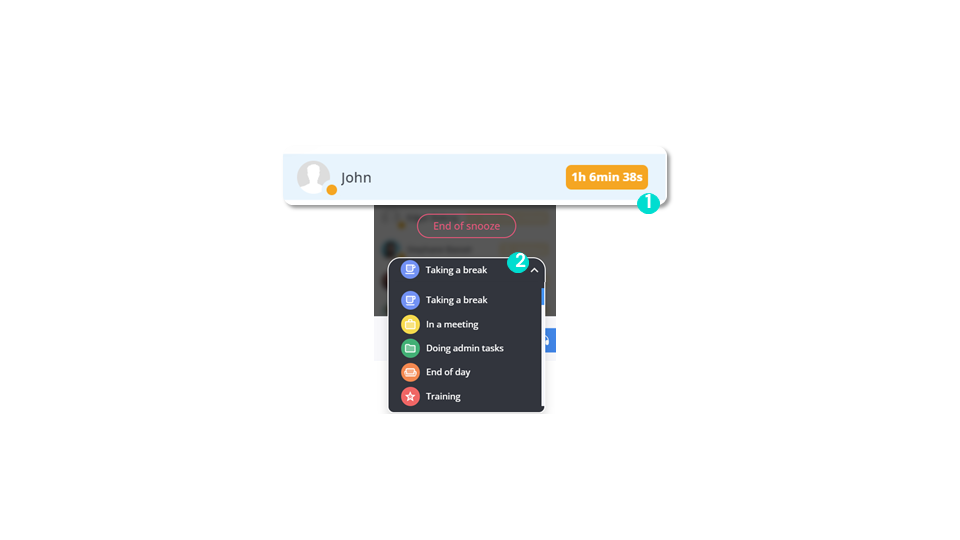
business advancedThe “Snooze” feature allows agents to make themselves unavailable and indicate that they do not wish to be disturbed. You can manage their availability according to your needs.
PS: If you also have “Technical” access, you can click on the user to set them to “Snooze” from their settings.
Dashboard access
Activity - Agent status
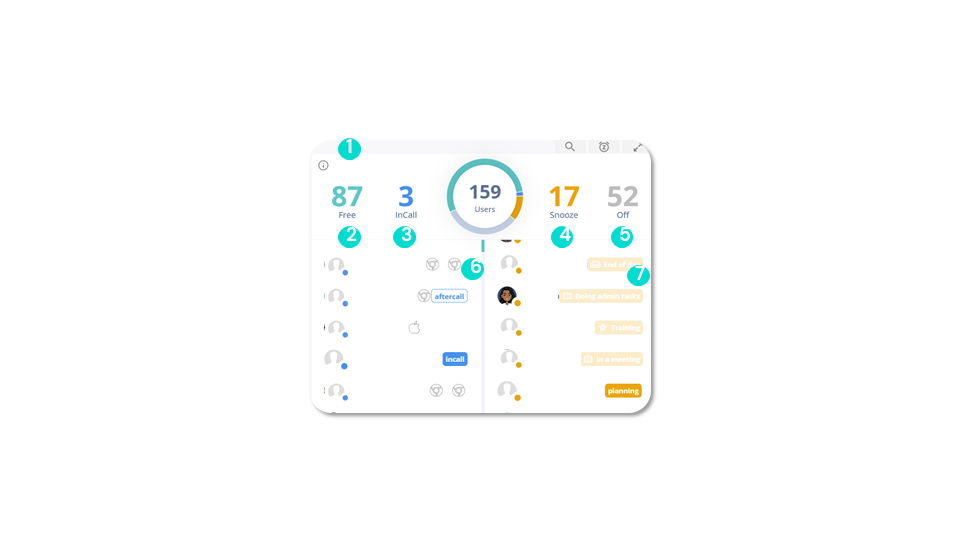
business advancedThe left-hand column shows users who are available and on a call, as well as the device they are using.
The right-hand column shows disconnected and snoozed users, and the reason for their unavailability.
Dashboard access
Activity - Radio coach
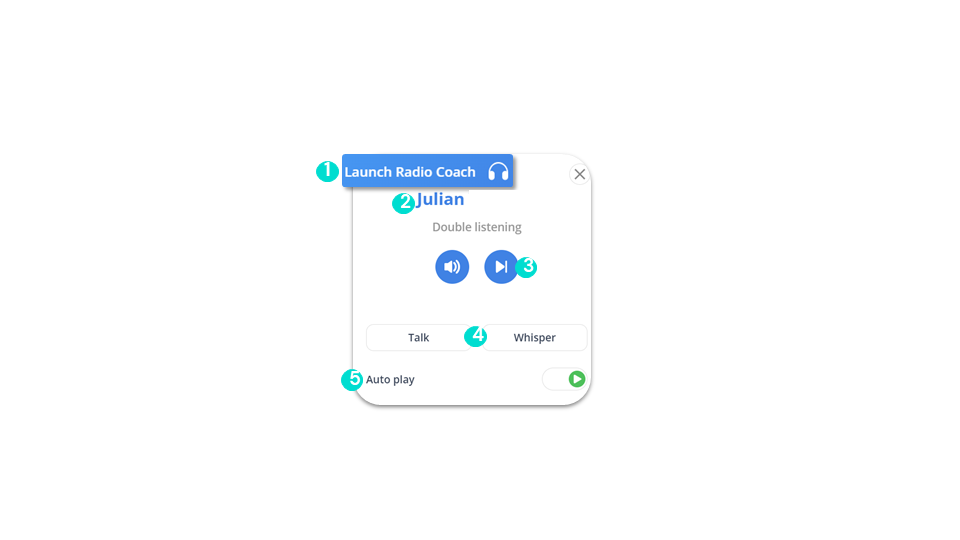
business advancedThis function enables you to continuously and discreetly launch random listening sessions in real time on calls in progress, without disturbing your colleagues’ calls.
Prerequisites: You need an administrator account.
You’ll find:
Dashboard access
Activity - IVRs
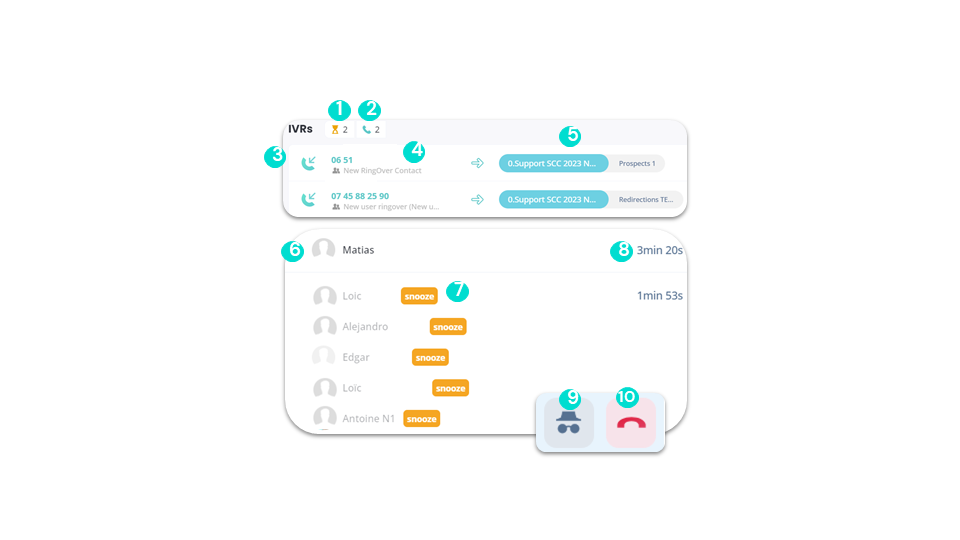
business advancedWhile on a call, you can also:
Dashboard access
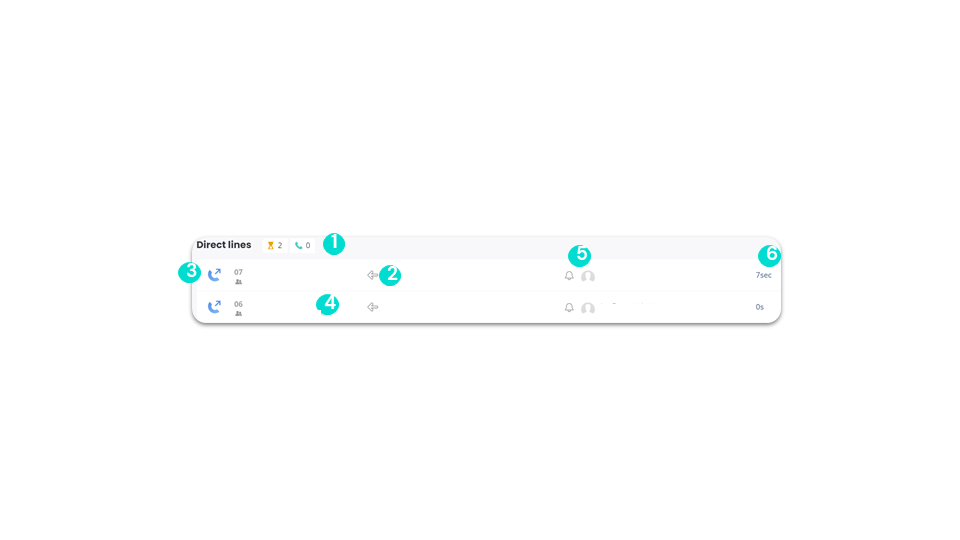
Activity - Direct Lines
business advancedDirect lines are direct calls.
Dashboard access
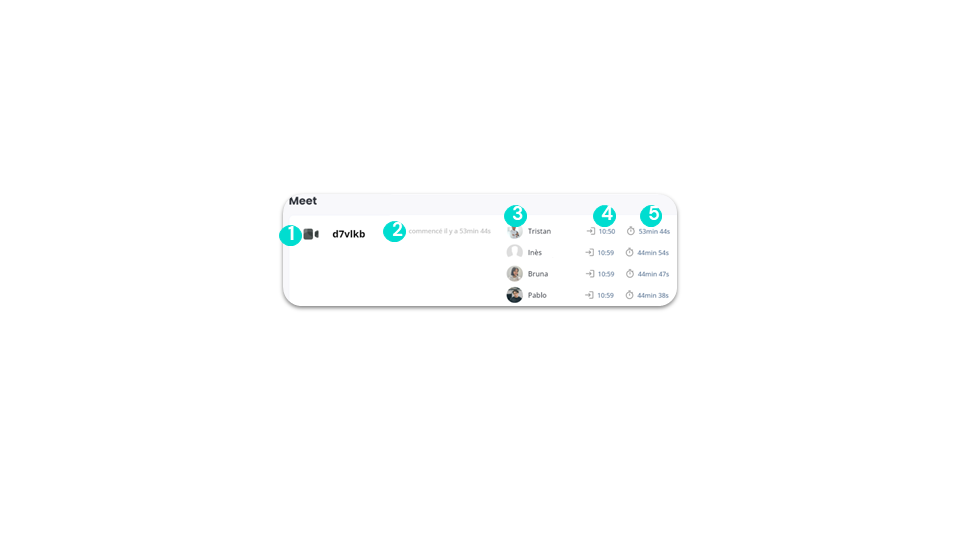
Activity - Meet
business advancedIn the activity section of your dashboard, you can see the Meet calls:
Dashboard access
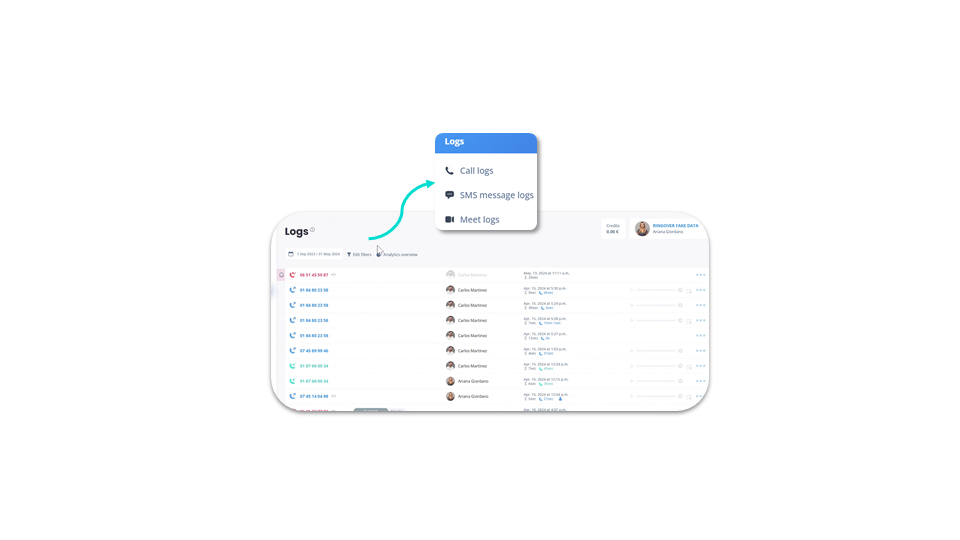
Call logs
smart business advancedFrom your Call Logs:
- Find all your outgoing, outgoing, missed calls and voice messages.
- Access, listen to and download your recordings.
- Compare your telephone performance over time and by agent using filters.
To go further, please visit our help center: Analysing your call logs
Dashboard access
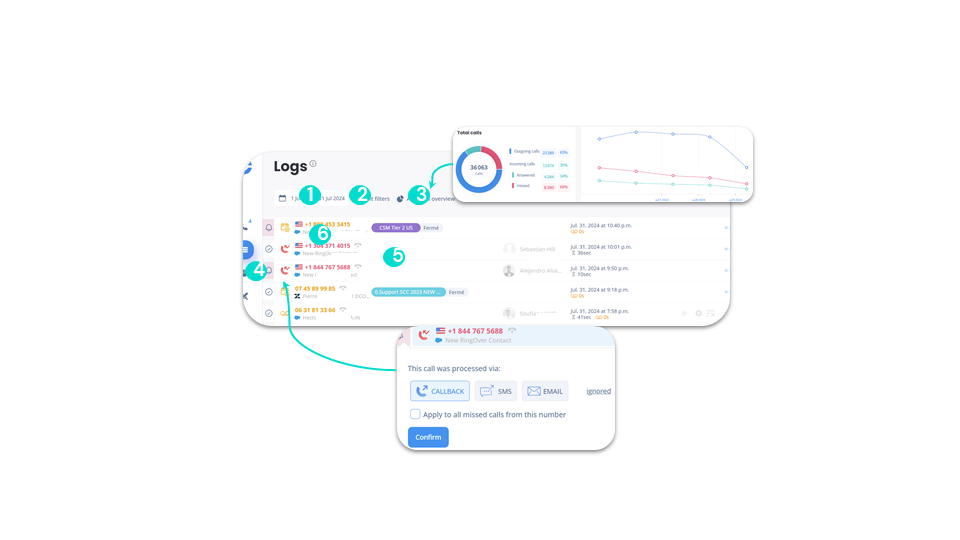
Call logs - Data
smart business advanced- Incoming
- Outgoing
- Missed
- Messaging
- Calls without keys selected
Dashboard access
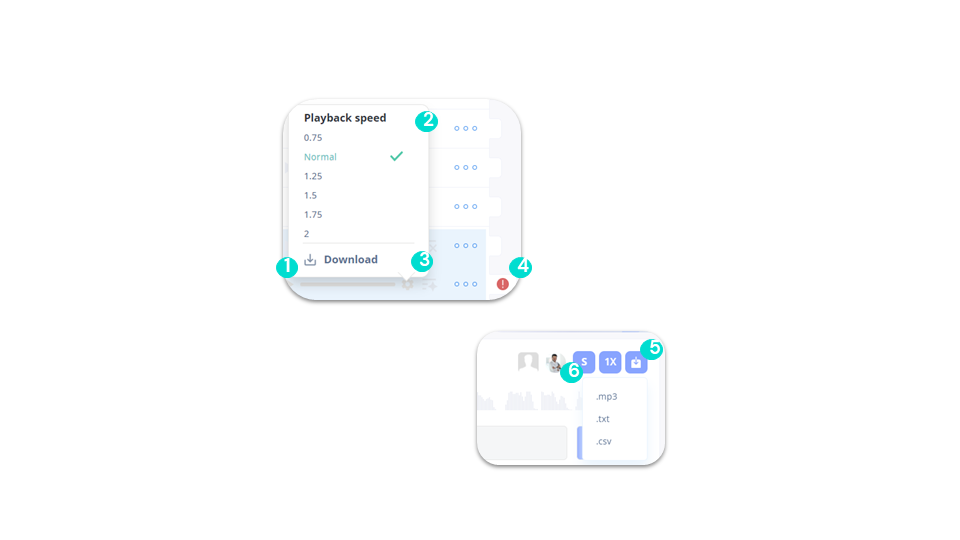
Call logs - Call details
smart business advancedYou can:
In the call details, you can:
Dashboard access
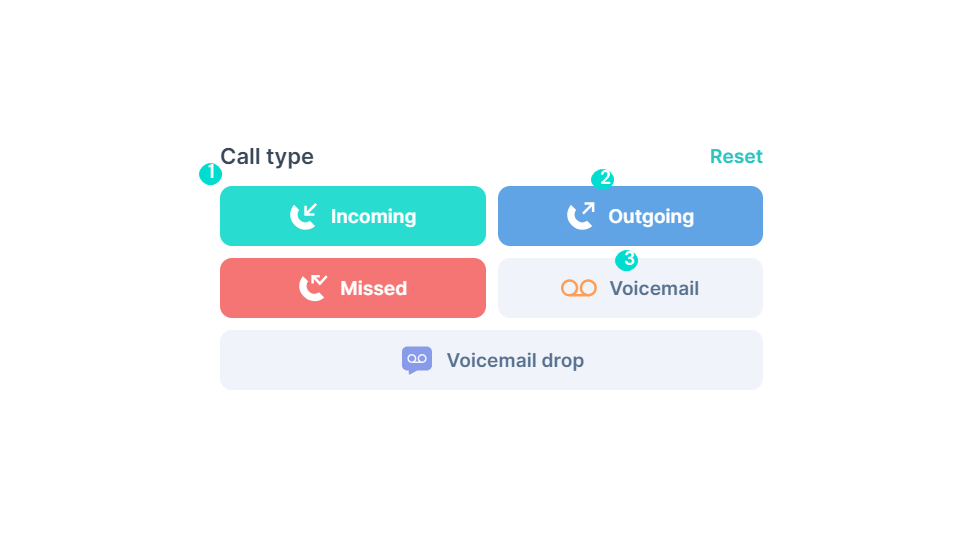
Call logs - Call types
smart business advancedLogs are your entire history of calls made, answered and missed. We have several types of calls:
Incoming calls
Dashboard access
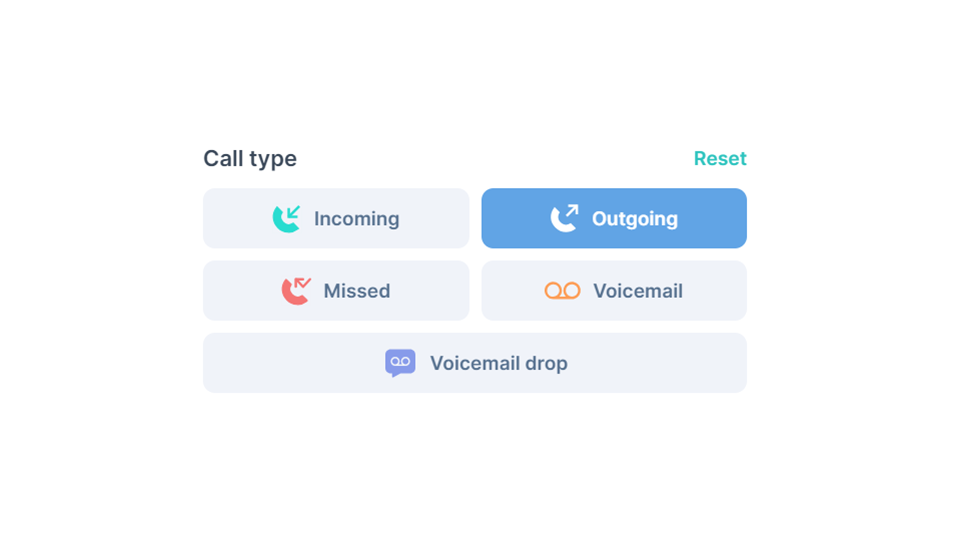
Call logs - Outgoing calls
smart business advancedOutgoing calls: These are calls that have been successfully made, meaning they have been established and completed with a connection between the caller and the recipient. This applies to both incoming and outgoing calls.
Dashboard access
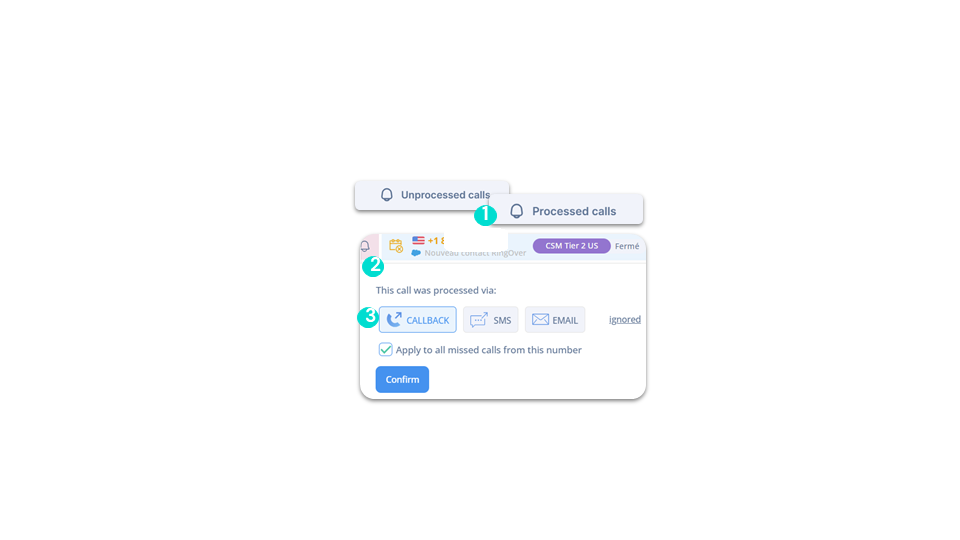
Call logs - Missed calls
smart business advancedUnanswered missed calls are represented by a small bell to the left of your call logs. It is displayed next to a missed call, and allows you to see directly which missed calls need to be handled.
Handle missed calls
Dashboard access
Call logs - Call details
smart business advanced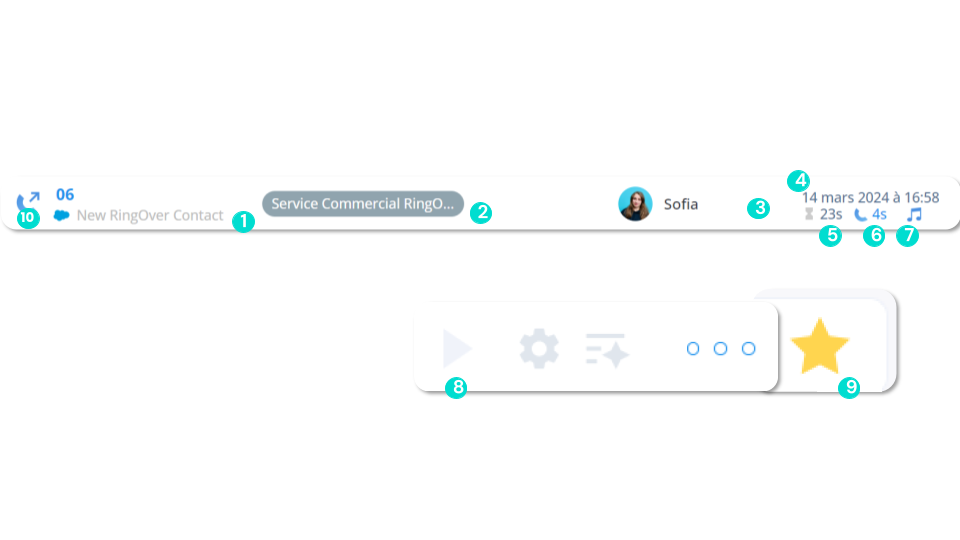
Dashboard access
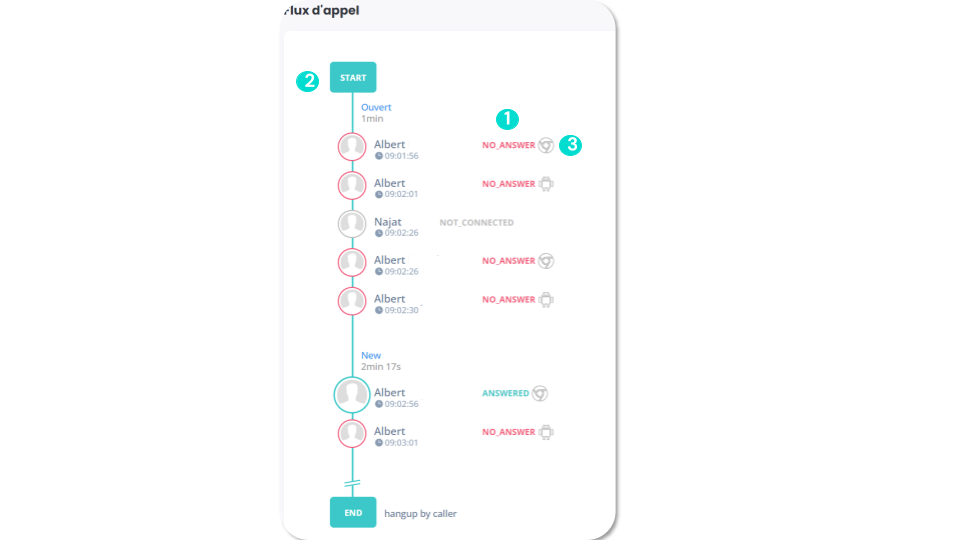
Call logs - Call flow
smart business advancedIn the call flow, you have the ability to see:
- ANSWERED: Call answered by the concerned user.
- NO_ANSWER: Missed call, no agent picked up the call.
- NOT_CONNECTED: Missed call, received while the agent was disconnected.
Dashboard access
SMS logs
business advancedFrom your SMS Logs, you can access your entire history of received and sent messages.
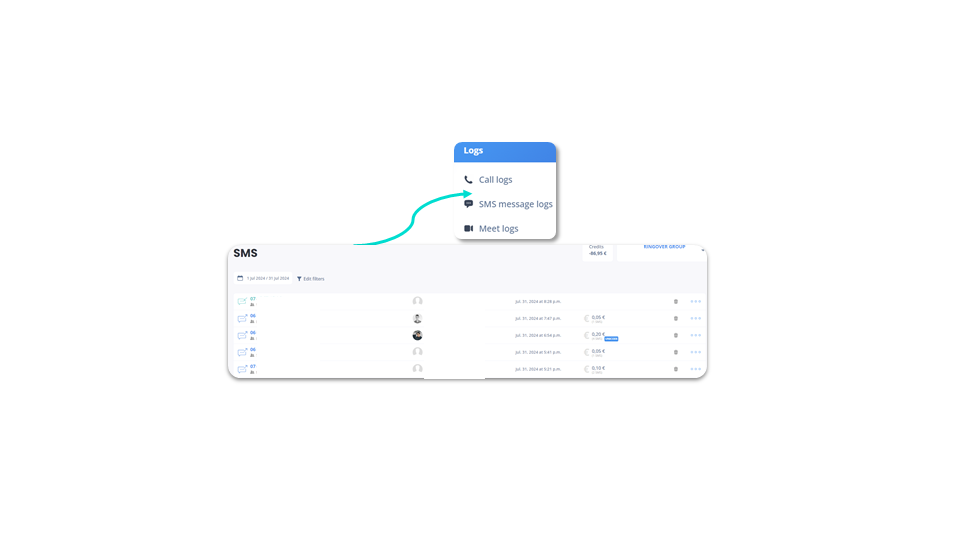
To go further, please visit our help center: Texting: Understanding and controlling usage
Dashboard access
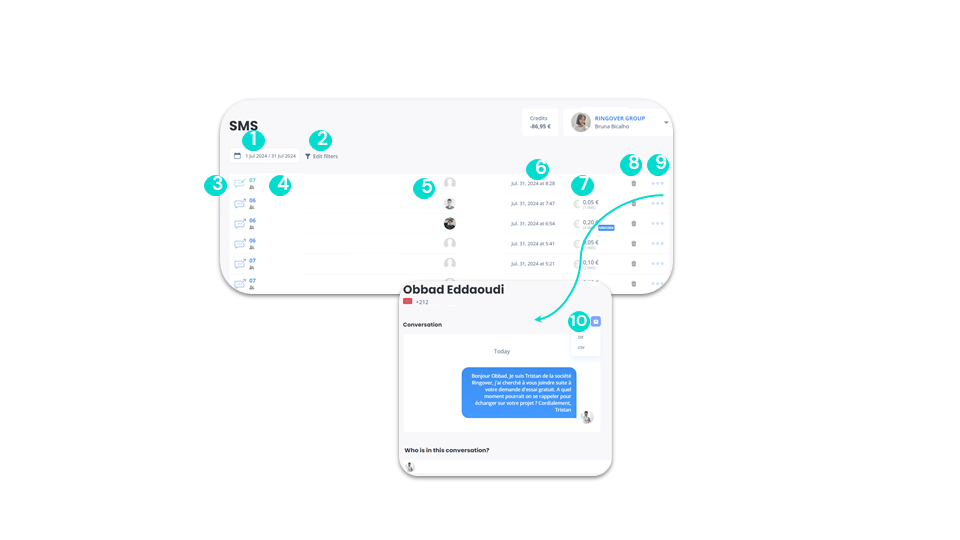
SMS logs - Data
business advancedIn SMS Logs, you can:
- Incoming
- Outgoing
Dashboard access
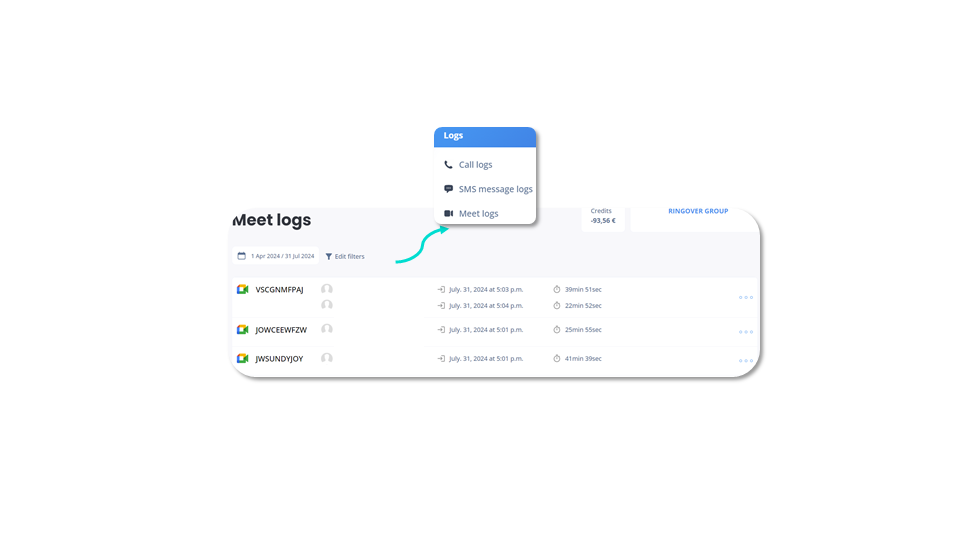
Meet logs
business advancedFrom your Meet logs, you can access your entire history of videoconferences.
Dashboard access
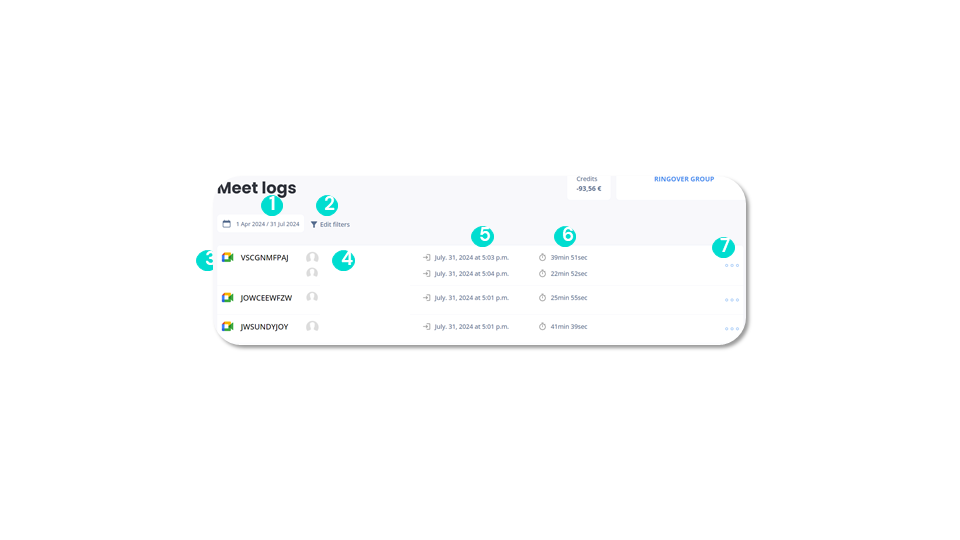
Meet logs - Data
business advancedIn Meet Logs, you can:
Dashboard access
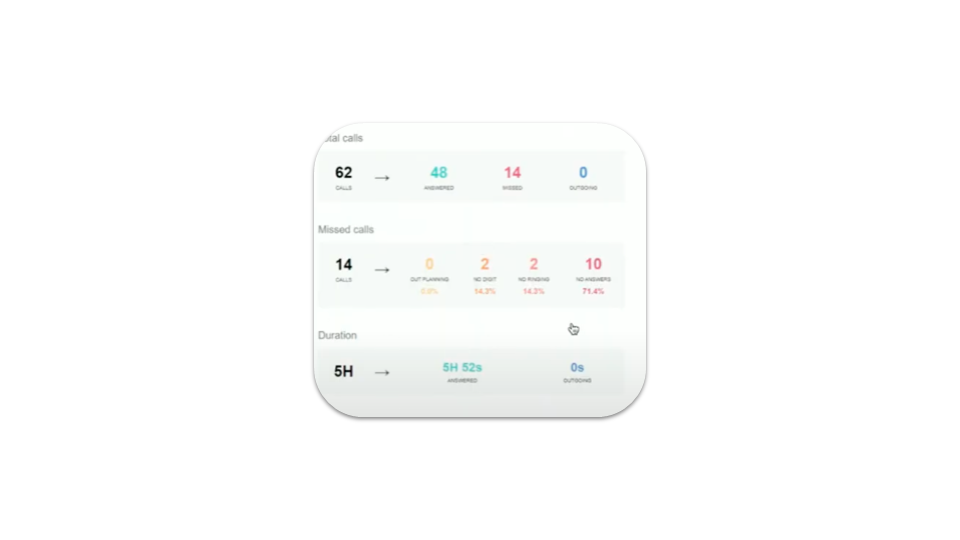
Export mail statistics JPG
advancedCall statistics can be exported as an image.
Filters include:
- Date selector to select frequency
- Option to select frequency (daily, weekly, monthly)
- Report sent to the user who requested it
- User can unsubscribe from a previous subscription
To activate these reports:
- Click on “Edit filters”
- Click on “Your filters”
- Click on the “mail” icon next to the saved filter for which you want to activate the reports
Note: For this option to be available, your filter must contain the criteria “yesterday”, “last week” or “last month”.
Dashboard access
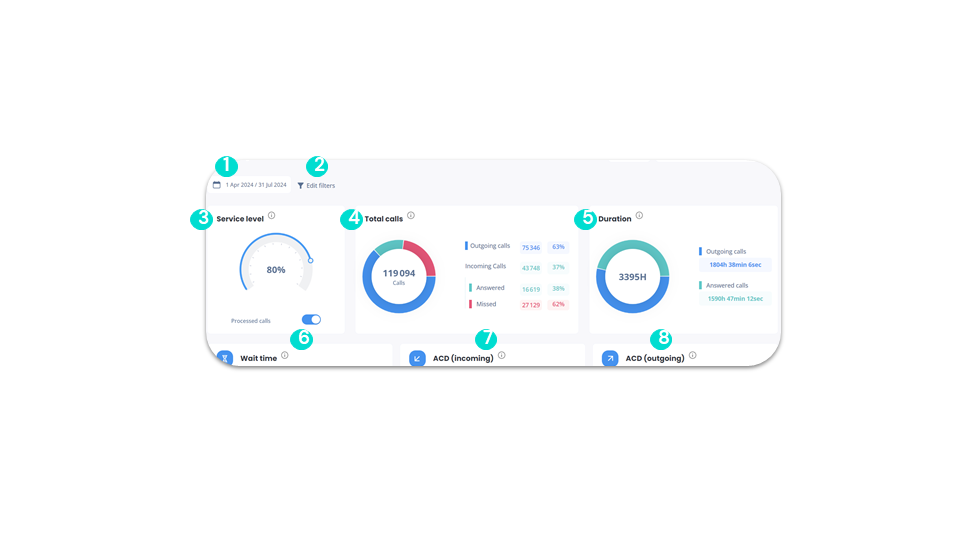
Call statistics - Data
business advancedIn the call statistics, you’ll find:
Dashboard access
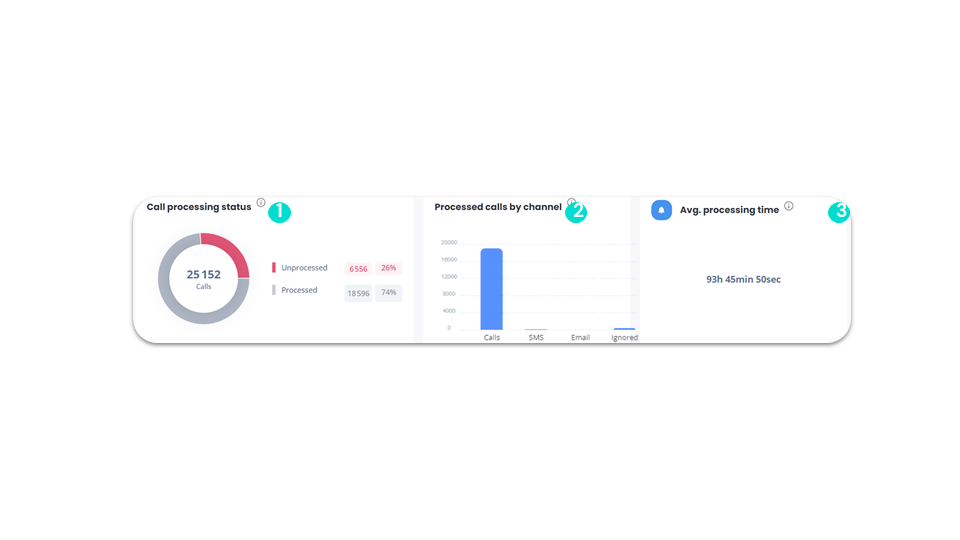
Call statistics - Call processing status
business advancedIn the call statistics, you’ll also find:
Dashboard access
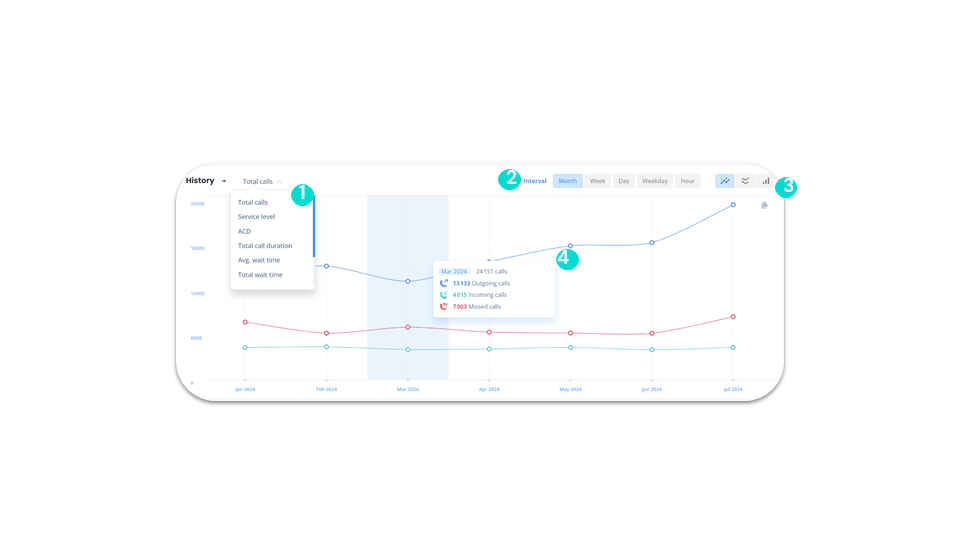
Call statistics - History
business advancedHistory gives you an overview of call progress, and you can choose the type of information to be displayed.
Dashboard access
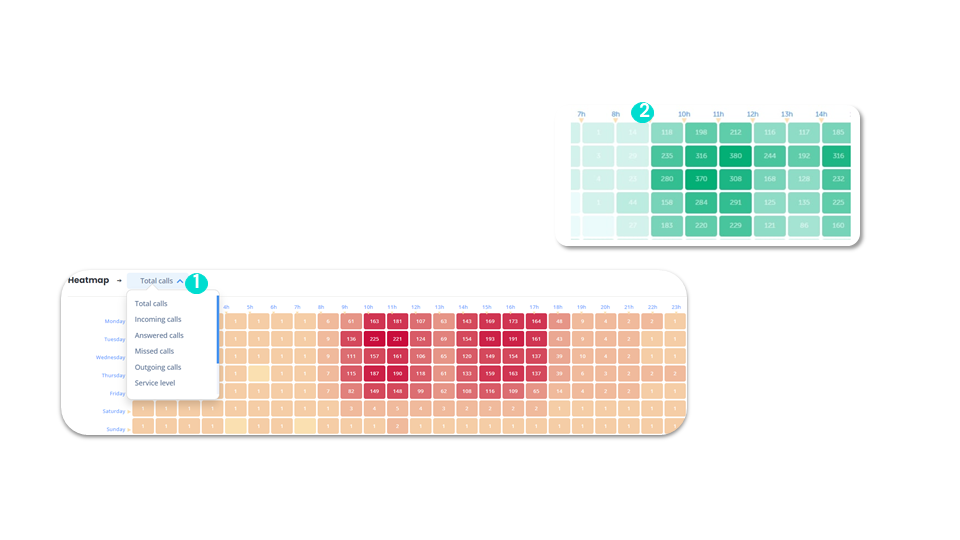
Call statistics - Heatmap
business advanced“Heatmap” is a feature that lets you track, at a glance, your activity and service levels hour by hour over the course of the week.
Dashboard access
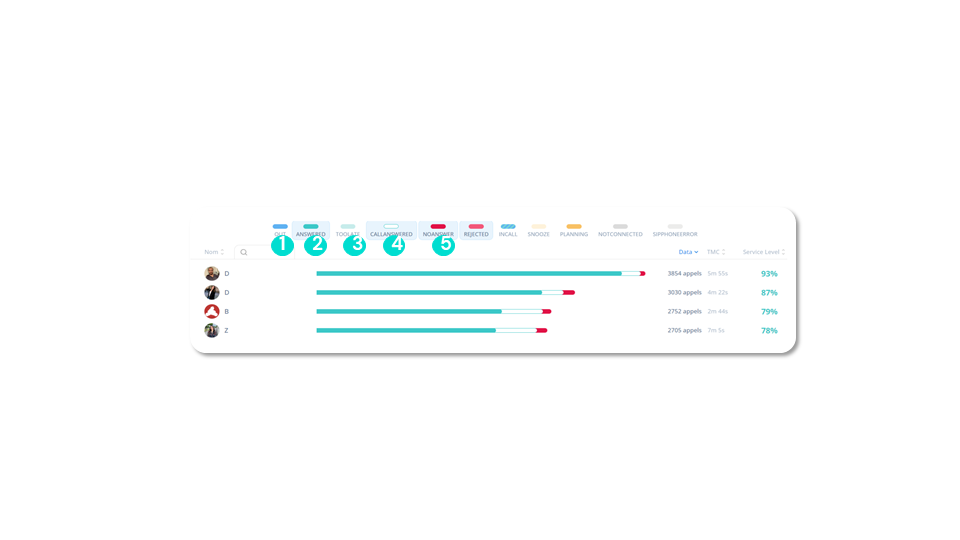
Call statistics - IVR Leaderboard (1)
business advancedHere’s how to understand the call statistics of users connected to your IVRs.
Dashboard access
Call statistics - IVR Leaderboard (2)
business advanced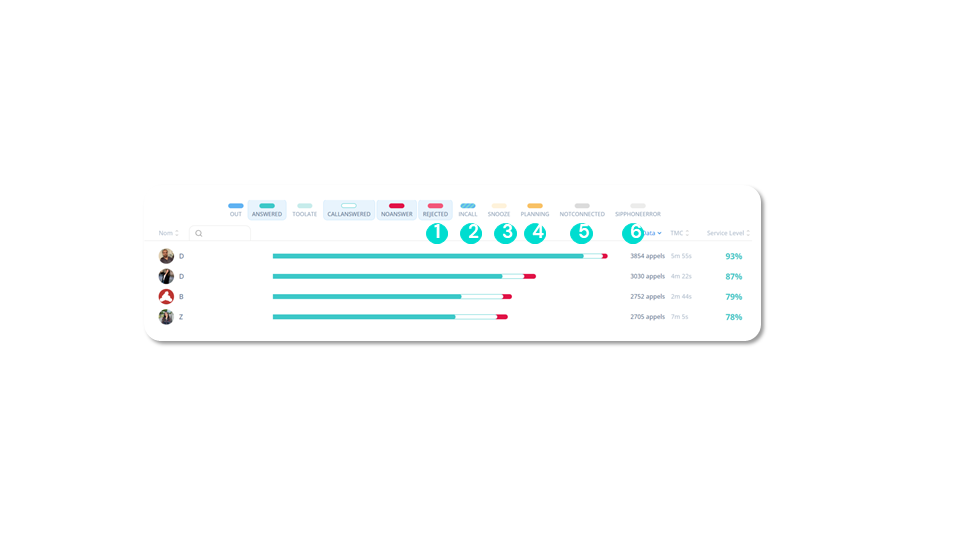
Dashboard access
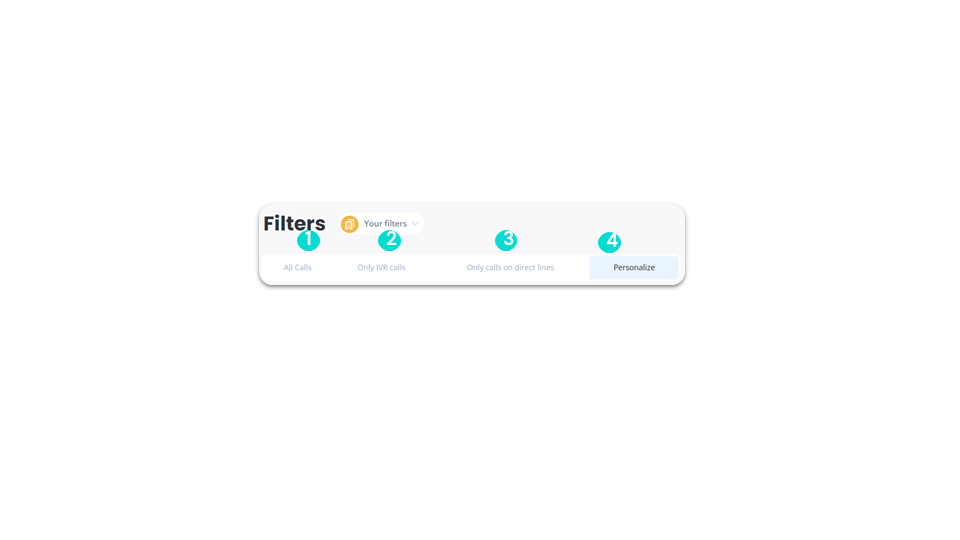
Call filters
smart business advancedFilter your call data:
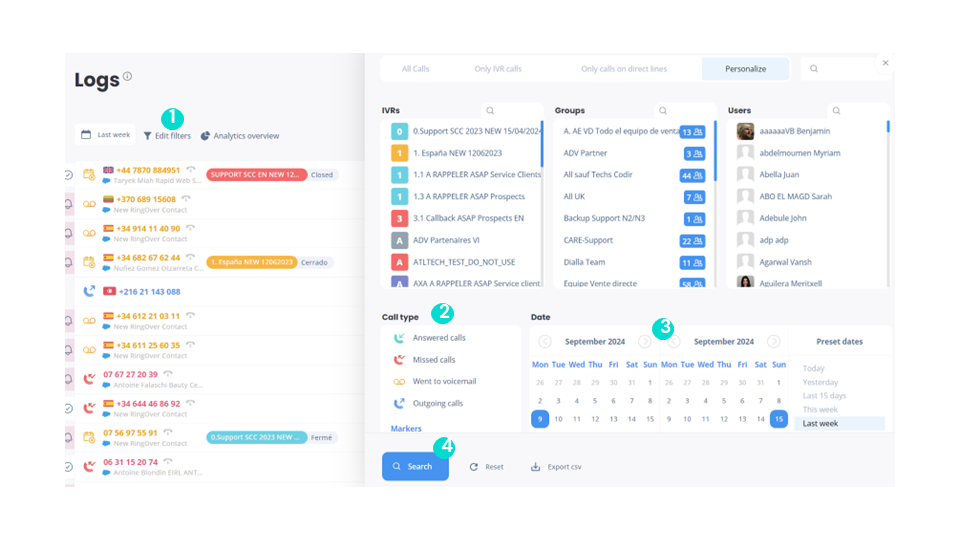
Dashboard access
Call filters - Call types
smart business advancedYou can choose which type of call to display:
Dashboard access
Call filters - By country
business advancedYou can filter by country
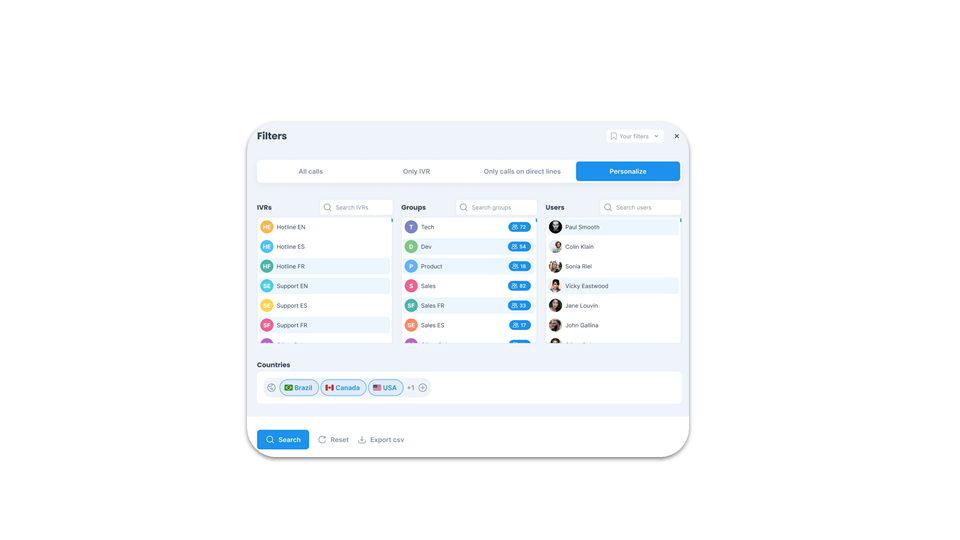
Dashboard access
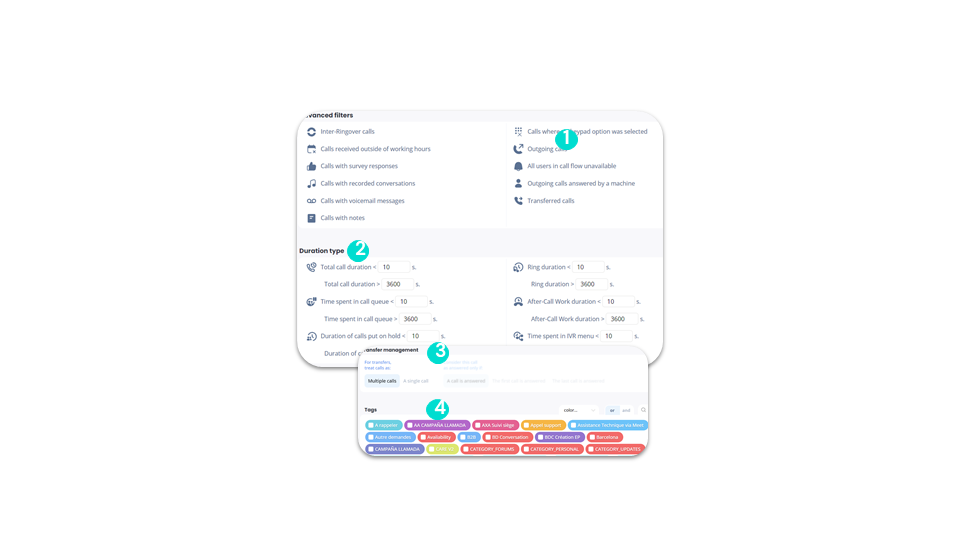
Call filters - Advanced filters, duration type & tags
smart business advancedThen you can:
Dashboard access
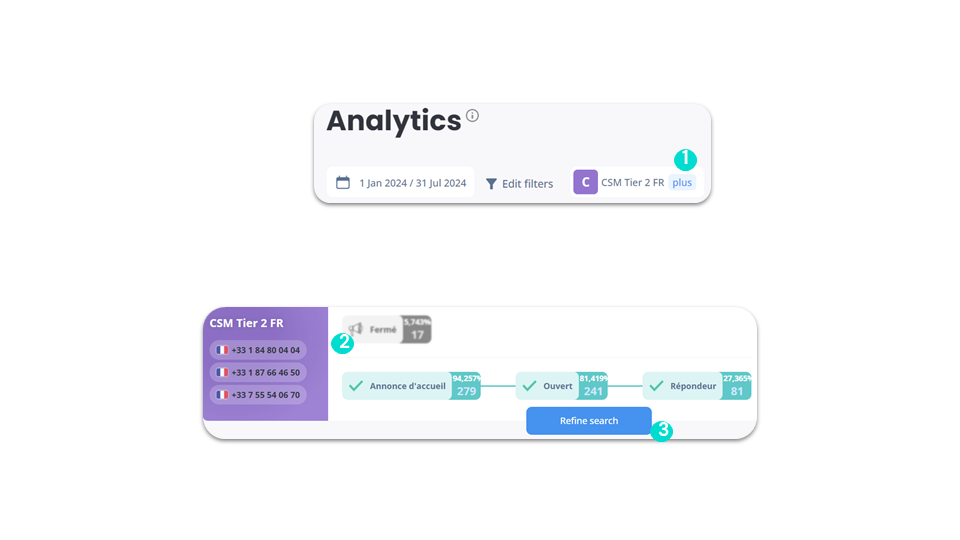
Call filters - IVR
business advancedYou can also refine your search by IVR:
Dashboard access
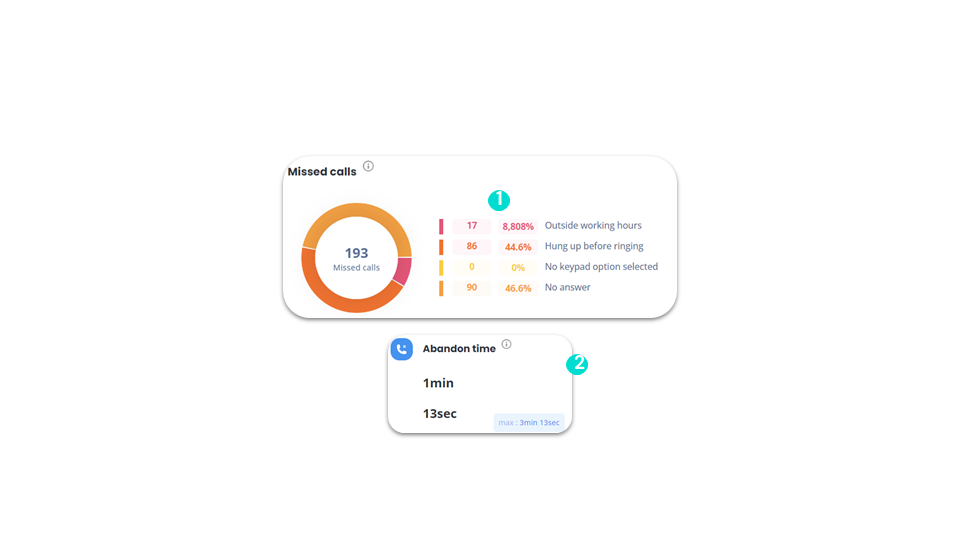
Call filters - IVR missed calls
business advancedIf you choose to display only the call data of a IVR, 3 types of additional data will be proposed to you:
Dashboard access
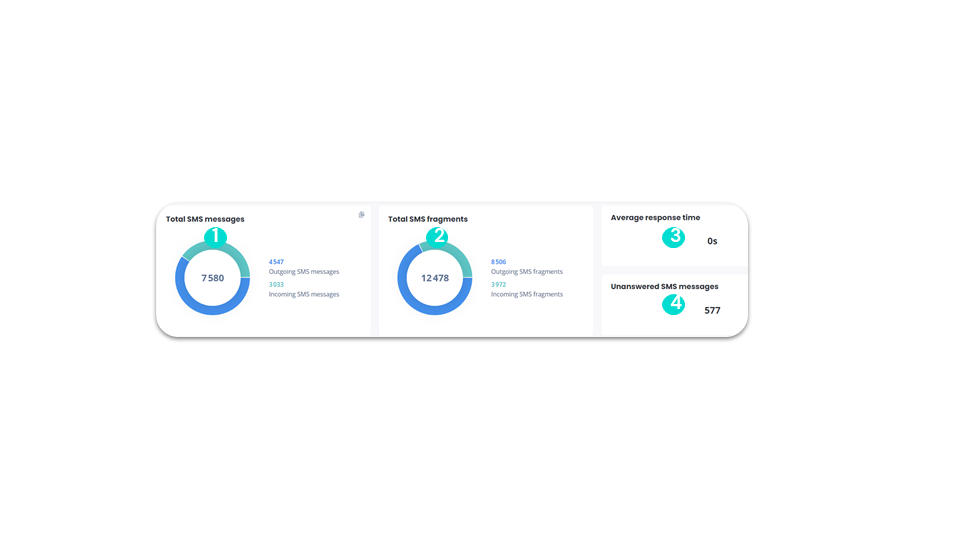
SMS statistics - Data
business advancedYou can view all your SMS statistics:
Dashboard access
SMS statistics - History
business advanced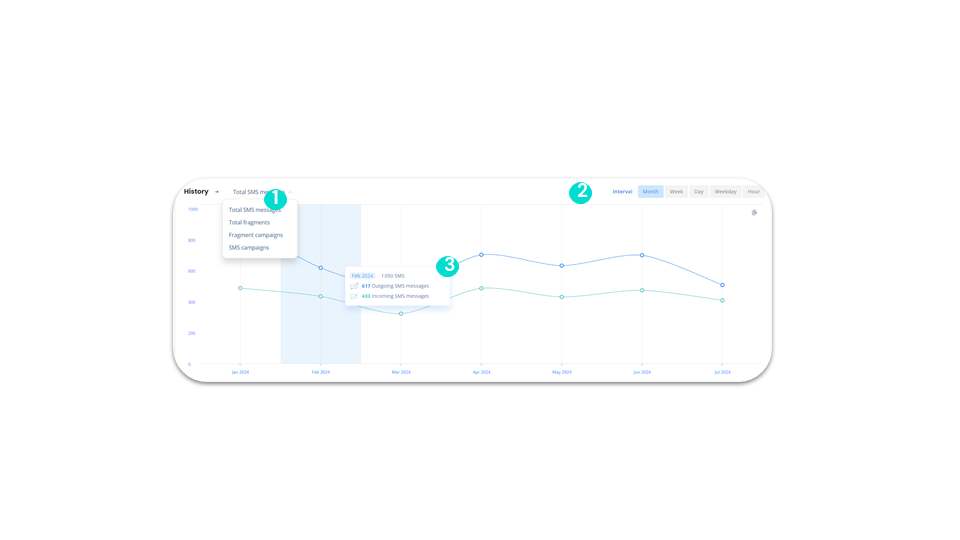
Dashboard access
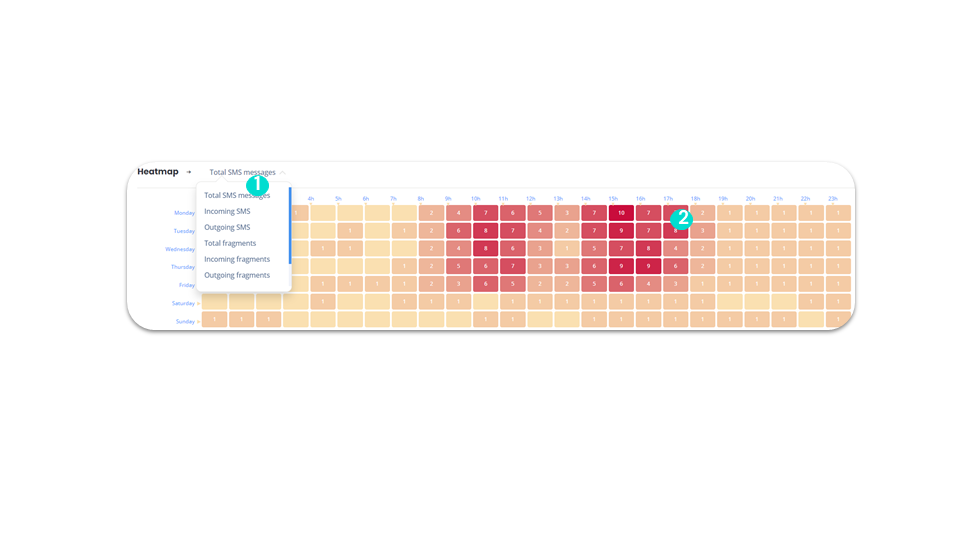
SMS statistics - Heatmap
business advancedAs with calls, we also have the Heatmap for SMS:
Dashboard access
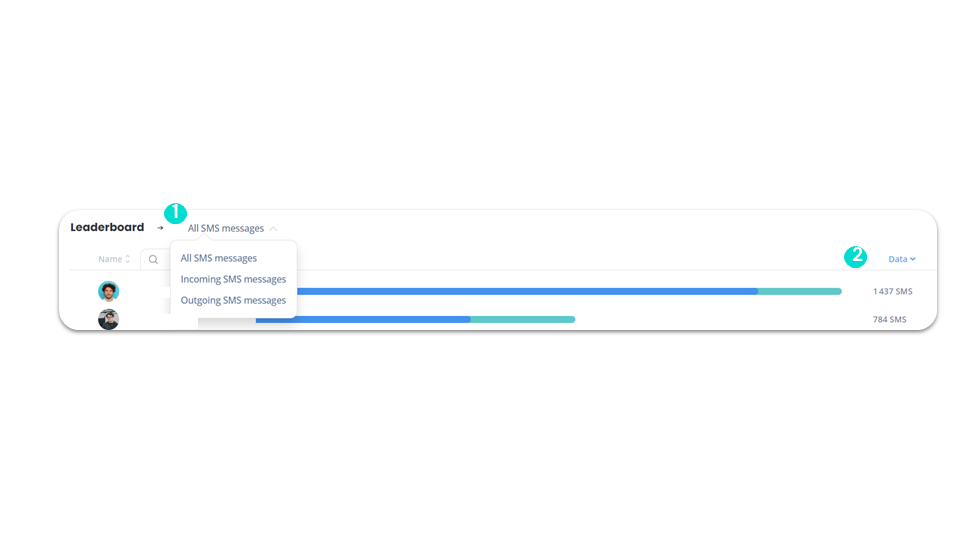
SMS statistics - Leaderboard
business advancedOn the Leaderboard, you can:
Dashboard access
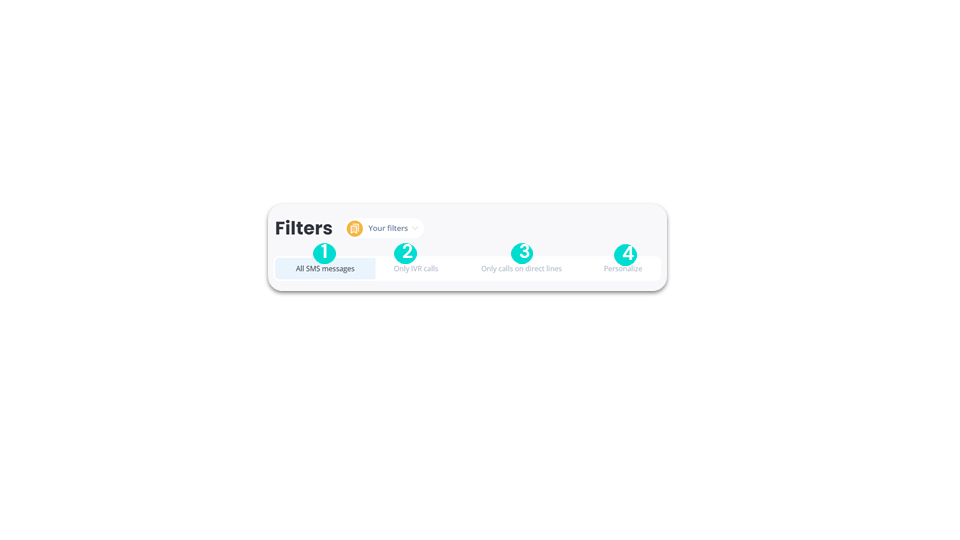
SMS filters
business advancedYou can filter your SMS data:
Dashboard access
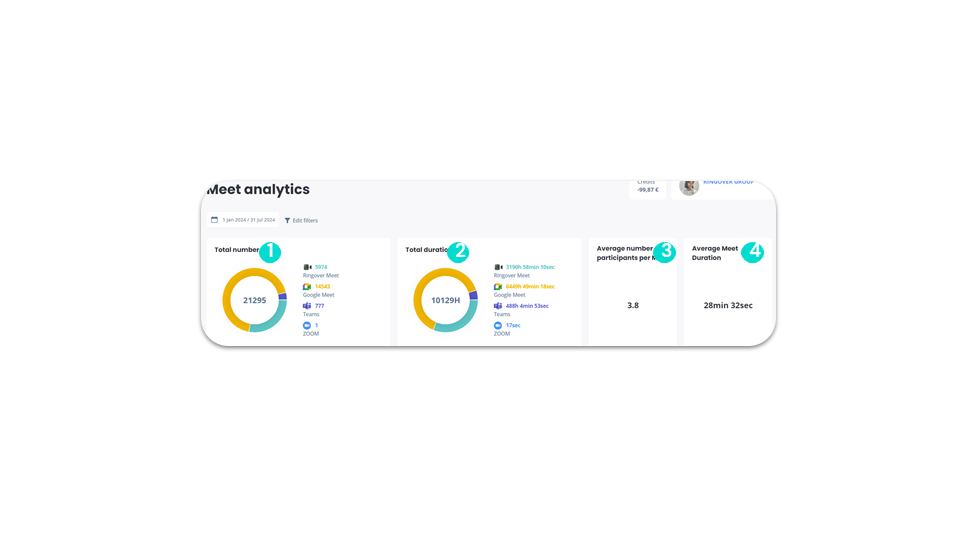
Meet statistics – Data
business advancedYou can view all your meet statistics:
Dashboard access
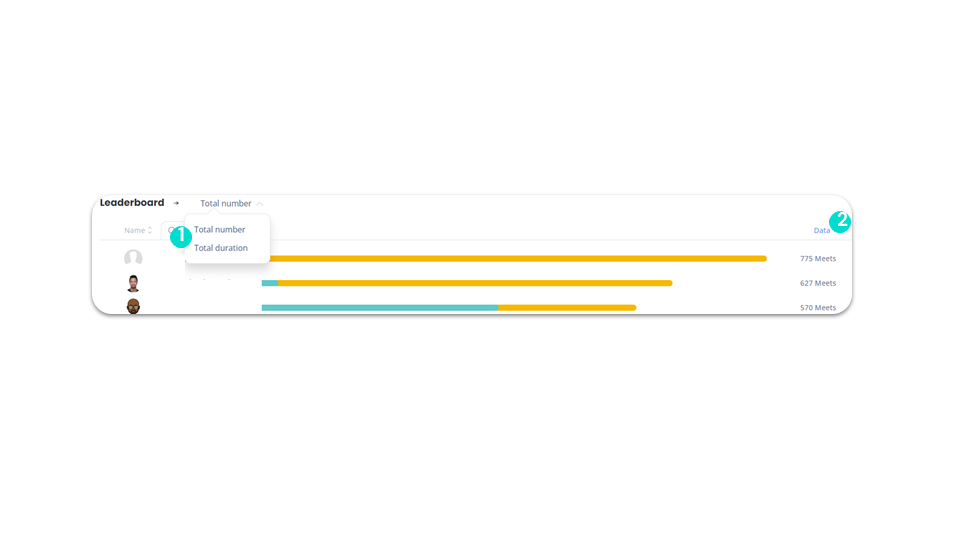
Meet statistics - Leaderboard
business advancedThe Meet statistics leaderboard lets you:
Dashboard access
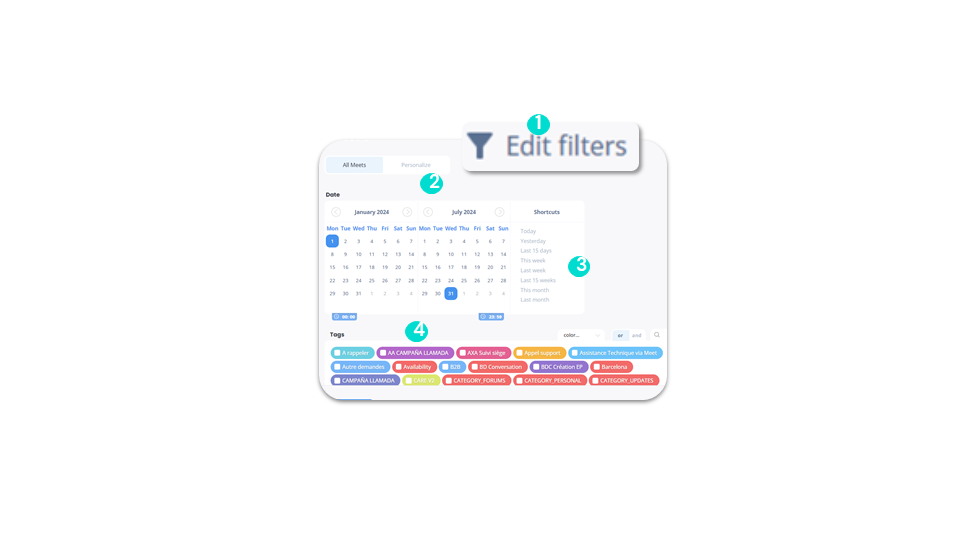
Meet filters
business advancedYou can filter your meets data to display activity according to the tool (Ringover, Teams, Zoom and Google):
Dashboard access
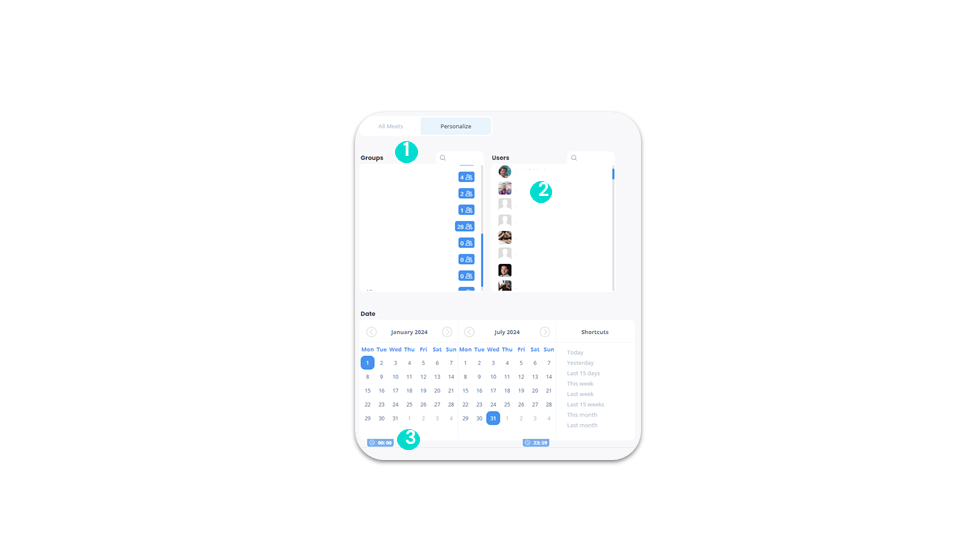
Meet filters - “Personalize” option
business advancedYou can filter your meet data by customizing it:
Dashboard access
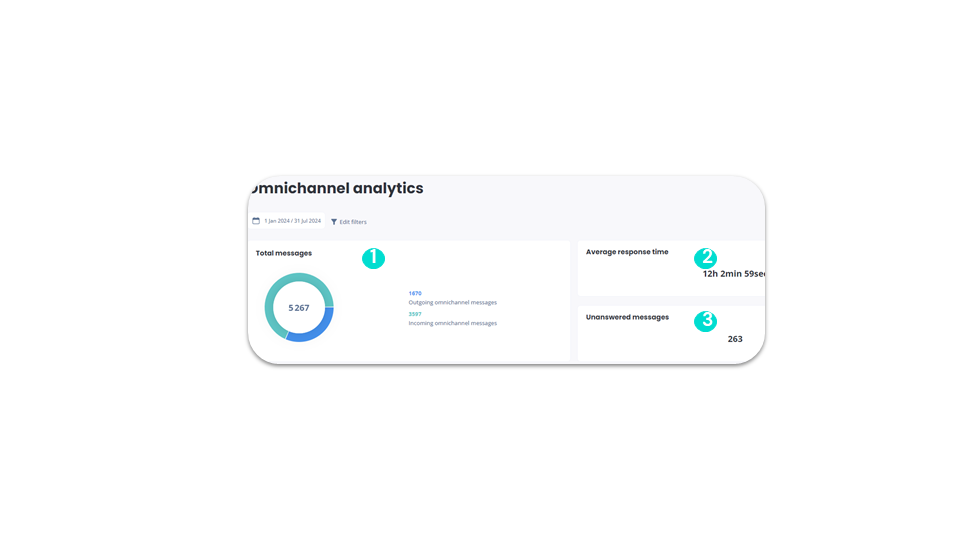
Omnichannel statistics
add-on business advancedOn omnichannel statistics, you can see:
Dashboard access
Omnichannel statistics - History
add-on business advanced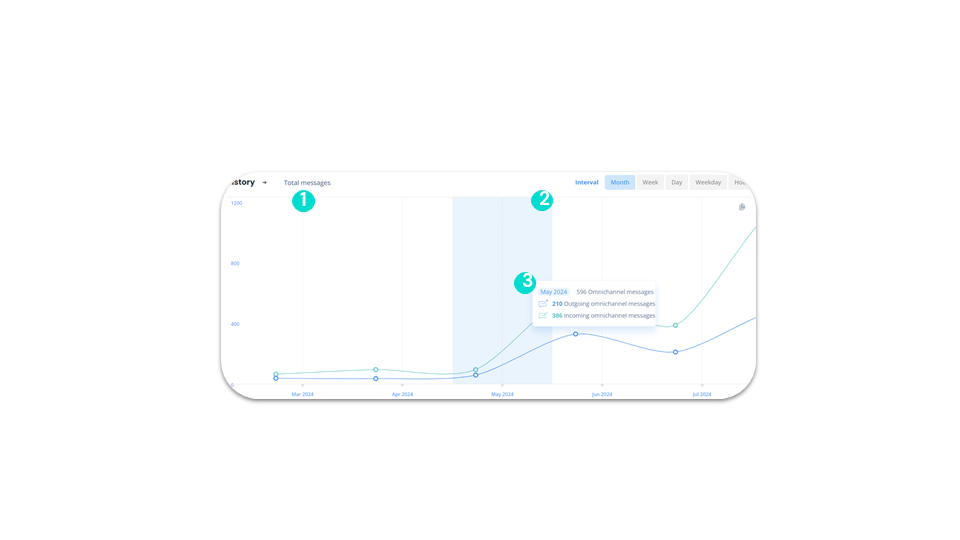
Dashboard access
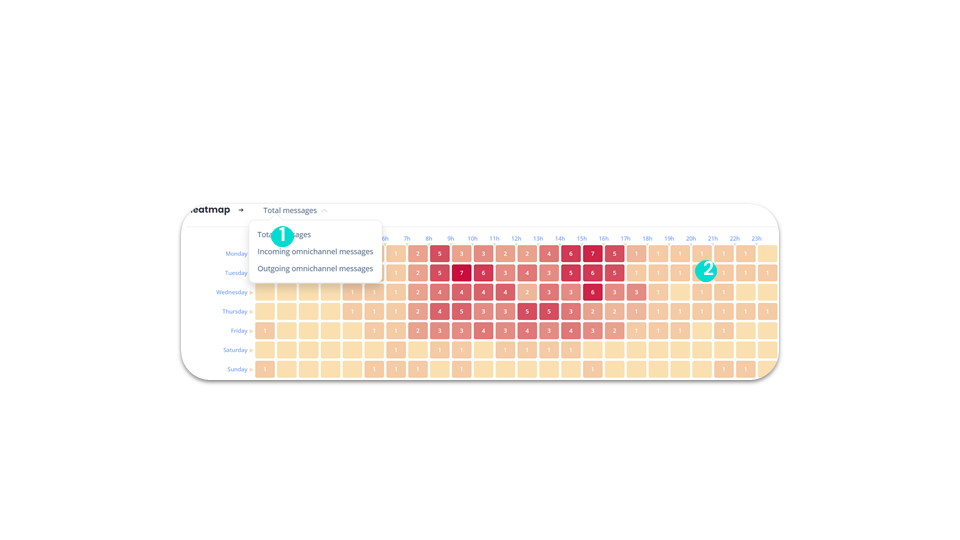
Omnichannel statistics - Heatmap
add-on business advancedAs for calls, we have the Heatmap for omnichannel messages:
Dashboard access
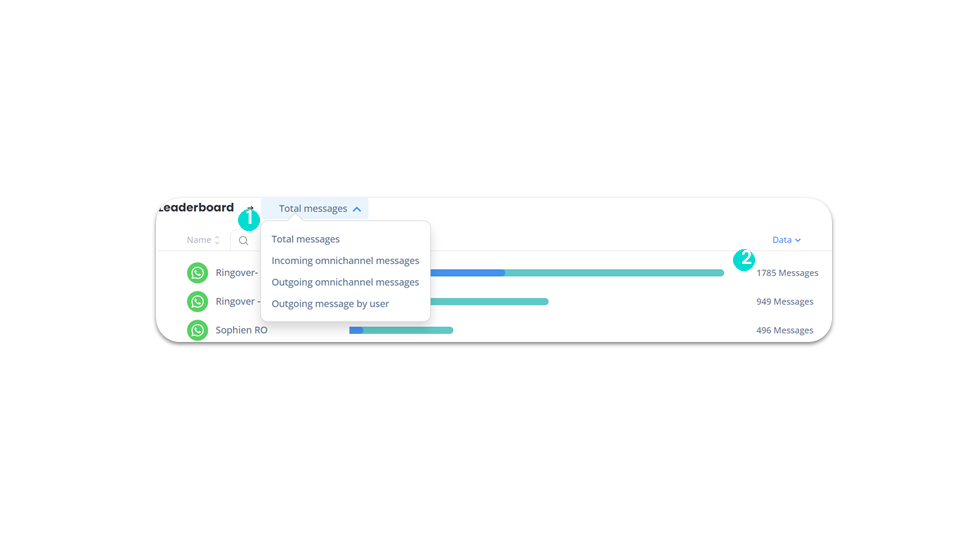
Omnichannel Statistics - Leaderboard
add-on business advancedThe omnichannel statistics leaderboard allows you to:
Dashboard access
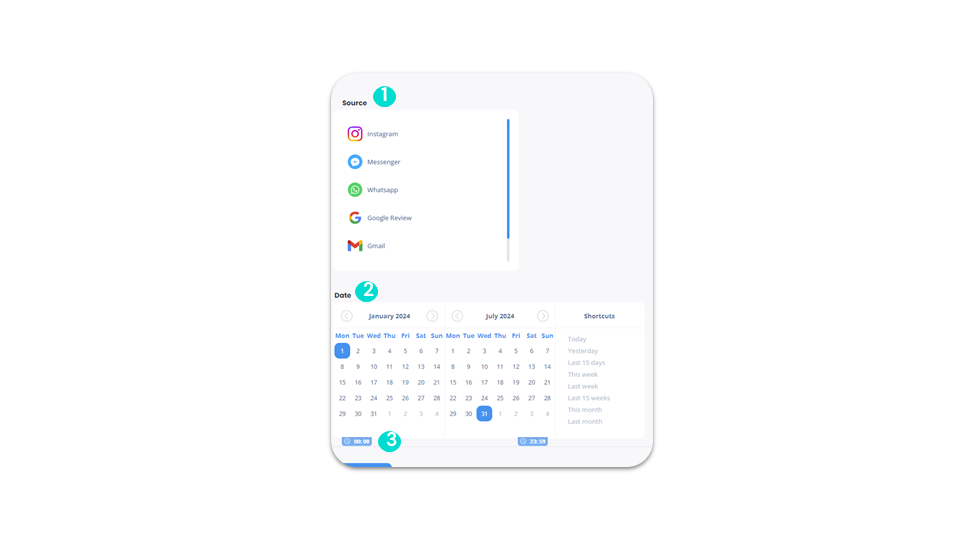
Omnichannel filters
add-on business advancedAfter clicking on “Modify filters”:
Dashboard access
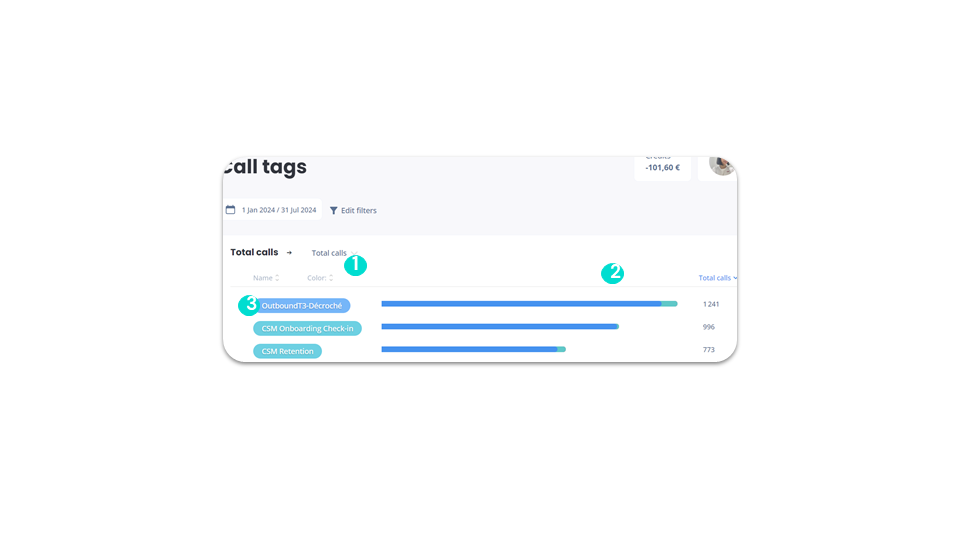
Tag statistics
business advancedYou can then view all your tag statistics, including:
Dashboard access
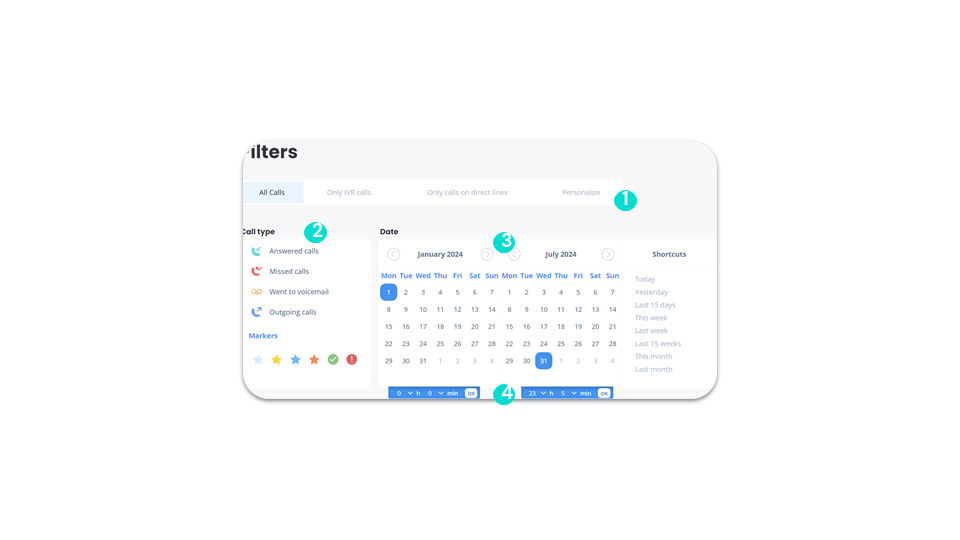
Tag filters
business advancedAfter clicking on “Modify filters”:
Dashboard access
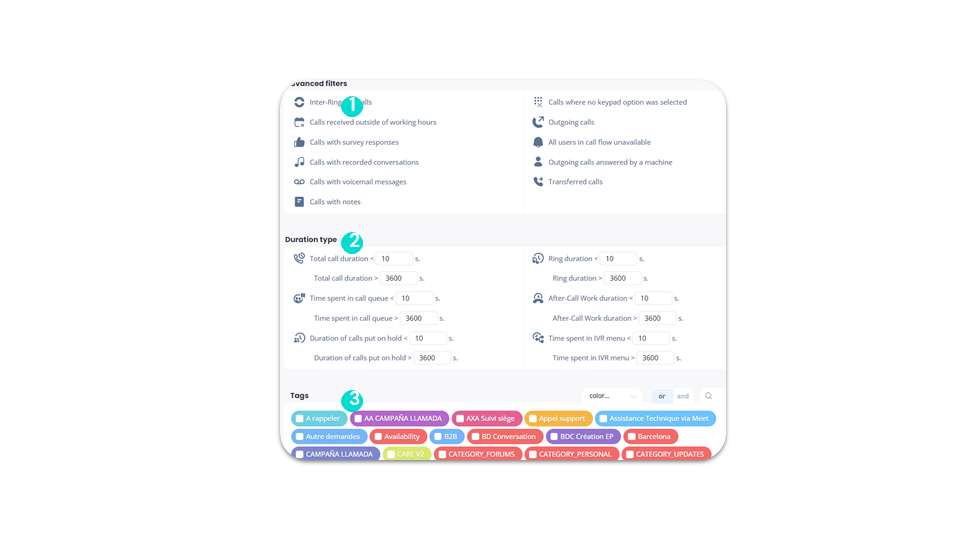
Tag filters - Advanced filters, duration type and tags
business advancedThen you can:
Dashboard access
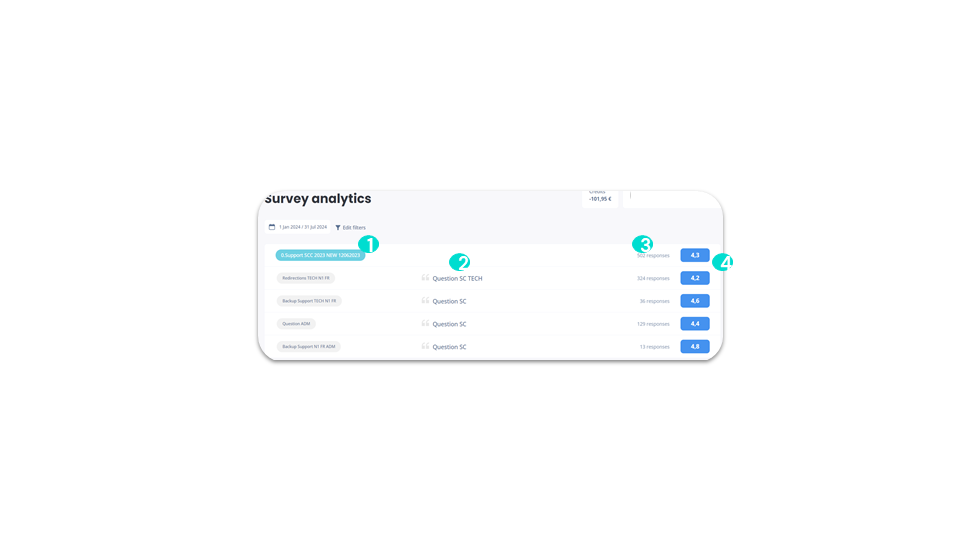
Survey statistics
business advancedIn the survey statistics, the following information is displayed:
Dashboard access
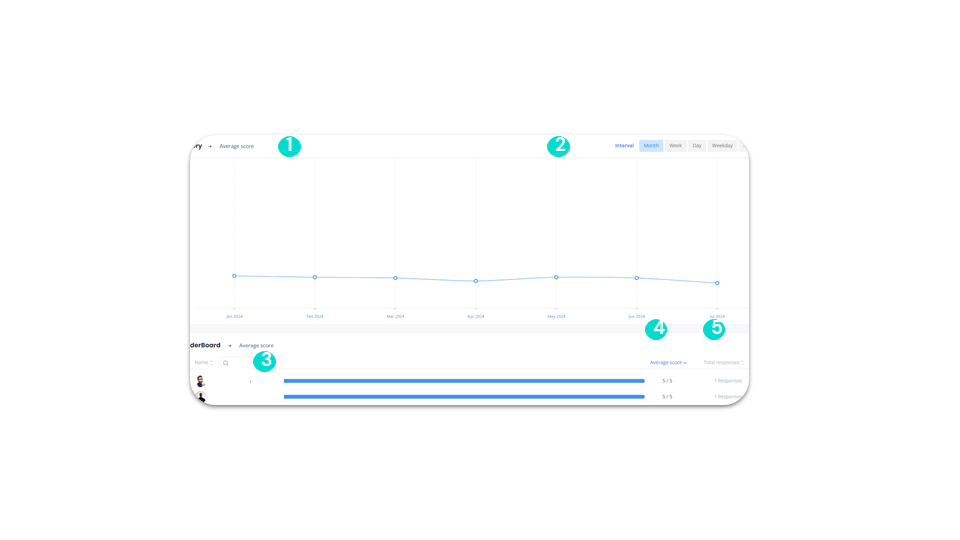
Survey statistics - History
business advancedHistory allows you to:
In the Leaderboard, we have:
Dashboard access
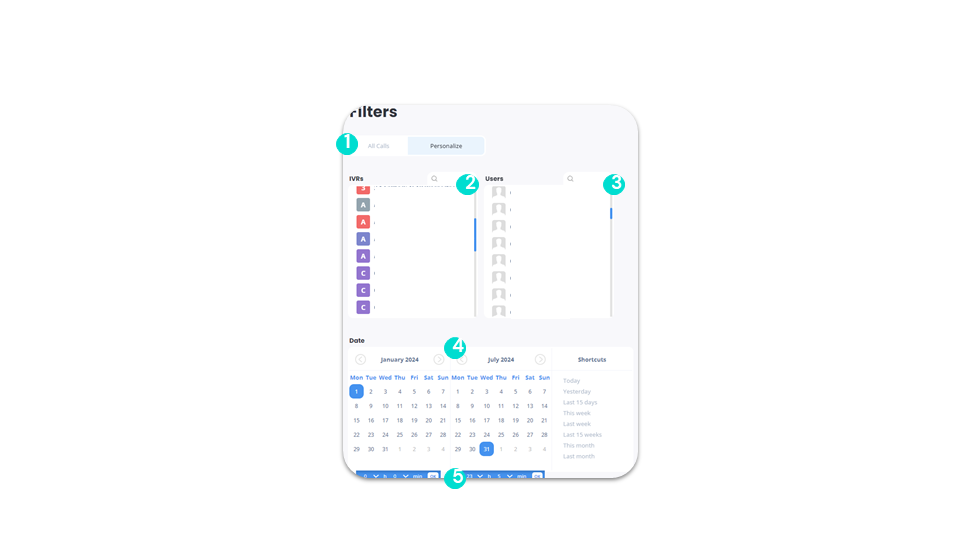
Survey filters
business advancedSurvey filters allow you to:
Dashboard access
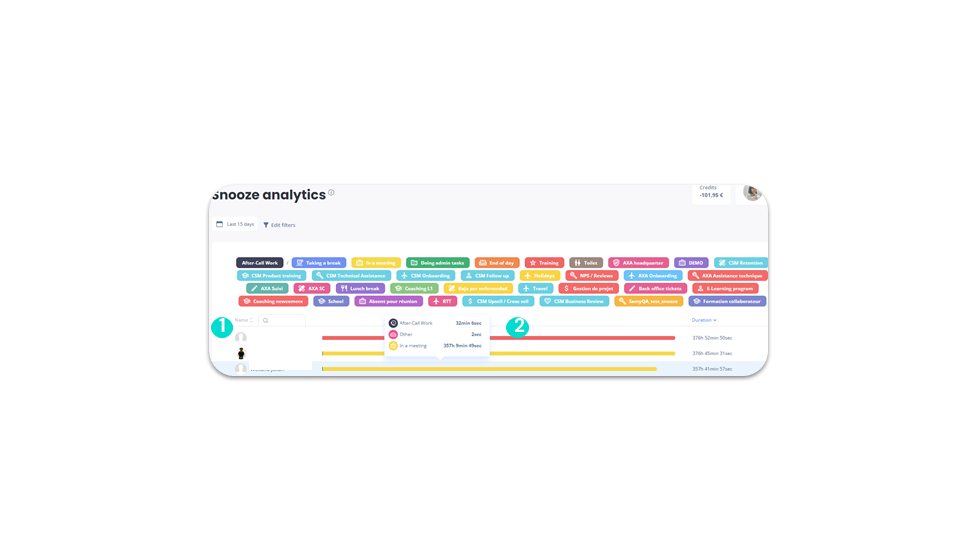
Statistics - Snooze
business advancedYou can use Snooze to disable interruptions to your Ringover account. This mode allows you to mute the sound and block calls and messages so as not to be disturbed.
Snooze statistics allow you to:
Dashboard access
Filters - Snooze
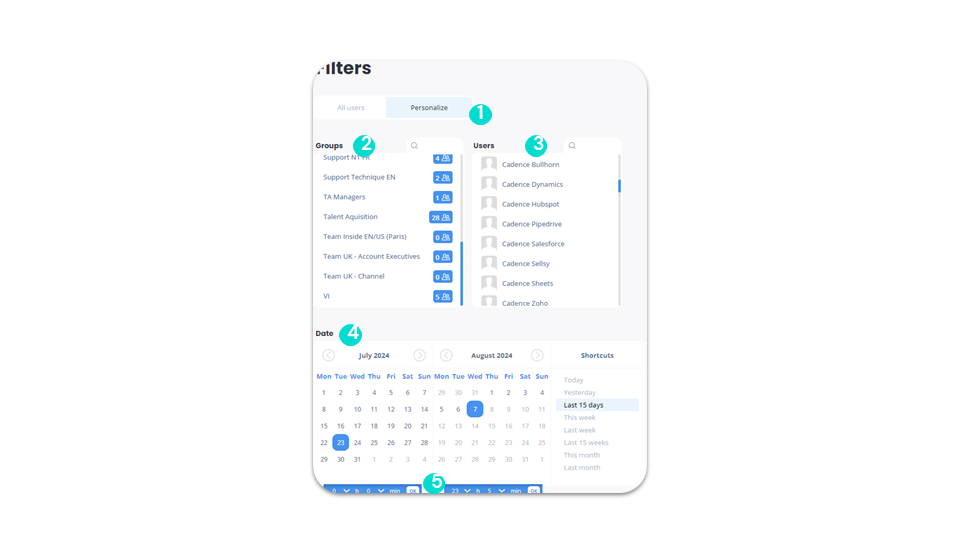
business advancedSnooze filters allow you to:
Dashboard access
Statistics - Incoming call
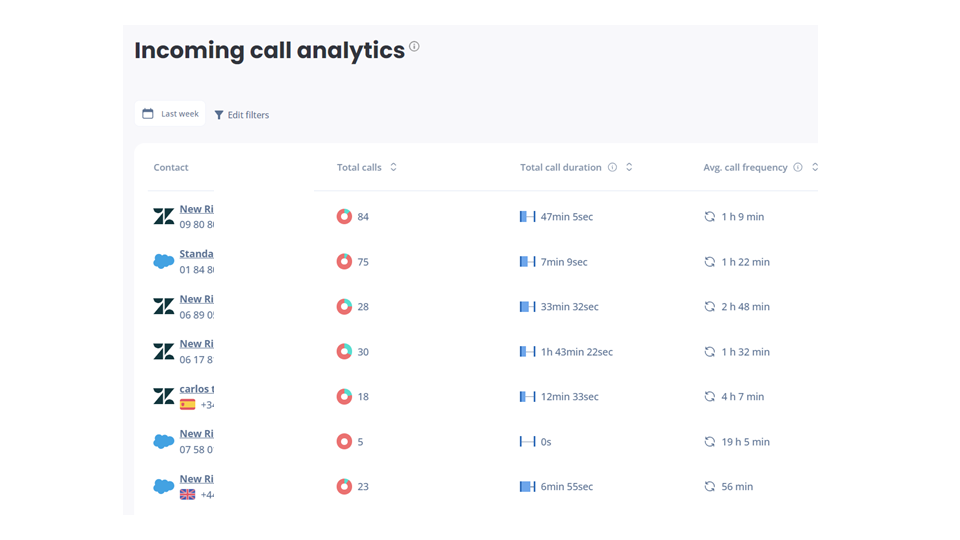
business advancedYou can see:
- Customer details to include information on each customer number that contacts us
- Total number of calls made to Ringover agents
- How many of these were answered and how many were not
- Length of conversation with this contact (total, minimum, maximum, average)
- Main beacons used for this contact
- Main agents who responded to this contact
- Ratio of calls received to calls transferred for this contact
- Recall frequency for this contact (min, max, avg)
Dashboard access
Statistics - Geographic
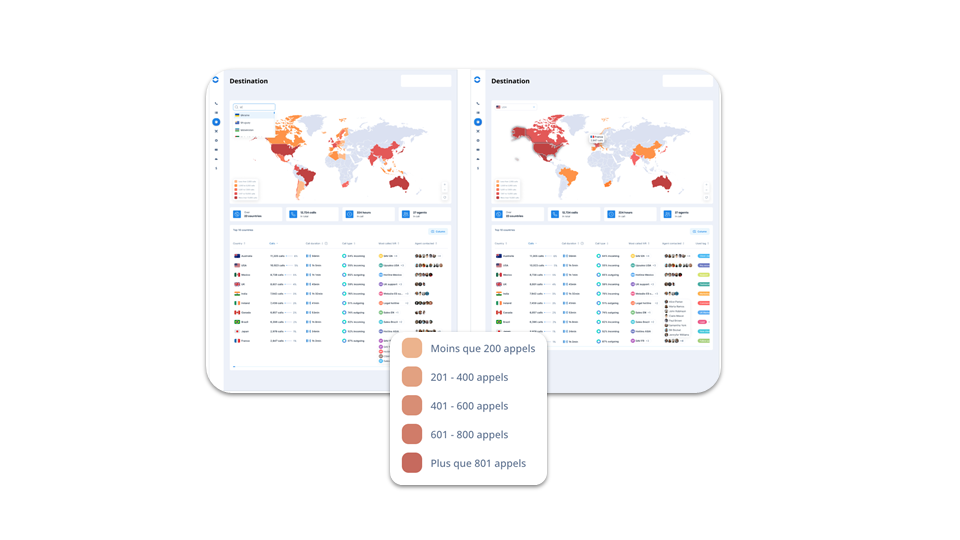
business advancedTo clearly visualize the origin and destination of calls, you have a map.
The map allows you to see call flows, and a table shows detailed statistics according to number code. These are only the 10 most frequently called countries.
The area receiving the most calls is highlighted in dark red on the map.
Login and use: Omnichannel
Requirements
add-on business advanced💡An Add-on is an extension designed for Ringover that extends its capabilities beyond the basic features, allowing for a wider variety of features and options.
💡This Add-on allows you to connect different communication channels to Ringover, saving time as everything is centralized on a single platform.
Requirements:
✅ This Add-on can only be activated by account administrators and/or super administrators.
Login and use: Omnichannel
Activating the Omnichannel Add-On
add-on business advancedTo activate this Add-on:
To go further, please visit our help center: How to connect and use your Omnichannel Add-on
Login and use: Omnichannel
Integrating WhatsApp
add-on business advancedAfter subscribing to our “Omnichannel Communication” Add-on:
- Go to the Ringover Dashboard under Integrations.
- Search for WhatsApp.
- Select a verified Meta account.
- Create a WhatsApp Business account.
- Select or create a user.
- Verify numbers via call.
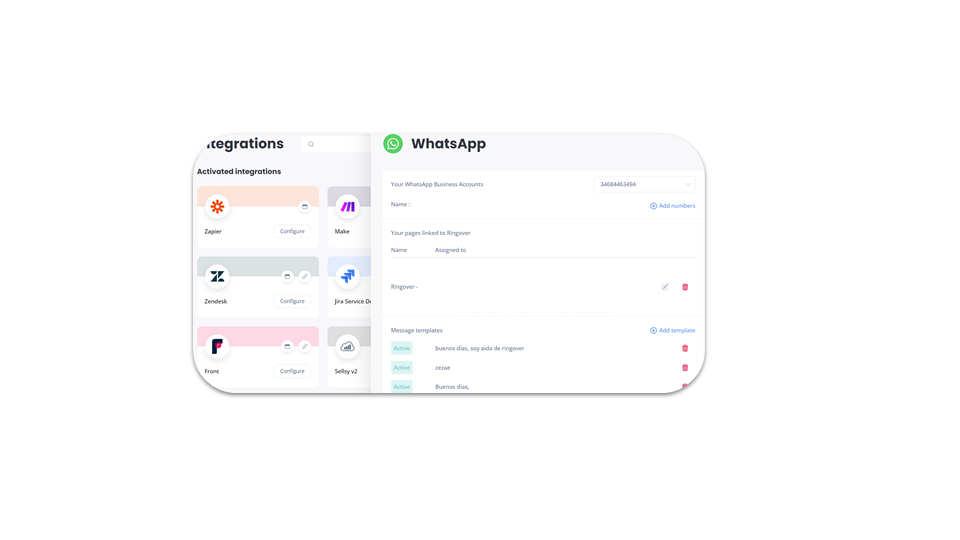
To go further, please visit our help center: How to connect and use your Omnichannel Add-on
Login and use: Omnichannel
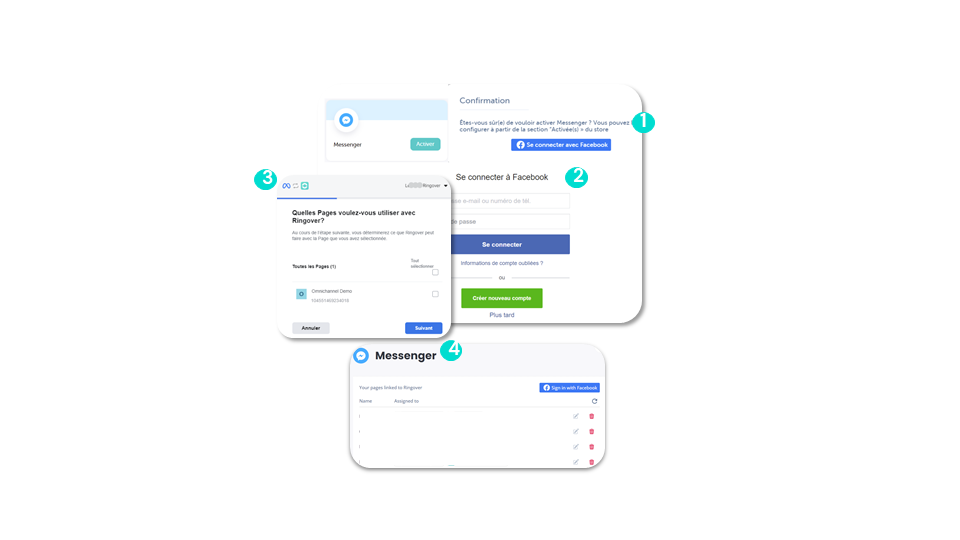
Facebook Messenger (1)
add-on business advancedTo complete this integration, go to your Dashboard.
Login and use: Omnichannel
Facebook Messenger (2)
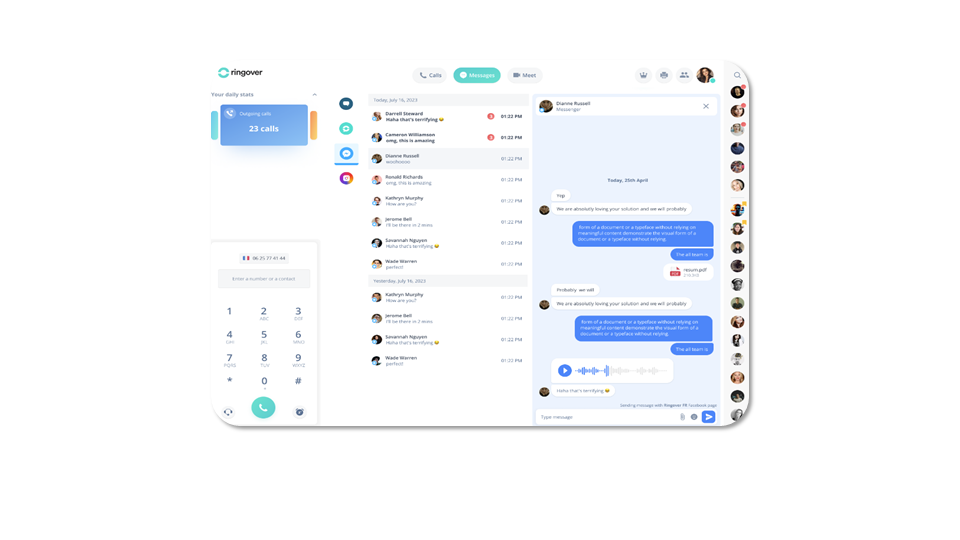
add-on business advancedUsing Messenger:
- Once the assignments are made, all messages sent to the connected pages will be received on your Web app in the messages section.
- Click on the Messenger icon and select the conversation.
Login and use: Omnichannel
Instagram (1)
add-on business advancedRequirements:
✅ Have a professional Facebook page and ensure you have switched your Instagram account to a professional account.
✅ Link your professional Instagram account to your Facebook page.
✅ Go through a simple authentication process without a code.
Login and use: Omnichannel
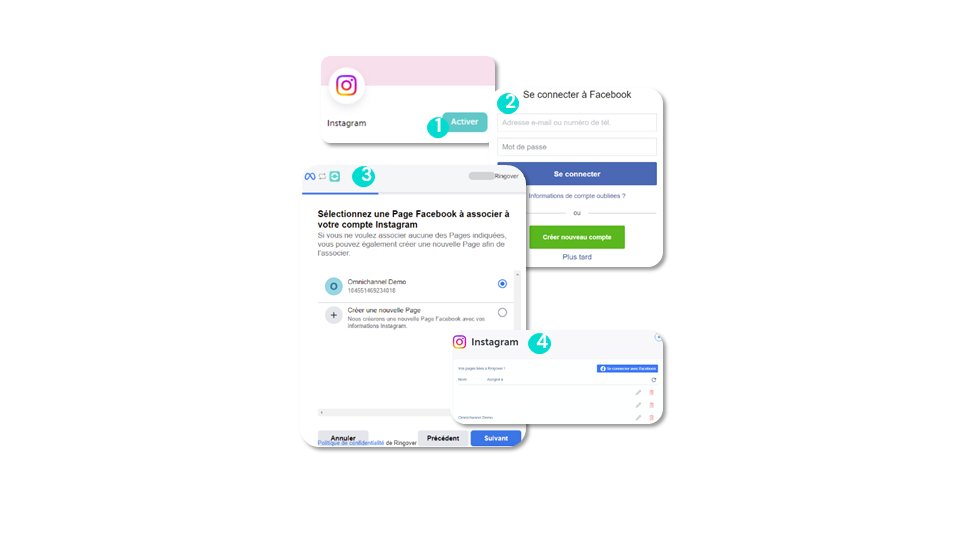
Instagram (2)
add-on business advancedTo complete this integration, go to your Dashboard:
Login and use: Omnichannel
Instagram (3)
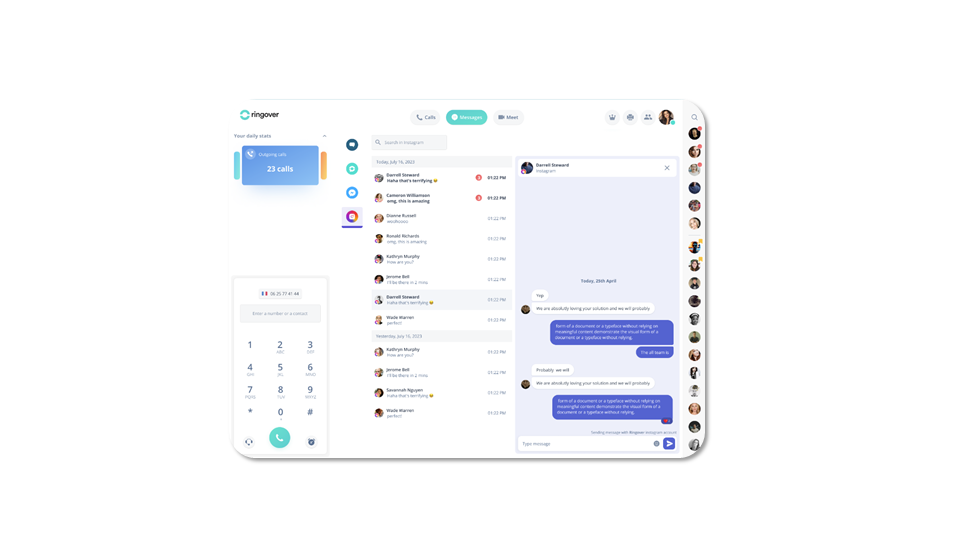
add-on business advancedUsing Instagram:
Just like on Messenger, the assigned agent will receive the Instagram notifications on their WebApp and will be able to answer them.
Login and use: Omnichannel
Google Review (1)
add-on business advancedRequirements:
✅ You need a certified Google Business account.
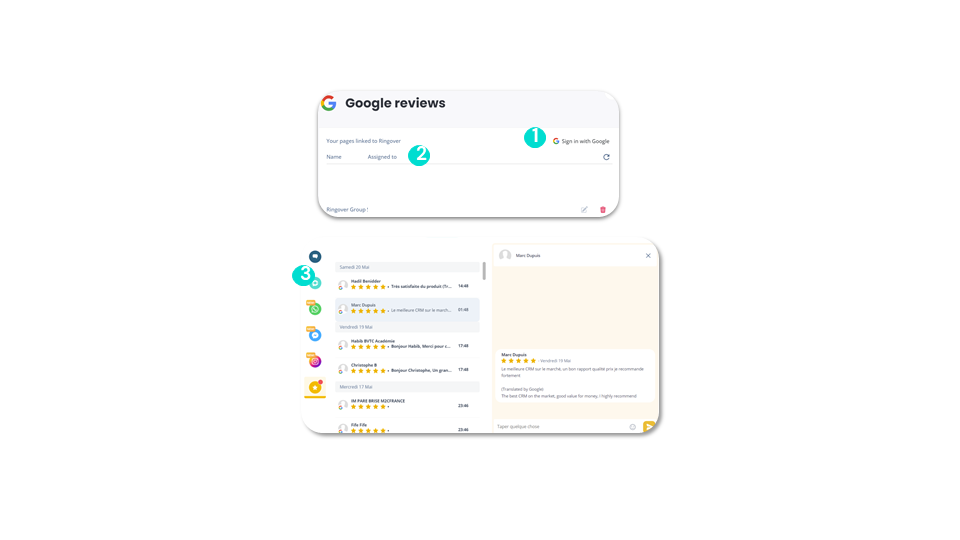
✅ To complete this integration: go to the Ringover Dashboard under Integrations and click on Activate in Google Review.
Login and use: Omnichannel
Google Review (2)
add-on business advancedResponding to reviews:
Login and use: Omnichannel
Outlook
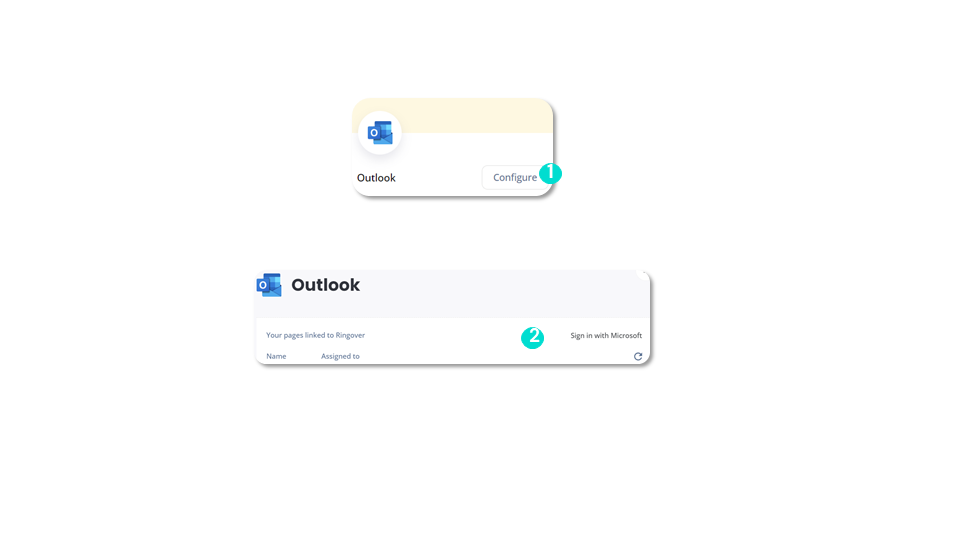
add-on business advancedTo complete this integration, go to your Dashboard. Then click on Integrations. Next, search for the Outlook integration and click Activate. Finally, confirm the activation.
Outlook is now active. To configure it:
Login and use: Omnichannel
WebApp
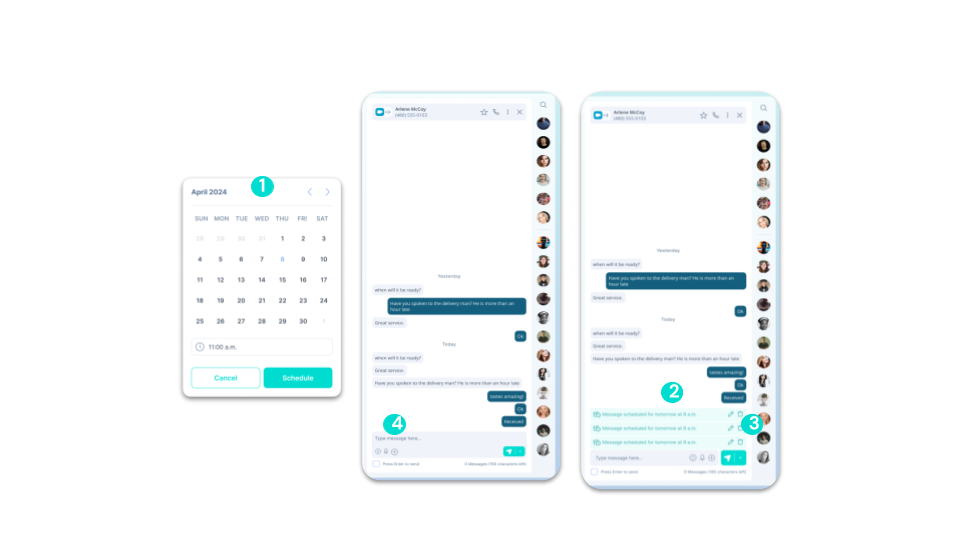
add-on business advanced✅ Available in all channels (SMS, WhatsApp, etc.).
⛔ Not available for one-way messages.
Login and use: Omnichannel
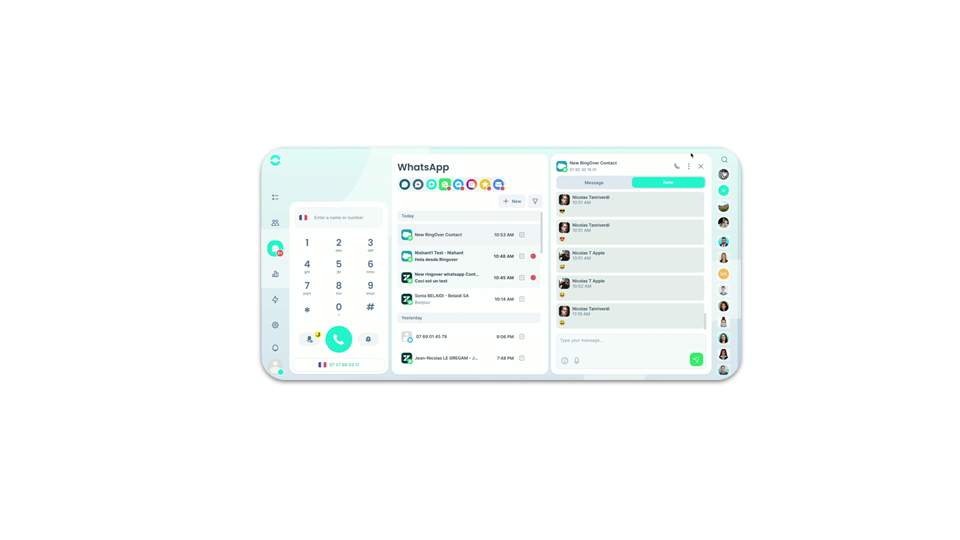
Internal Notes for Omnichannel Messaging (except email)
add-on business advancedYou can add a note visible only to other internal users.
Add and configure a number
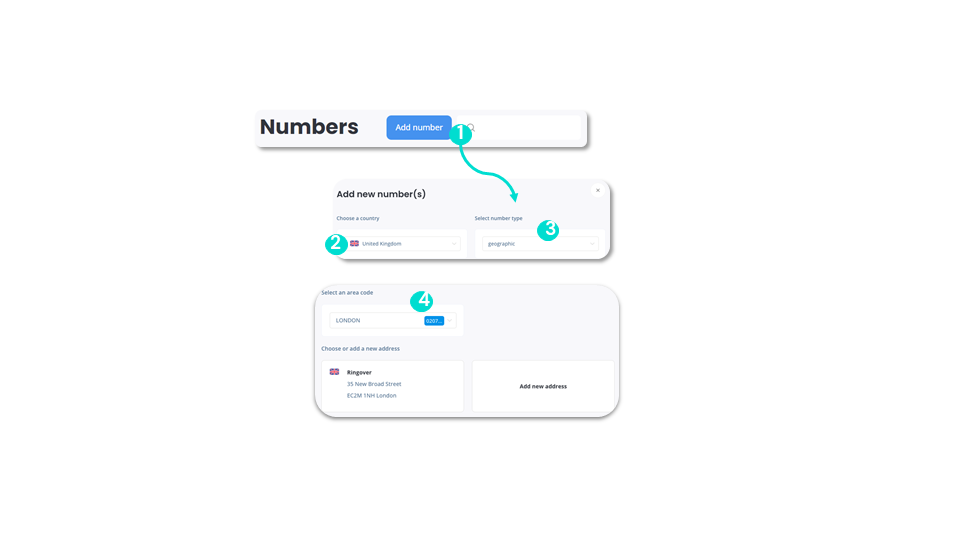
Add a number
smart business advancedGo to the “Numbers” section:
💡If the number is not available, please contact our dedicated team by e-mail at numbers@ringover.com
💡To obtain numbers in a specific locality, you must have an address in the city corresponding to the number
💡For example, if you want a number with a Madrid area code, you’ll need to enter an address in Madrid
Add and configure a number
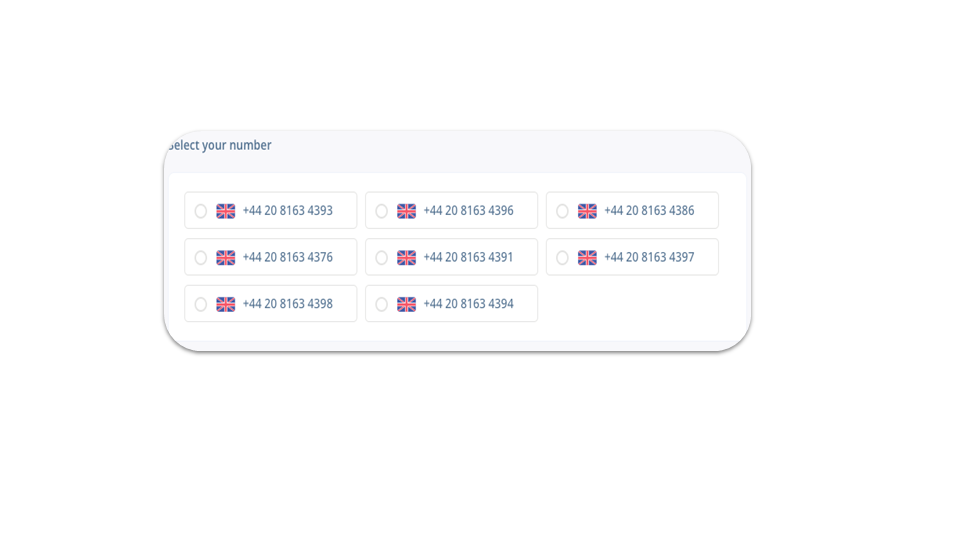
How to choose a number
smart business advancedHere’s how to choose a number:
Add and configure a number
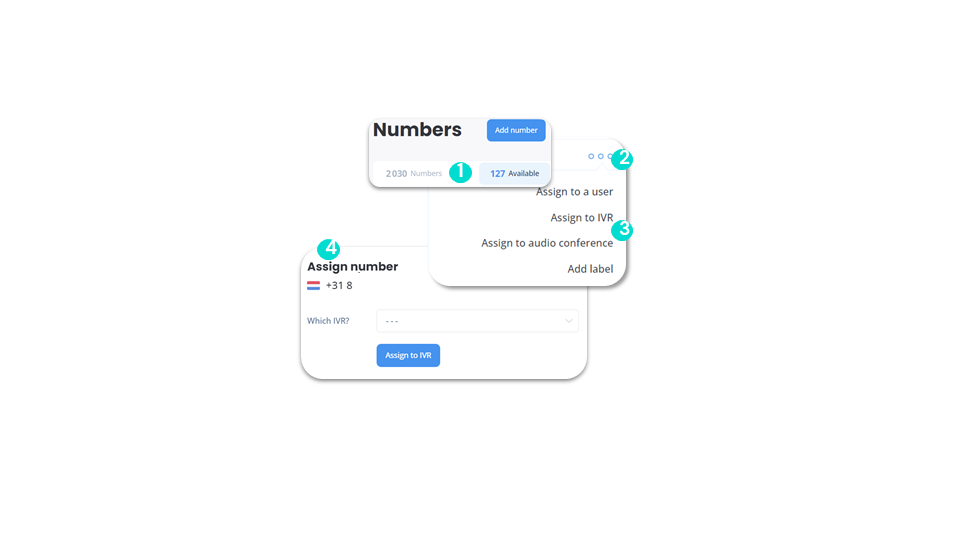
Assign a number
smart business advanced💡When an employee leaves, a number becomes free. The administrator must take steps to remove the number from this license in order to reassign it.
Keep your existing number
Portability
smart business advanced💡With the number portability option, keep your existing landline or cell phone number for your Ringover account.
💡Before creating your account and choosing a number, contact our customer service department directly at support@ringover.com or UK : +44 20 3808 5555 / US : +1 844 411 1221.
💡We’ll tell you what you need to send us: the portability mandate, your last phone bill and proof of identity. Upon receipt of the requested documents, your number will be ported to your Ringover account within 10 to 30 days, depending on the country. You’ll then be able to make international calls!.
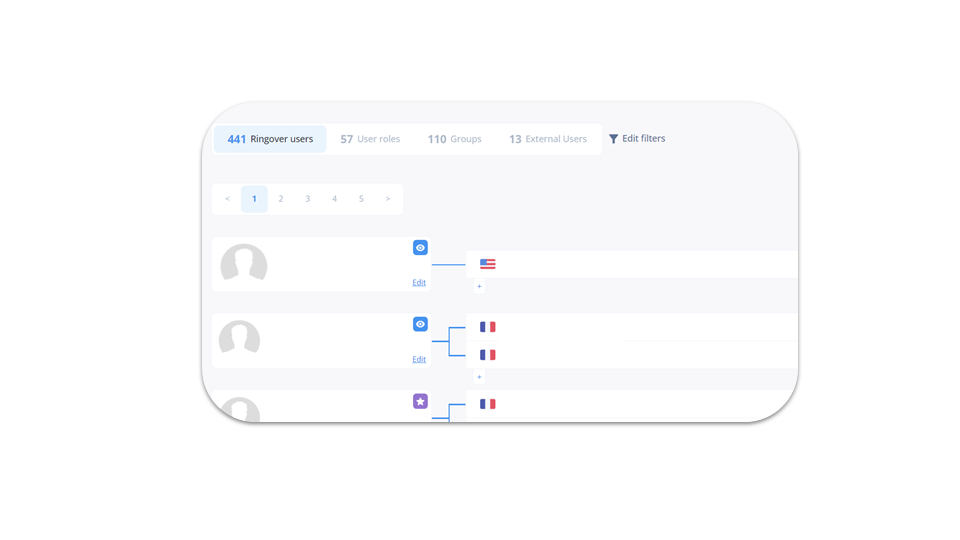
To go further, please visit our help center: Keeping your existing number
Managing users
Add a user
smart business advancedOnce you’ve created a number, go to “Users” in the “Configuration” menu.
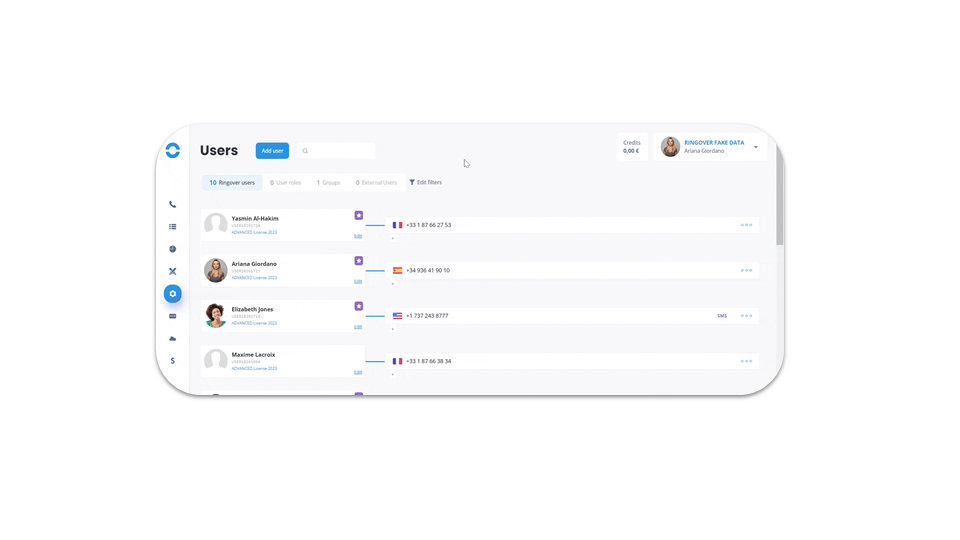
Managing users
Create a user group
smart business advancedFrom the “User” section:
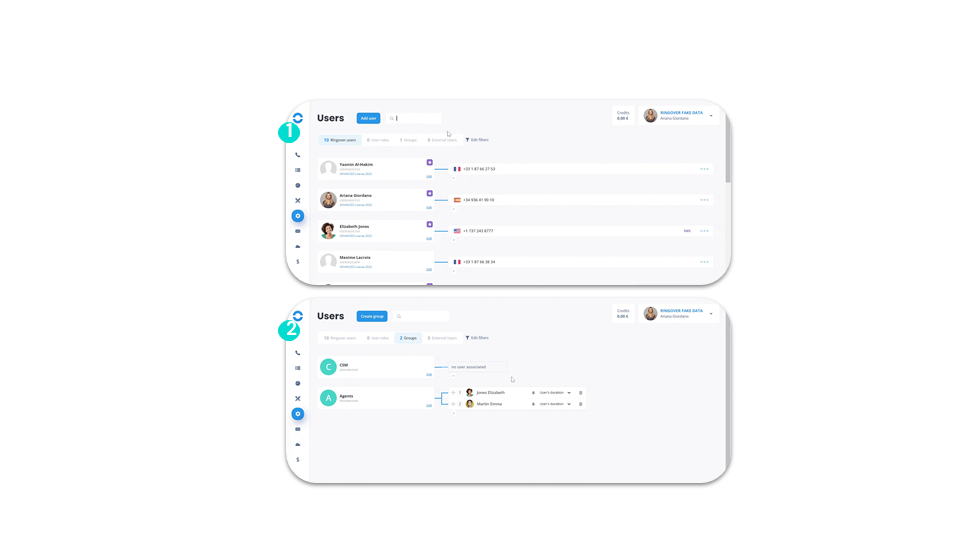
Managing users
Configure an user
smart business advancedTo configure a user, go to “Users” in the “Configuration” menu.
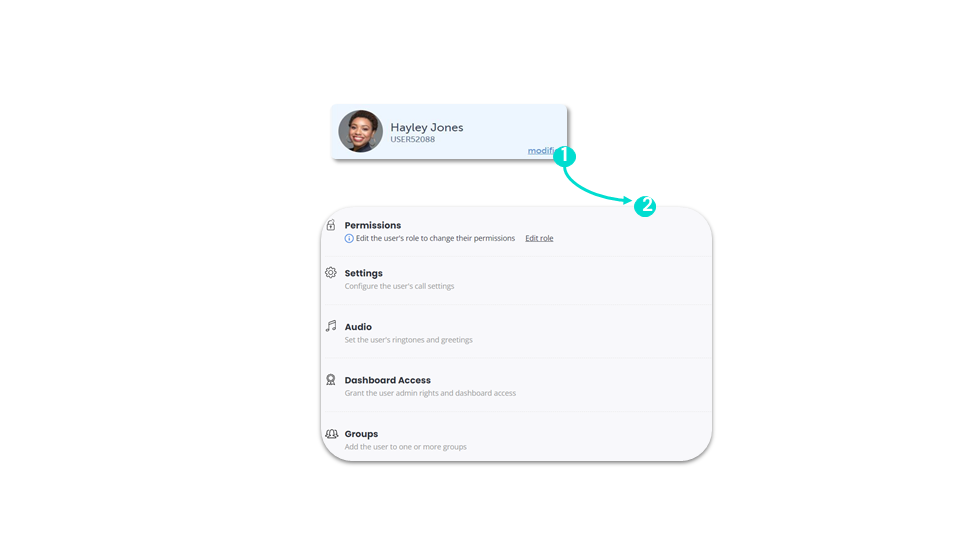
Managing users
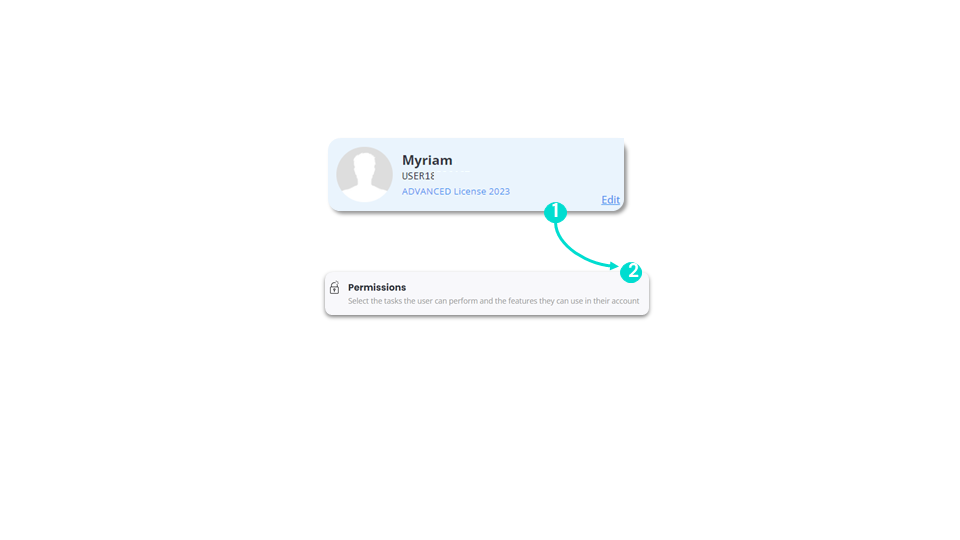
Managing permissions
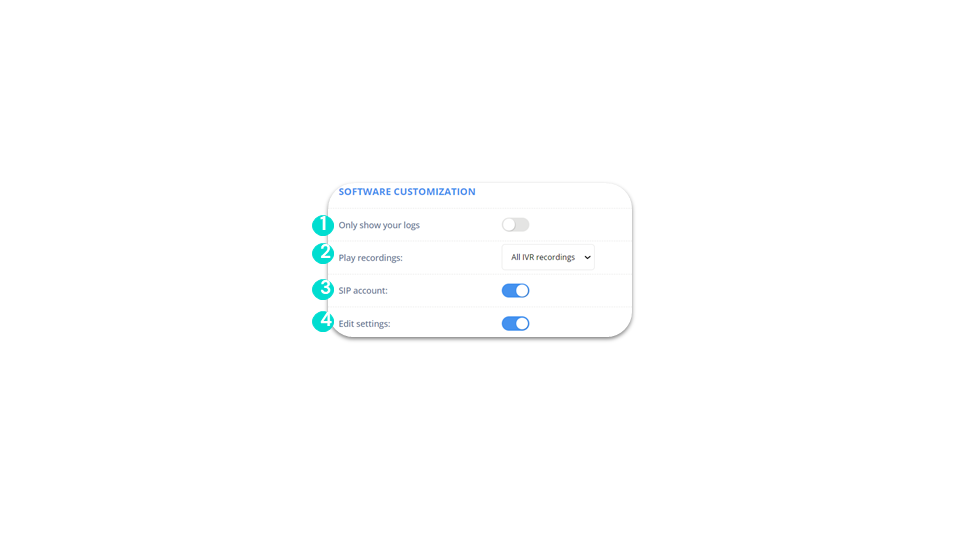
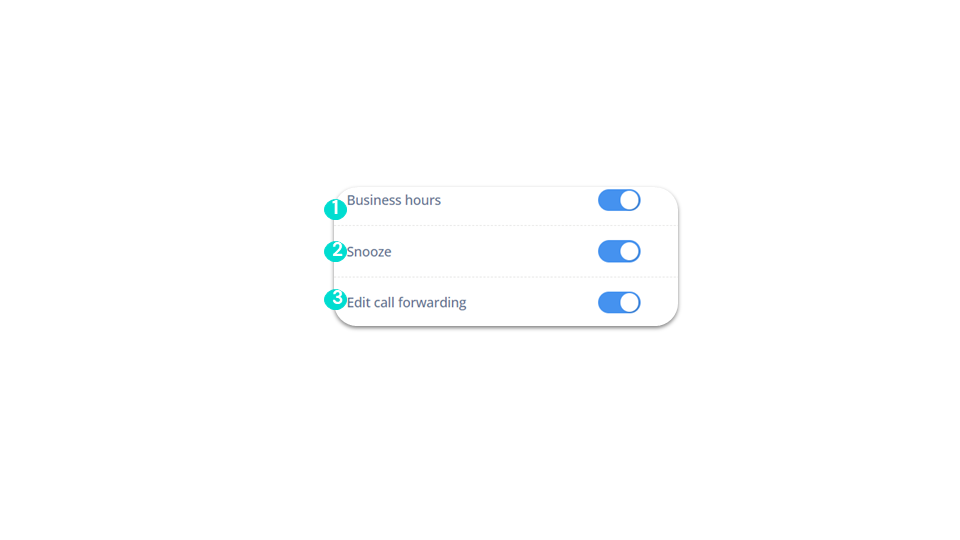
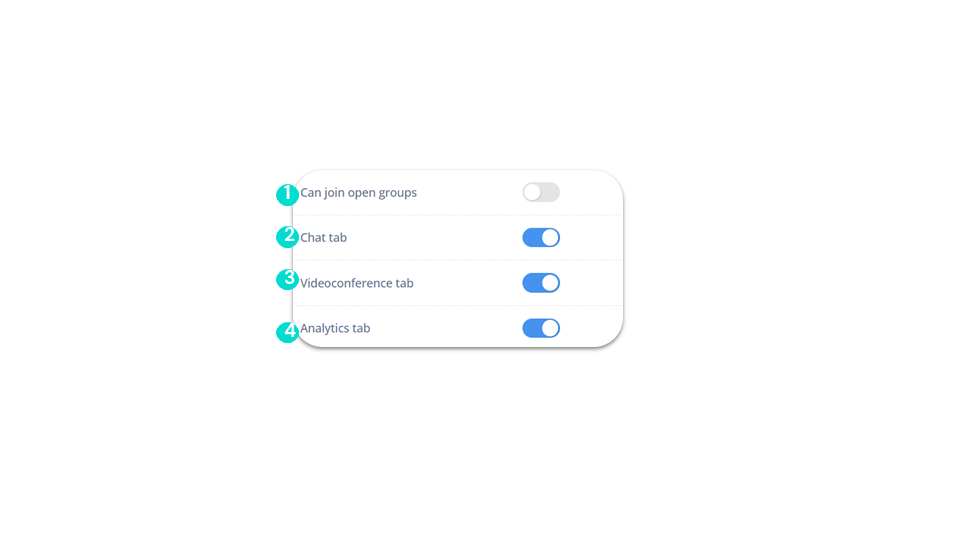
business advanced- Software personalization: authorize your team’s users to personalize their phone (schedule, snooze, etc.).
- Calls: set your users’ rights to their daily calls (tags, aftercall, outgoing number modification…).
- Recording and supervision: manage your users’ day-to-day supervision.
Software customization - 1/4
Managing users
Managing permissions
Software customization - 1/4
business
advanced
In the “Software customization” section, you have:
Software customization - 2/4
Managing users
Managing permissions
Software customization - 2/4
business
advanced
Software customization - 3/4
Managing users
Managing permissions
Software customization - 3/4
business
advanced
Software customization - 4/4
Managing users
Managing permissions
Software customization - 4/4
business
advanced
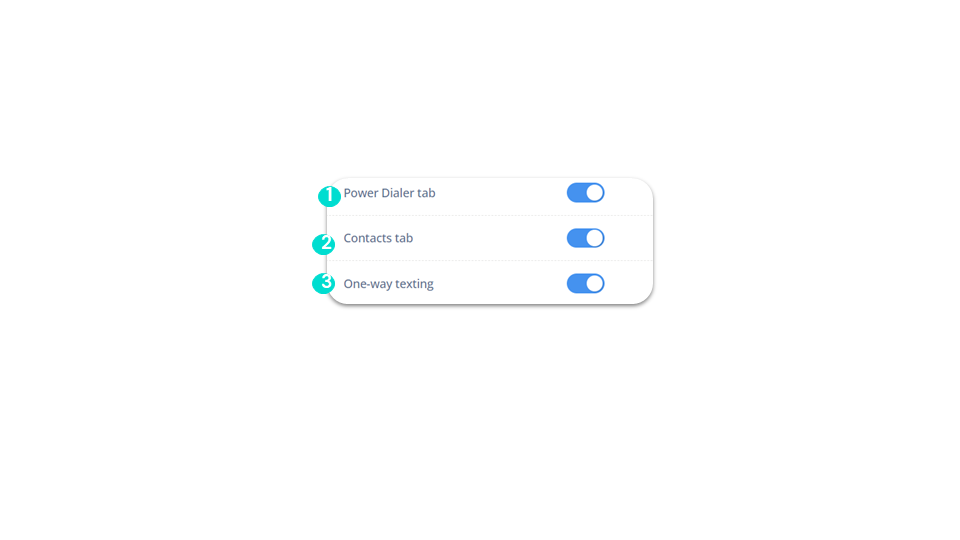
Managing users
Managing permissions
Calls - 1/3
business
advanced
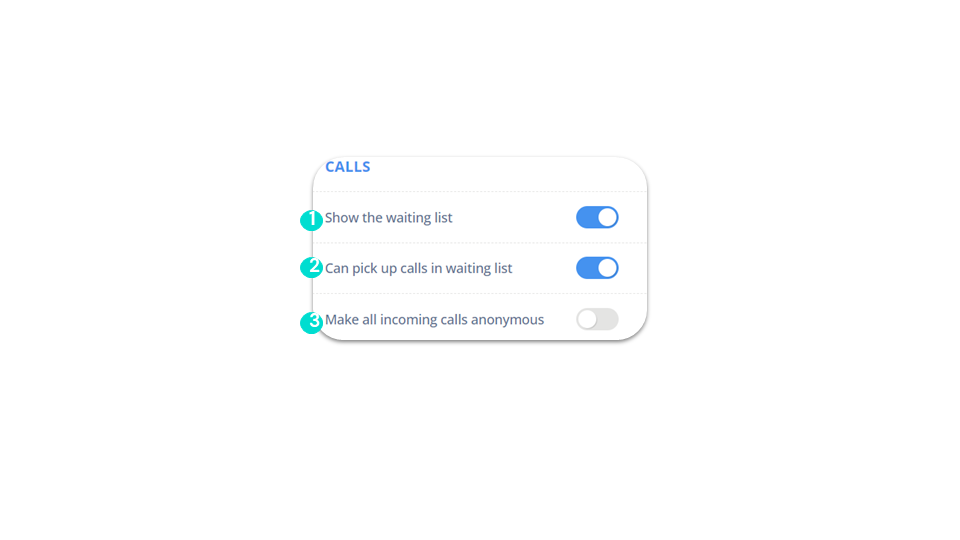
Managing users
Managing permissions
Calls - 2/3
business
advanced
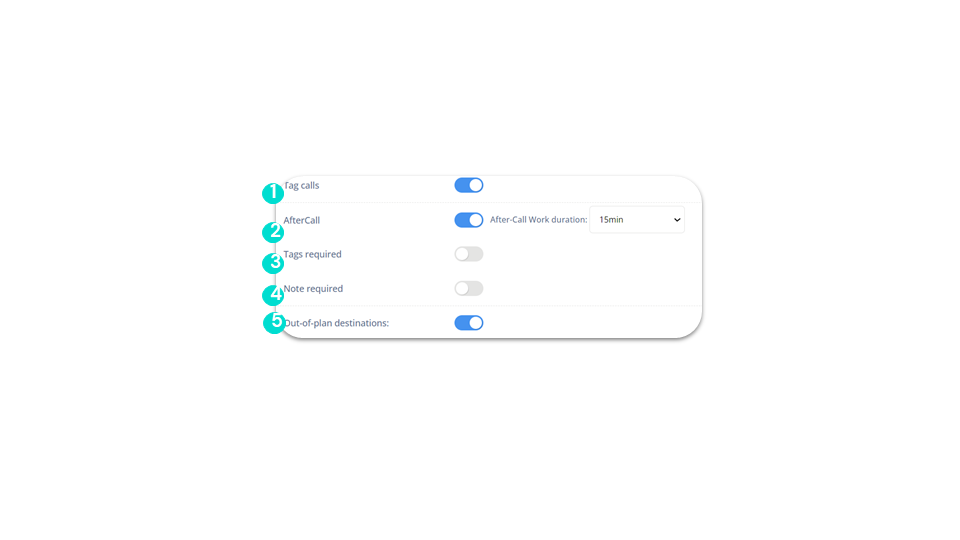
Managing users
Managing permissions
Calls - 3/3
business
advanced
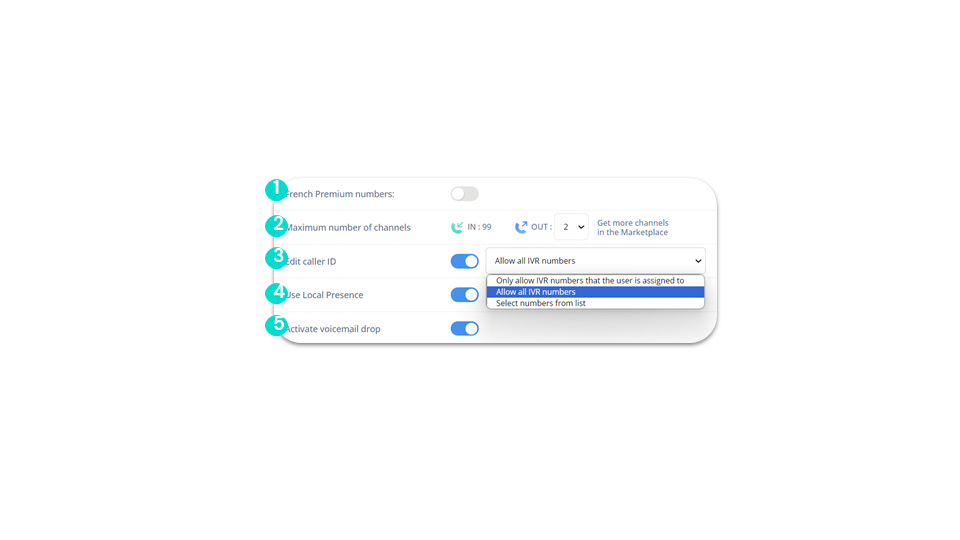
Recording & supervision - 1/2
Managing users
Managing permissions
Recording & supervision - 1/2
business
advanced
Recording & supervision - 2/2
Managing users
Managing permissions
Recording & supervision - 2/2
business
advanced
Managing users
Set up a user’s phone
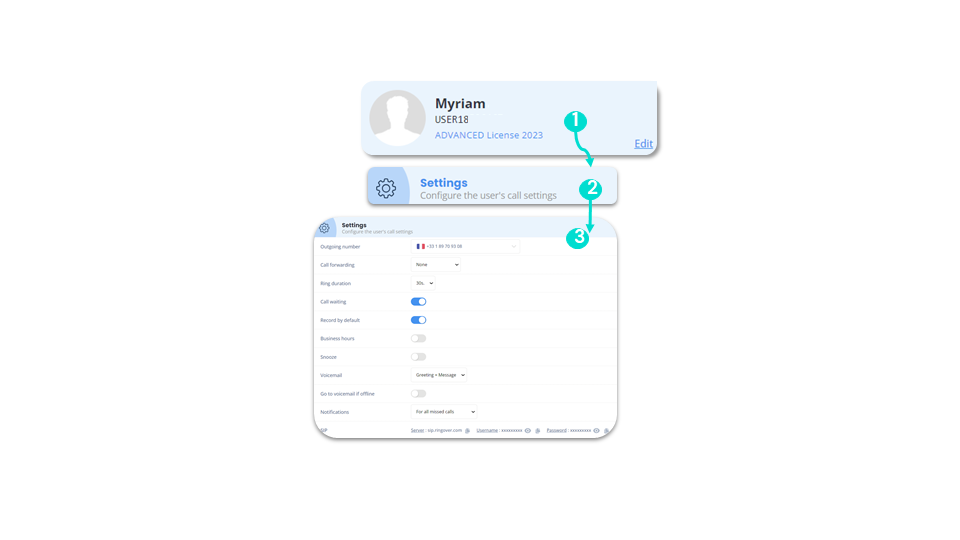
business advancedFrom the “Users” section, in the “Settings” section, you can set the phone parameters for each user.
Managing users
Configure direct line announcements and sounds
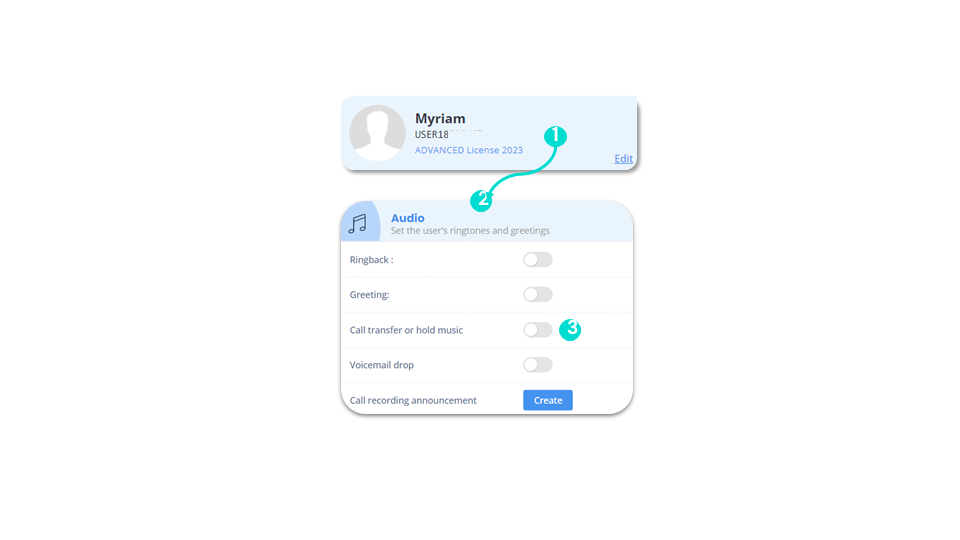
business advancedGo to “Users” in the “Configuration” menu:
Managing users
Configure direct line announcements and sounds
business advanced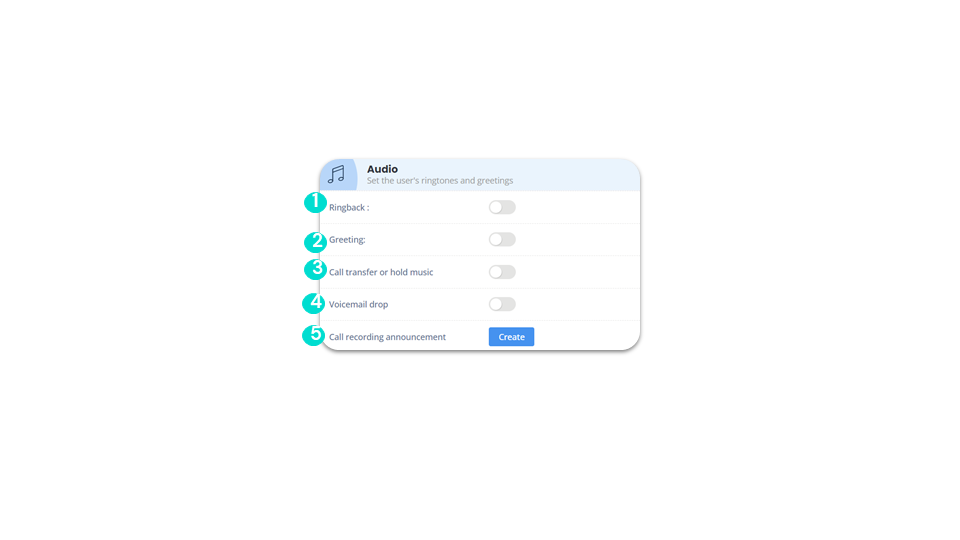
Managing users
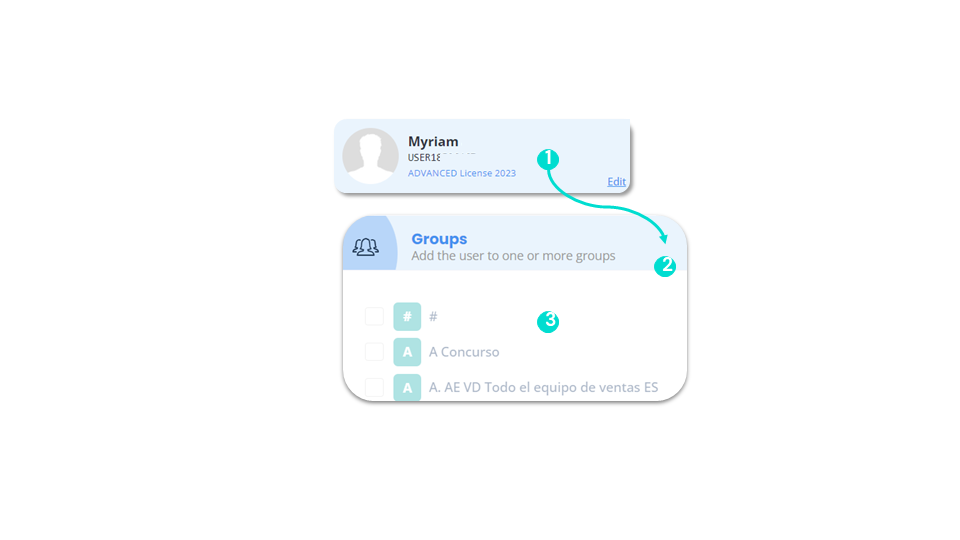
Groups
business advancedFrom the “Users” menu, in the “Groups” section, you can set the group(s) to which each user belongs.
Managing users
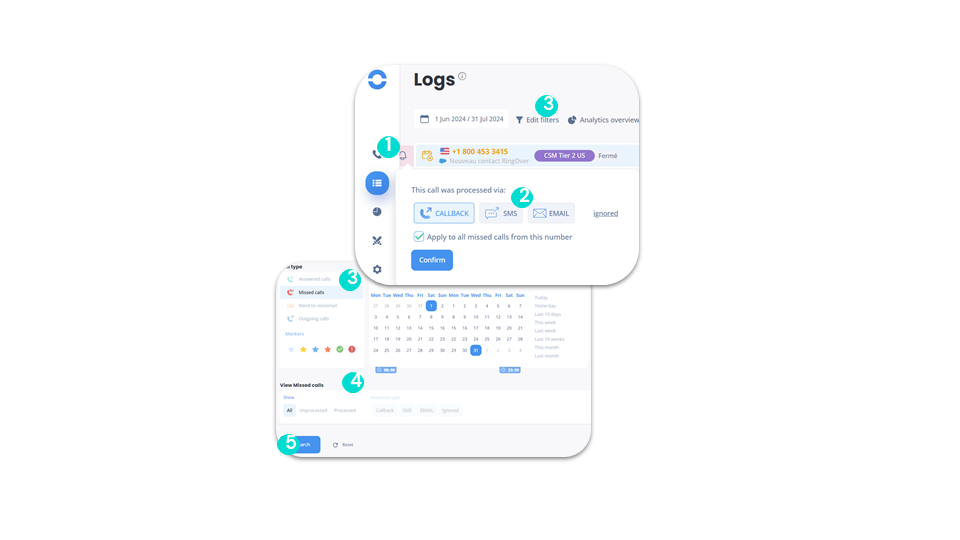
Handle missed calls from your IVR
smart business advancedGo to your Logs in your Dashboard.
Managing users
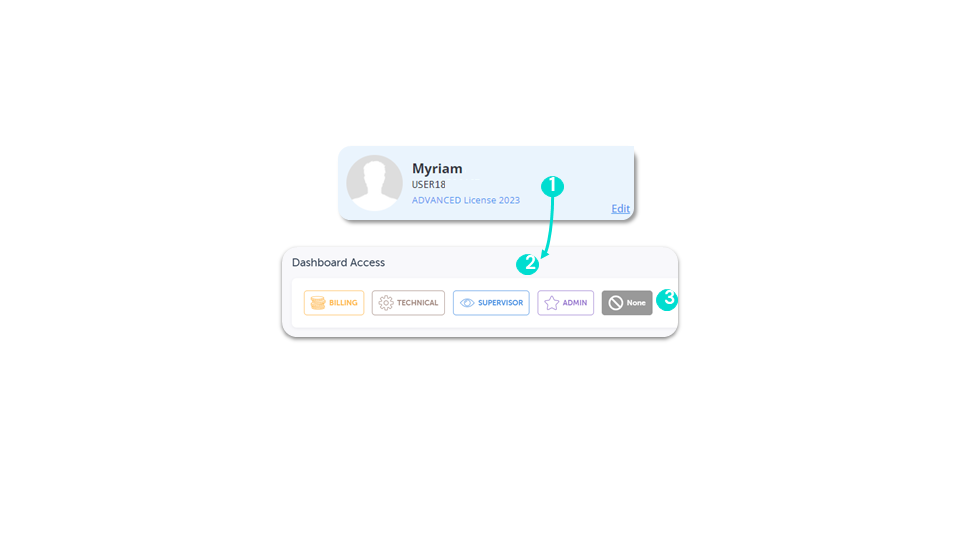
Dashboard access rights (1)
smart business advancedFrom the “Users” section of the “Dashboard Access” menu:
To go further, please visit our help center: Granting Dashboard access rights
Managing users
Dashboard access rights (2)
smart business advanced🚫 None: only for telephony, no Dashboard access.
💰 Accountant: If you assign this role to a user, this user will only have access to the “Credits and billing” page to add credits and download invoices.
⚙ ️Technical: If you assign this role to a user, they will only have access to the “Configuration,” “Developer,” and “Integrations” pages, allowing them to create IVRs, users, groups, and numbers.
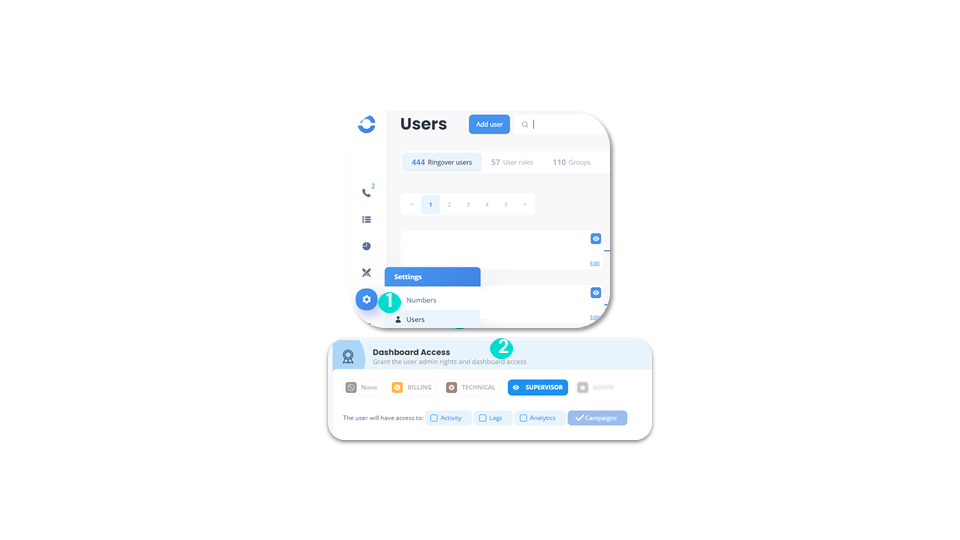
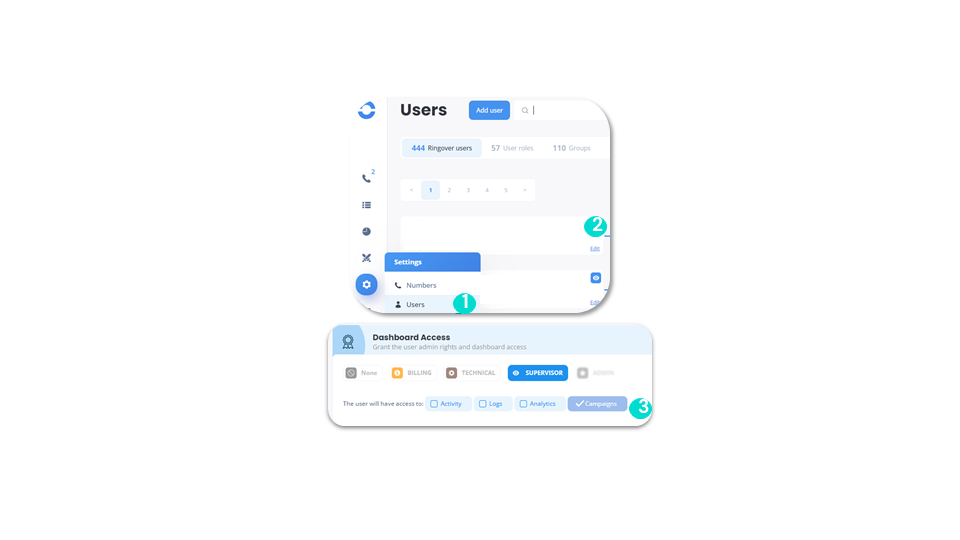
📈 Supervisor: If you assign this role to a user, this user will only have access to the “Activity,” “Logs,” “Campaigns” and “Statistics” pages. They will also only have access to data for groups/IVRs authorized by the administrator.
⭐ Admin: This is the most important role. If you assign this role to a user, they will have full access to the Control Panel with no restrictions. Only the superadministrator can grant this role access to another user. Furthermore, it’s important to note that an administrator cannot modify the access of another administrator; it must be done by the superadministrator.
Configure an IVR
Create an IVR
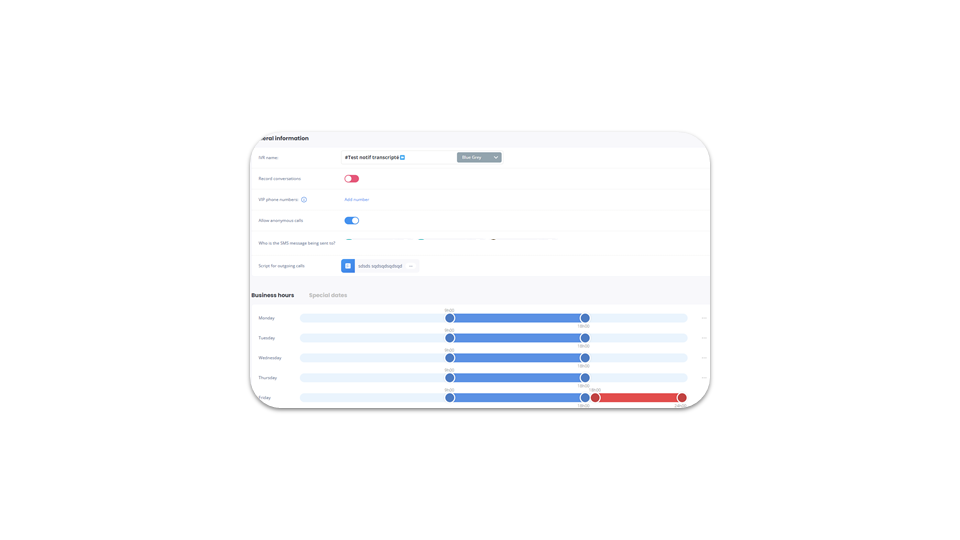
smart business advancedGo to “Voice standards” in the “Settings” menu.
- Name your IVR.
- Choose whether incoming and outgoing call conversations will be recorded.
- Define VIP numbers, always given priority in the queue.
- Choose to allow or deny anonymous calls.
- Create a script for outgoing calls.
- Configure the script.
Configure an IVR
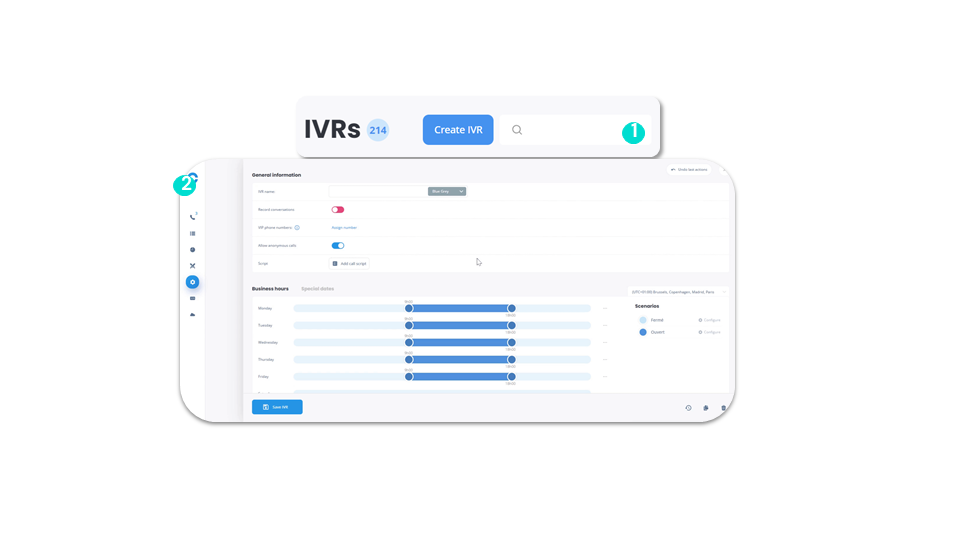
Go to scenario modification
smart business advancedGo to your dashboard, in the “Voice standards” section.
Configure an IVR
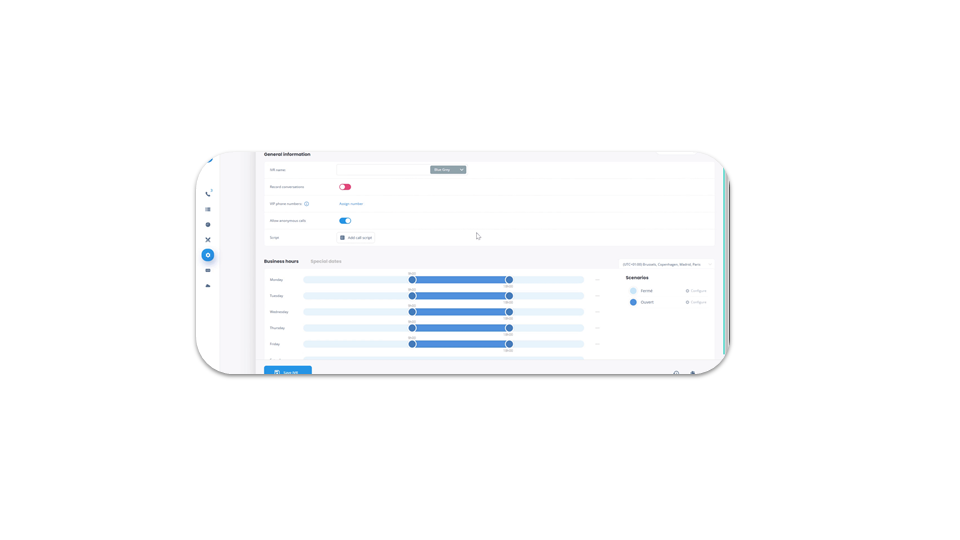
Configure call forwarding according to agent status (1)
smart business advancedGo to your dashboard, in the “Voice standards” section.
Configure an IVR
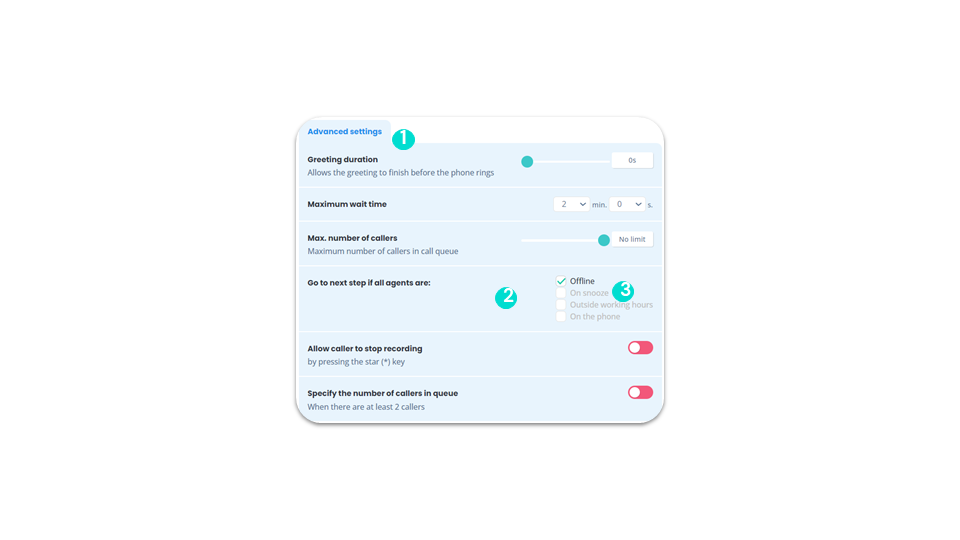
Configure call forwarding according to agent status (2)
smart business advanced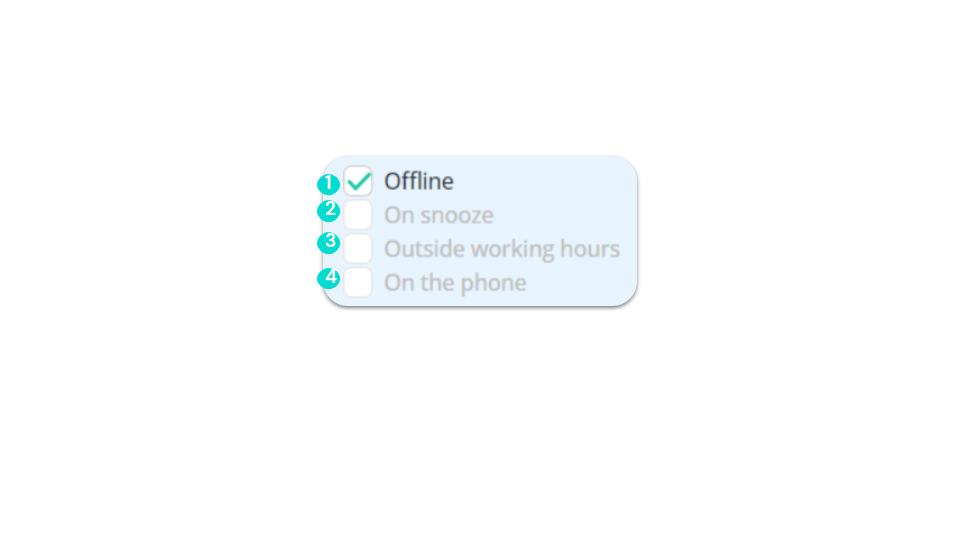
Configure an IVR
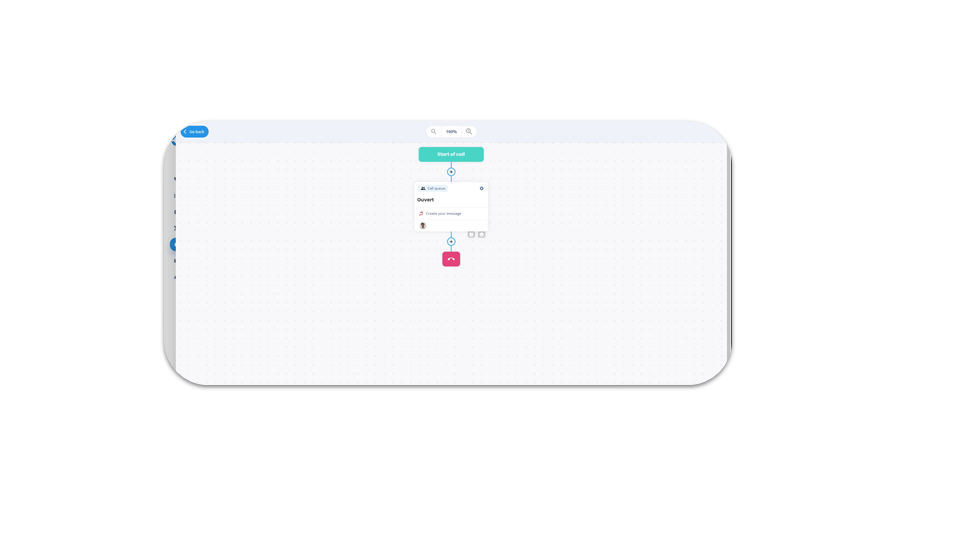
Creating a greeting with voice synthesis and background music
smart business advancedThe voice announcement you create is saved in the “Your sounds” tab, and its name - MyAnnounce - can be modified. Your announcement can then be reused in the same or another standard.
Configure an IVR
Creating a greeting with an mp3 file
smart business advanced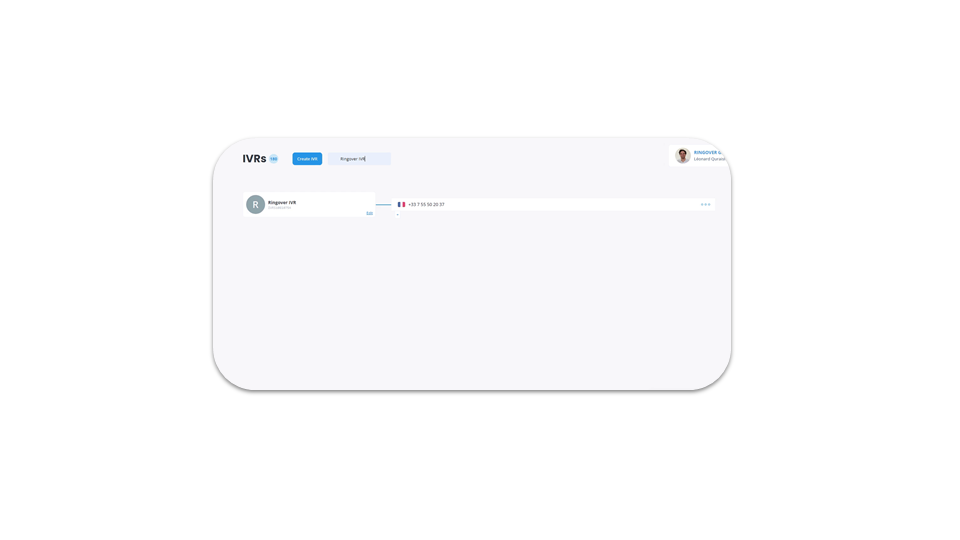
Using call tags
Create and modify tags
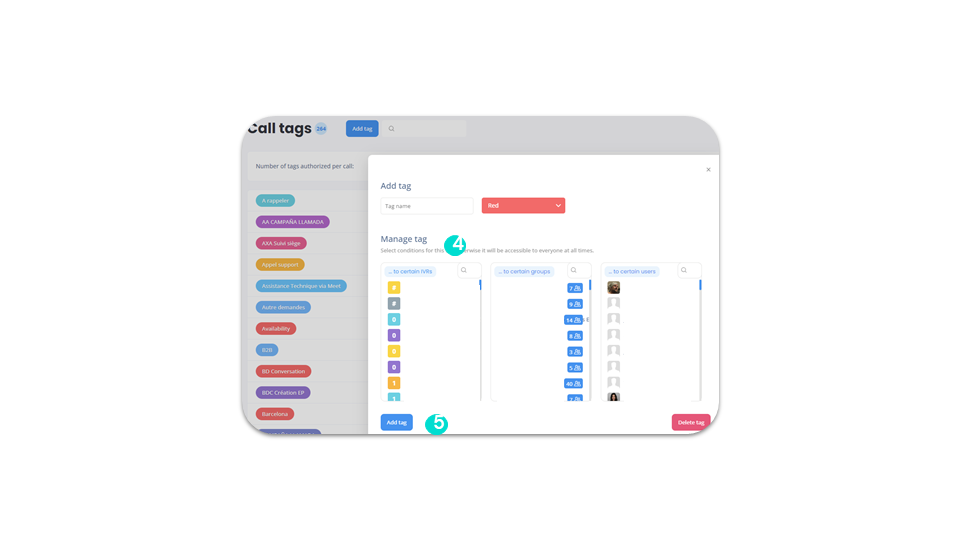
smart business advancedGo to your Dashboard, in your Call Tags to create and modify tags.
Using call tags
Allow your users to tag their calls
business advancedGo to “Users” in the “Settings” menu.
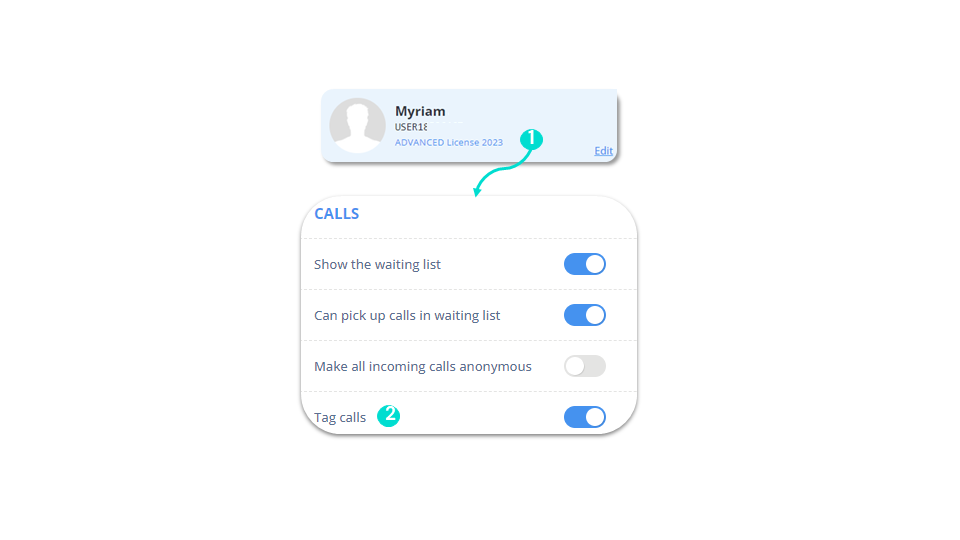
To go further, please visit our help center: Authorizing your users to tag their calls
Using call tags
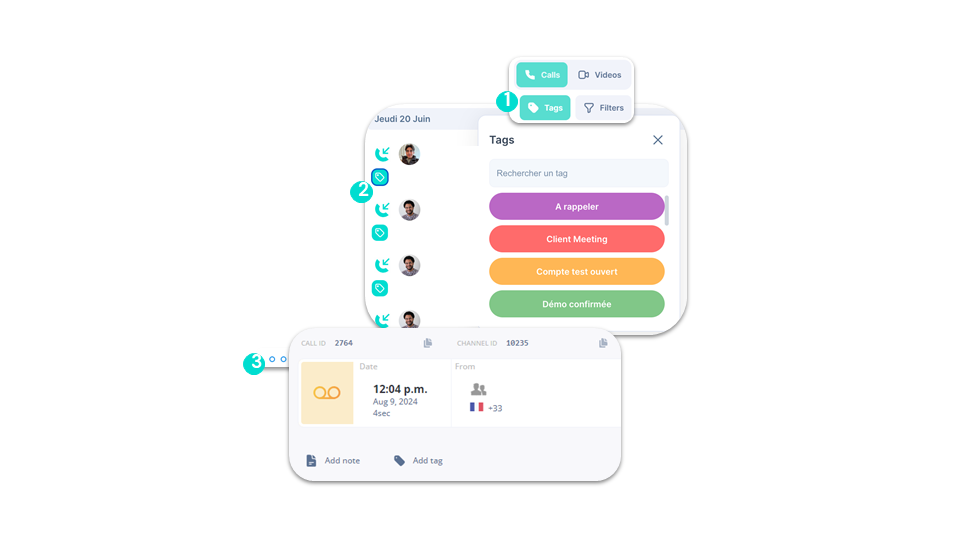
WebApp & Dashboard
smart business advancedOn app.ringover.com, from the “Calls” page you can tag each of your calls.
Via the Dashboard:
- Go to the three dots.
- Click on “Add tag”.
Create your network
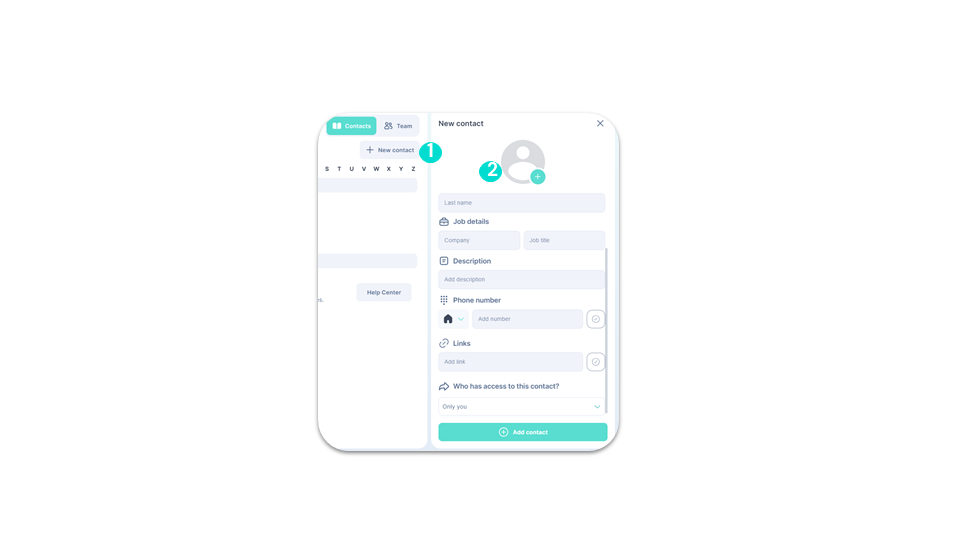
WebApp
smart business advancedYou can add contacts:
Create your network
Dashboard
smart business advanced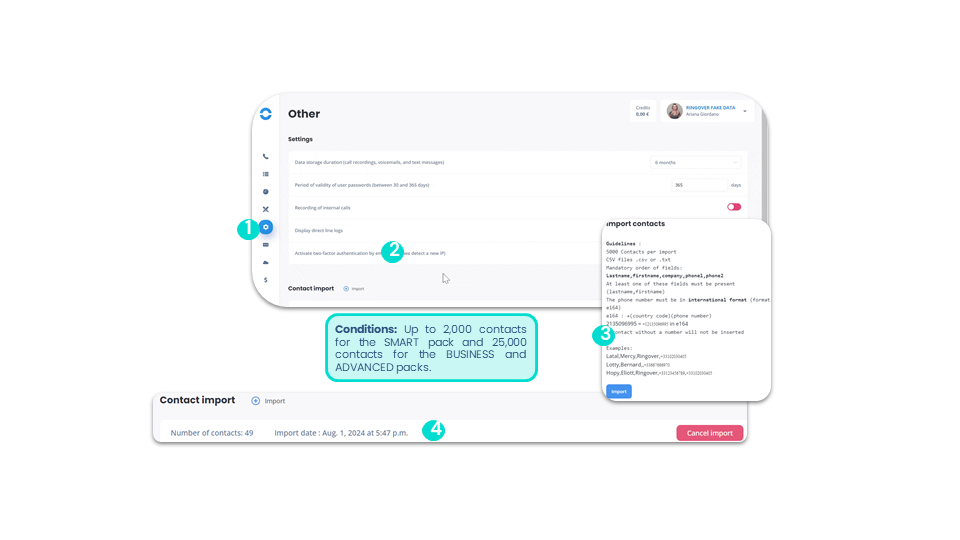
Create your network
Find and call a contact
smart business advancedThere are 2 different ways to search for a contact in your contact list:
To go further, please visit our help center: Making and receiving calls
Add a number to the blacklist
Dashboard
business advancedIf a contact or number you don’t know or don’t want to receive any more calls from bothers you, you can block it from your Ringover Dashboard by adding it to your list of blocked numbers. In this way, the number will also be blocked for your entire team.
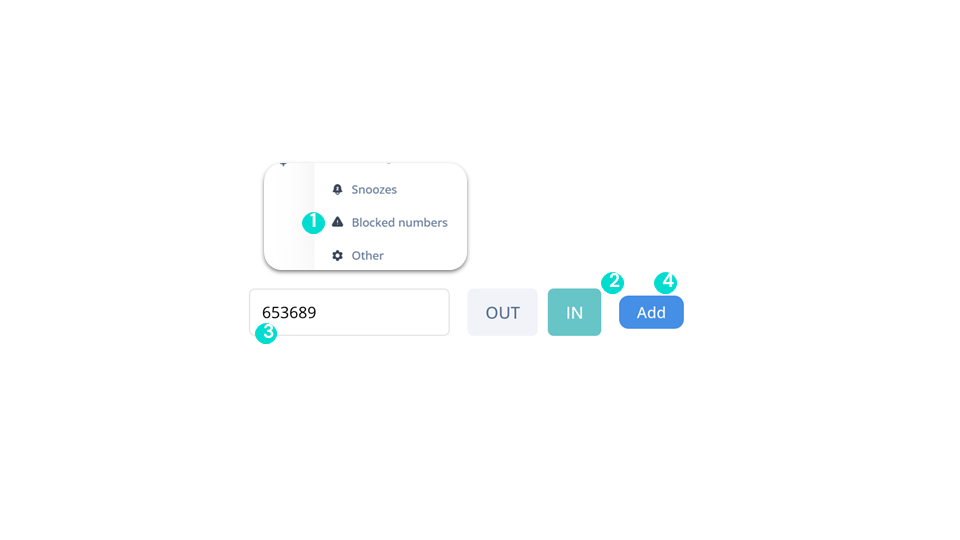
Add a number to the blacklist
Webapp
business advancedYou can also block individual numbers. To do this, go to your WebApp:
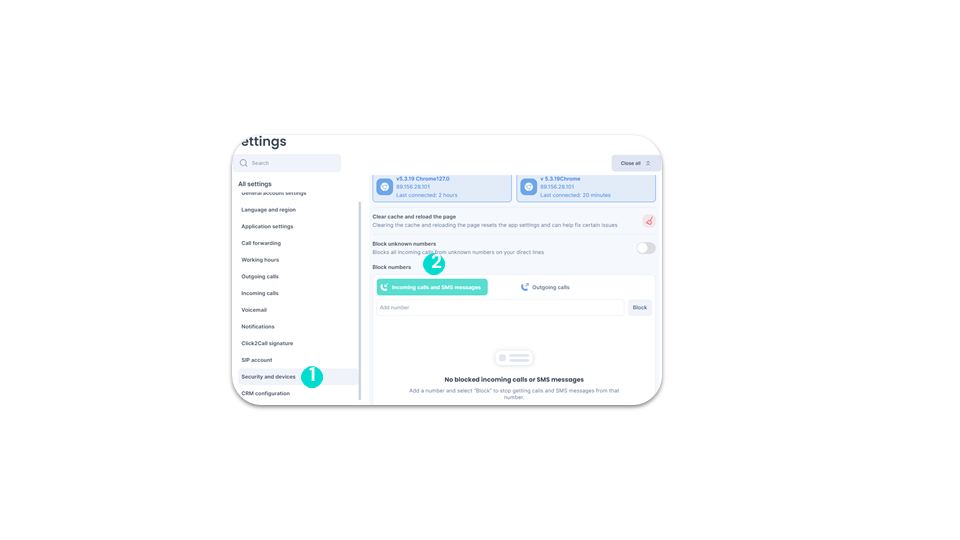
Send SMS campaigns
Set access to “SMS Campaigns” functionality (1)
business advancedOnly the administrator can configure user access to the “SMS Campaigns” feature.
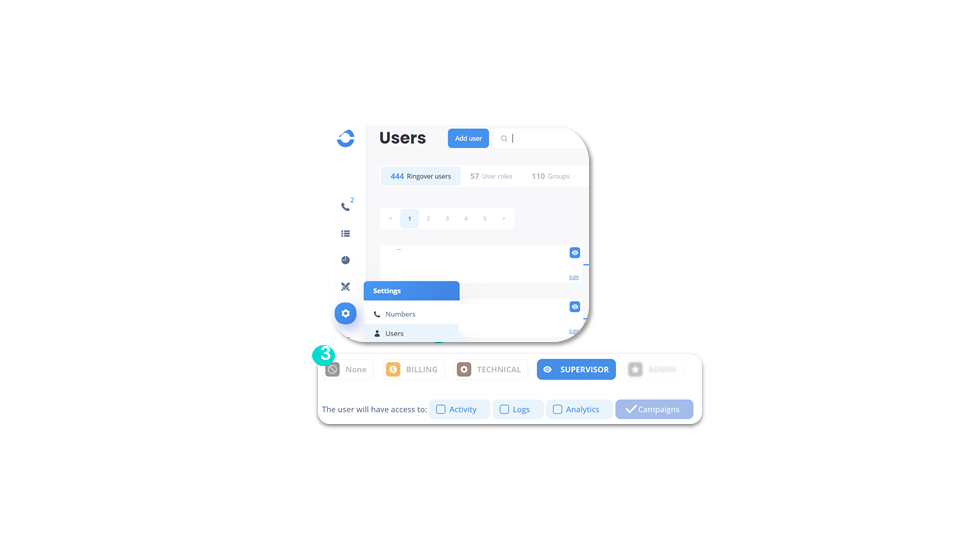
Send SMS campaigns
Set access to “SMS Campaigns” functionality (2)
business advanced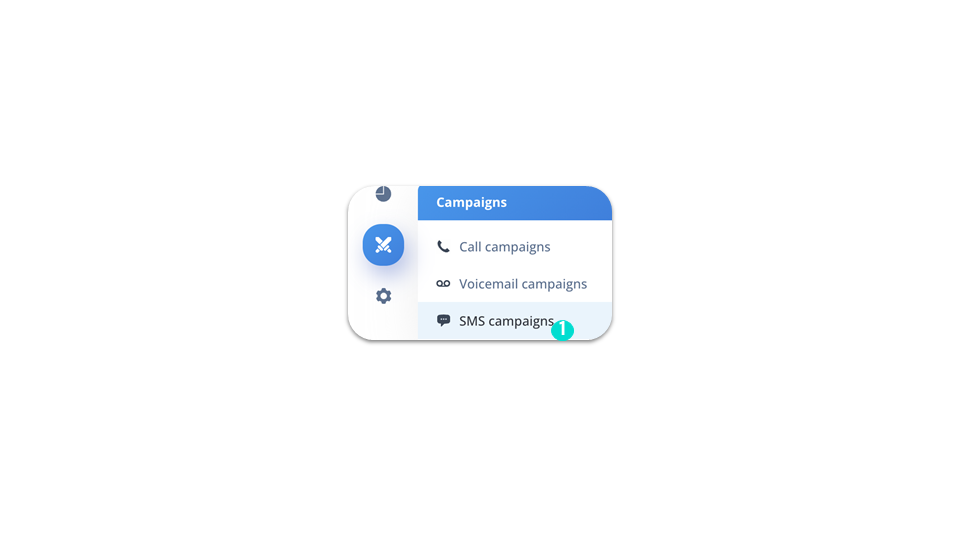
Send SMS campaigns
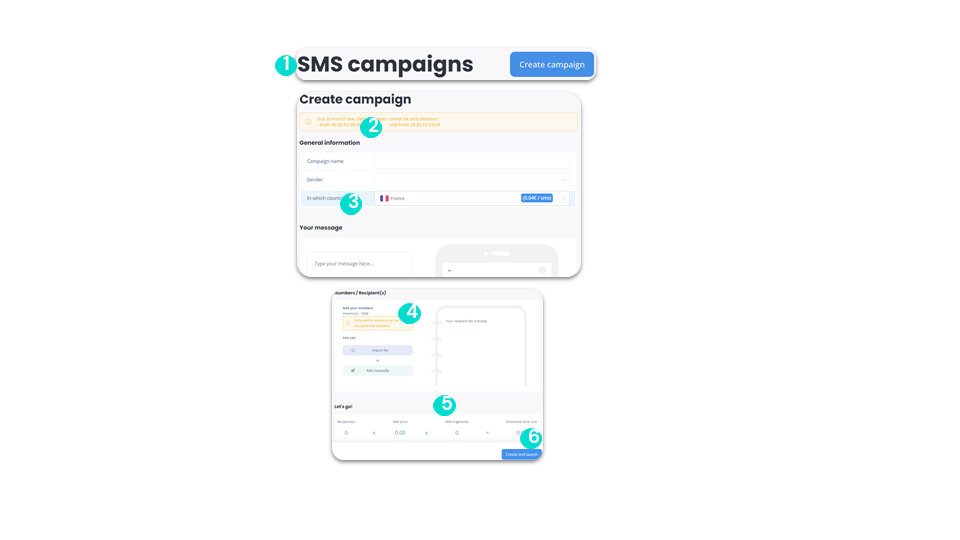
Send an SMS campaign
business advancedOnce your request has been validated, you will have access to the “SMS Campaigns” function.
Launch call campaigns
Configure access to functionality
advancedOnly the administrator can configure user access to the “Call Campaigns” feature.
Launch call campaigns
Create a call list (1)
advanced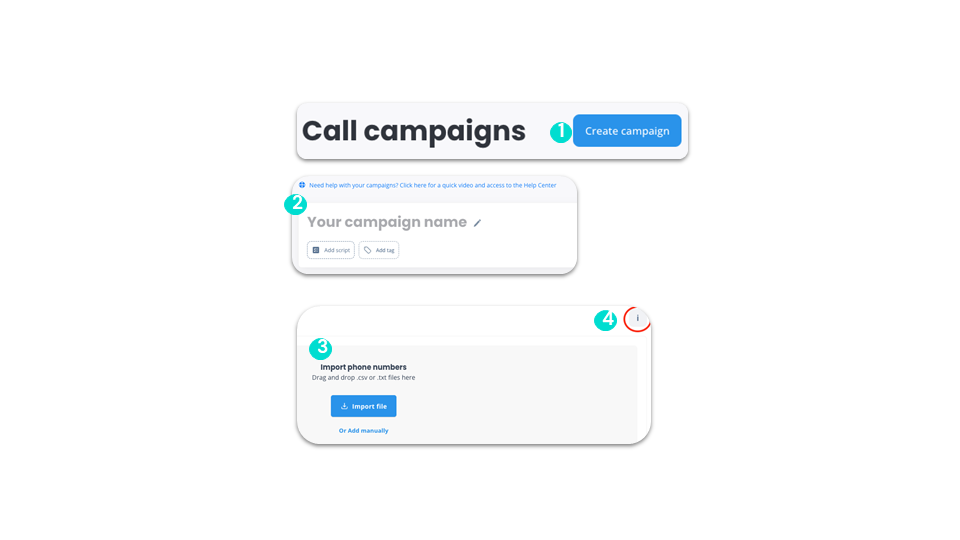
Launch call campaigns
Create a call list (2)
advanced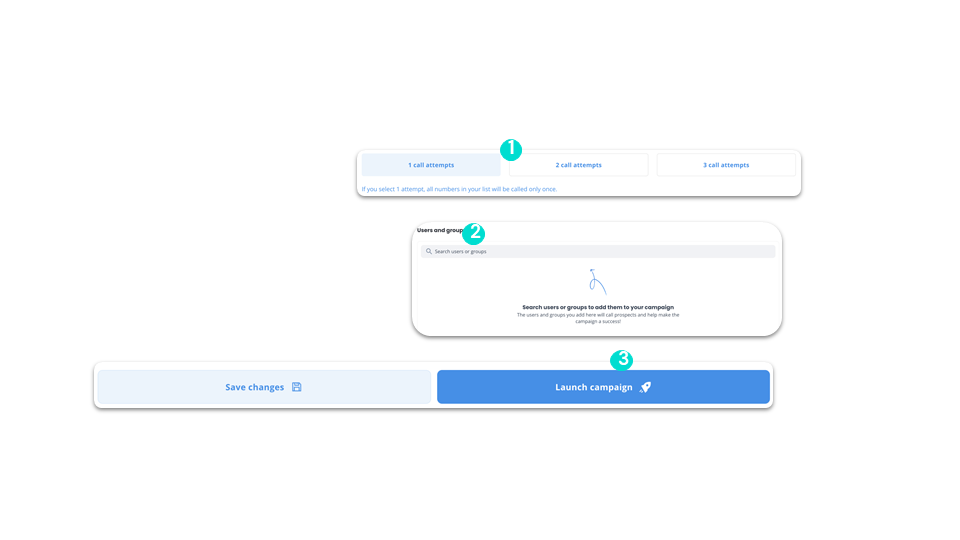
Launch call campaigns
Add numbers
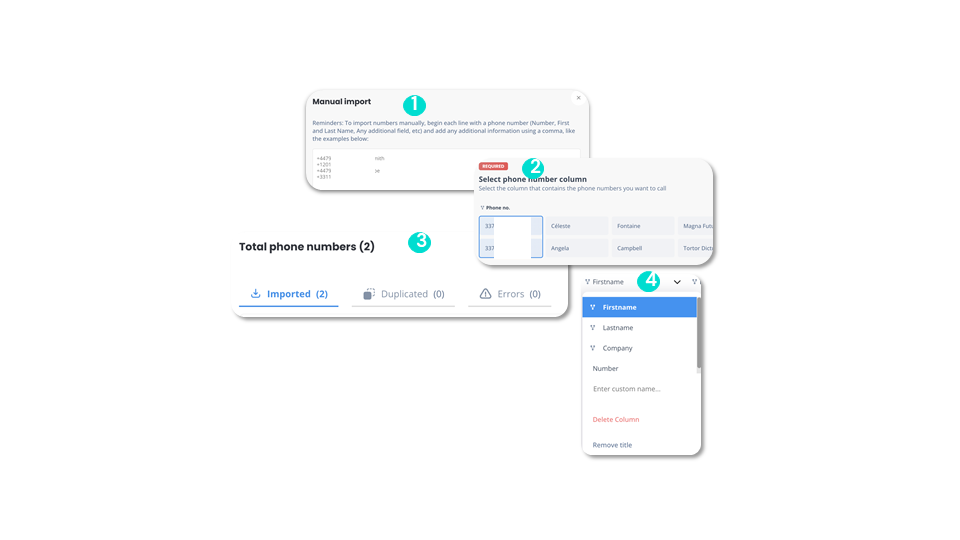
advancedYou can also manually add the numbers you wish to call. To do so, click on “Or add manually”.
By import:
Launch call campaigns
Launch campaign
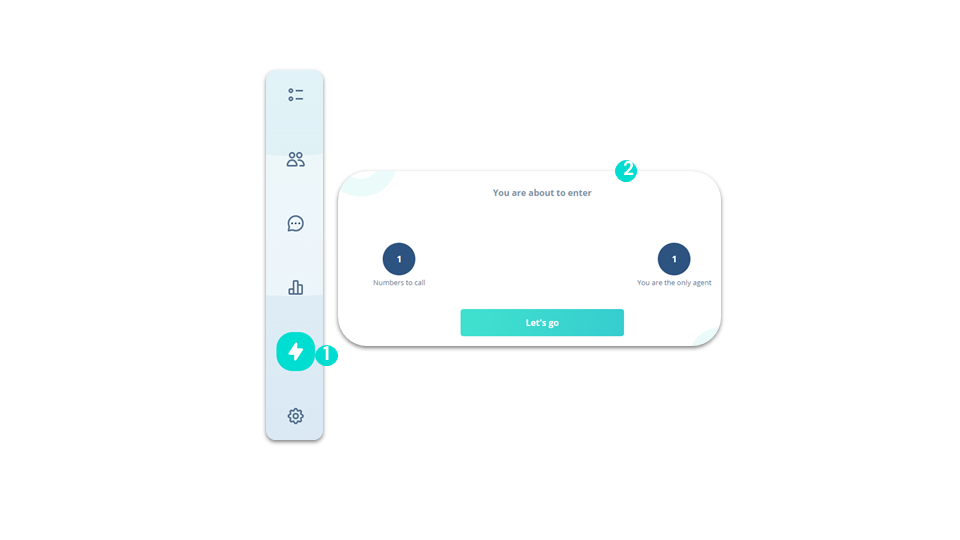
advancedTo launch a call campaign:
Send voicemail campaigns
Configure access to functionality
advancedOnly the administrator can configure user access to the “Voicemail Campaigns” feature.
Send voicemail campaigns
Launch voicemail campaigns
advanced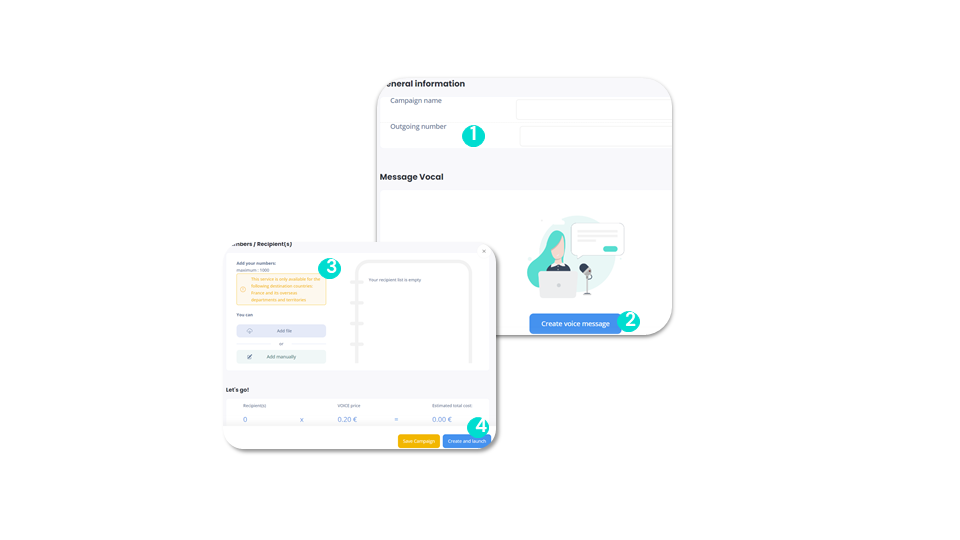
To go further, please visit our help center: Sending a Voicemail Campaign
Billing
Go to billing tab
smart business advancedIn just a few clicks, you can buy credit, view all your invoices, manage your consumption and your means of payment. All you have to do is:
OR
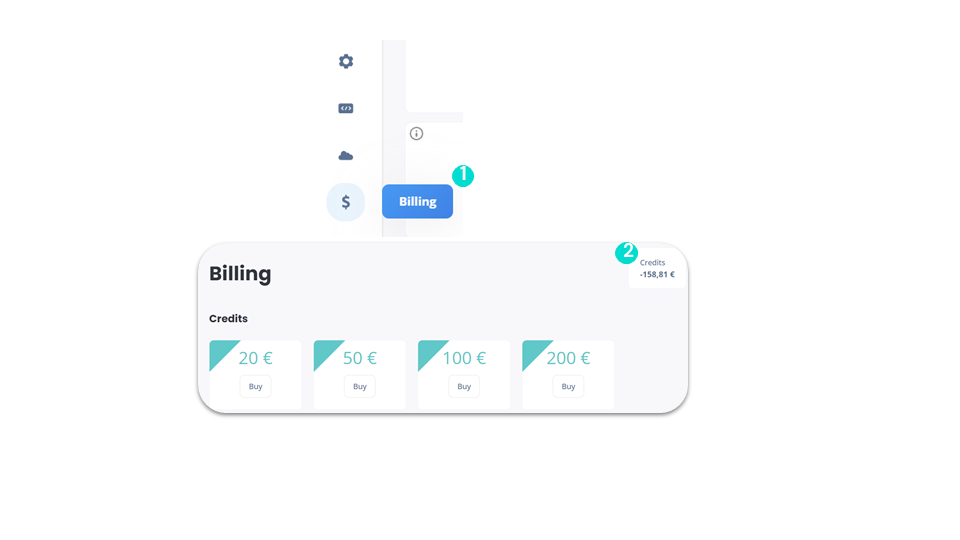
Billing
Buy your credits
smart business advancedCall credit lets you call destinations not included in your unlimited plan, send SMS from a Ringover mobile number or launch SMS campaigns.
You can choose to block your overage authorization so as not to be billed unexpectedly at your next due date.
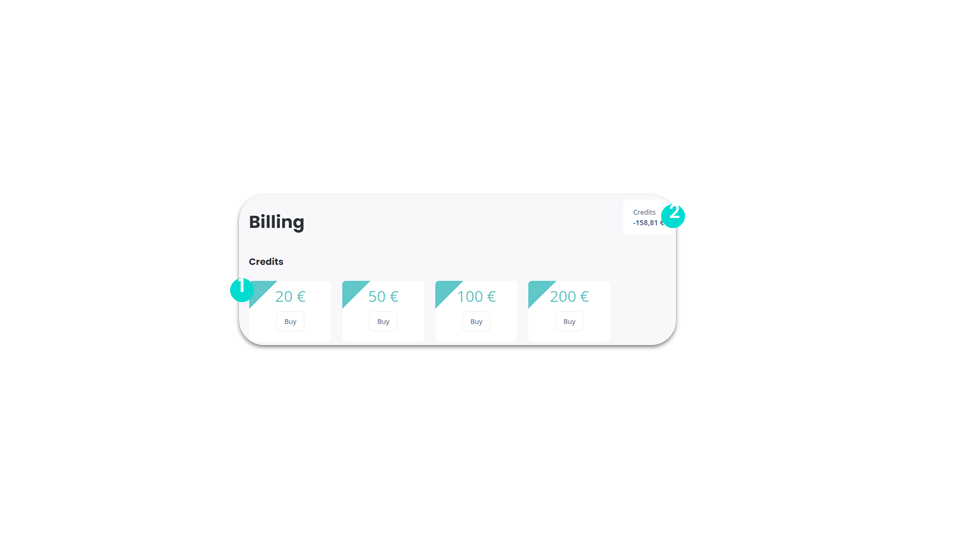
Billing
Manage your licenses
smart business advancedIn the “Your licensesÐ section, you’ll find a summary of the number of licenses you have available.
You can manage the addition and deletion of your licenses independently:
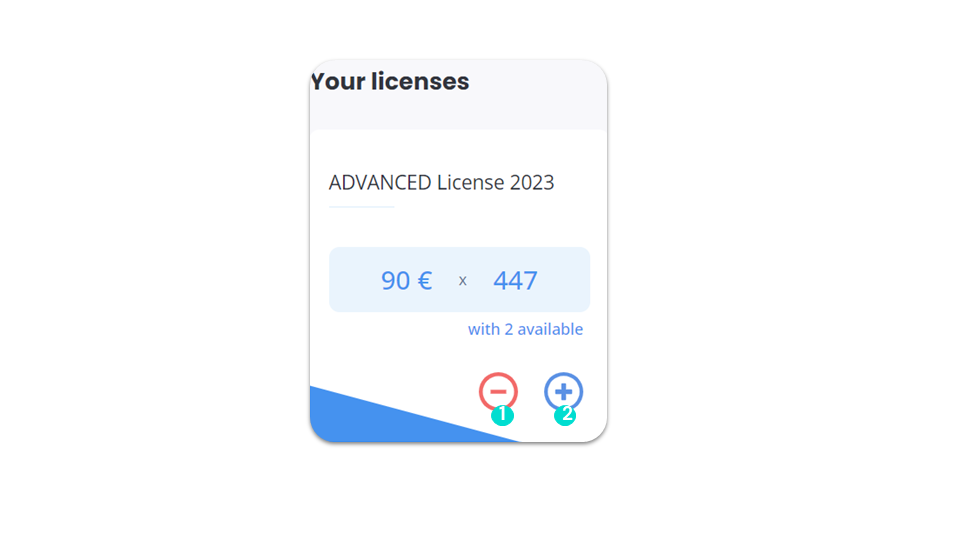
Billing
Manage your point of contacts
smart business advancedYou can add useful contacts:
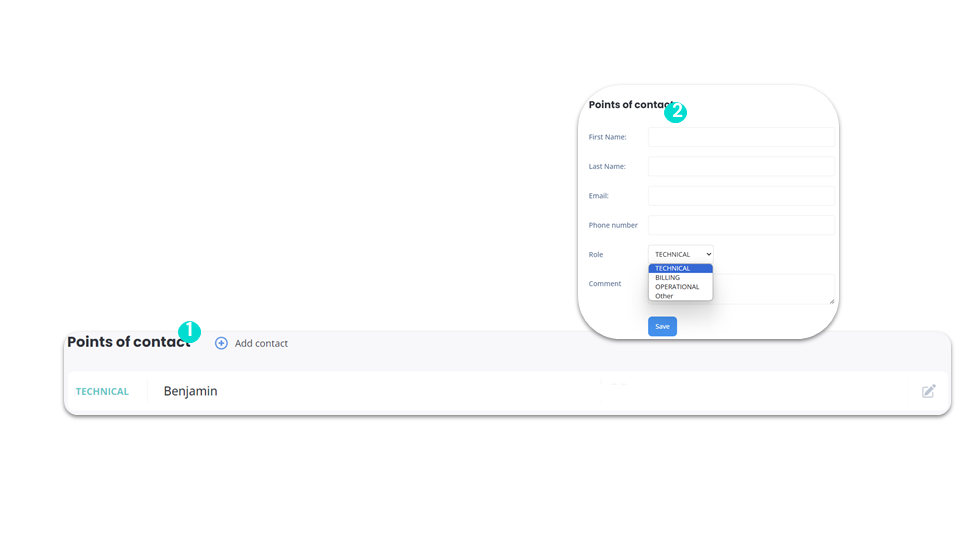
Billing
Manage your billing addresses
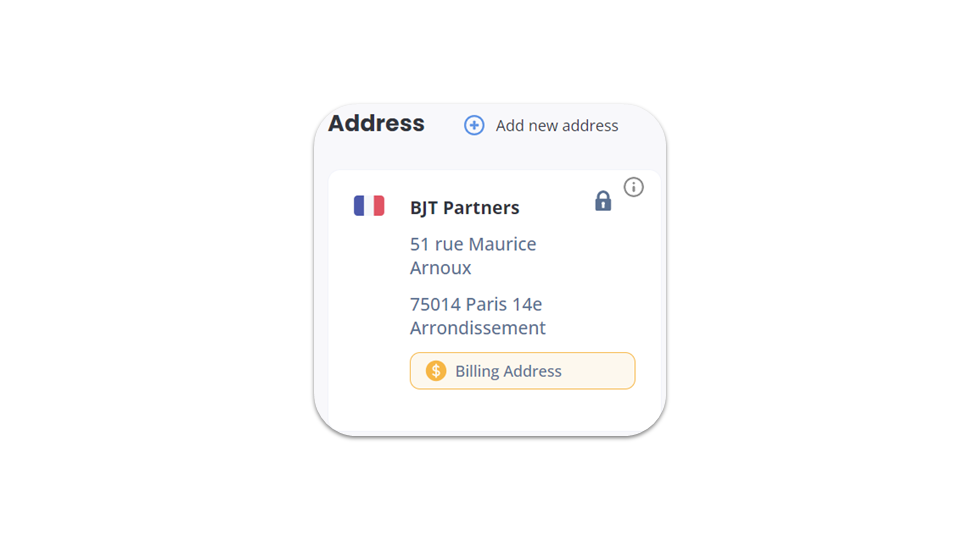
smart business advancedFrom the “Billing Address” section, you can manage your billing addresses.
You can add as many billing addresses as you like.
You will always be billed at the first address you enter, which is considered your main billing address.
Billing
Access your documents
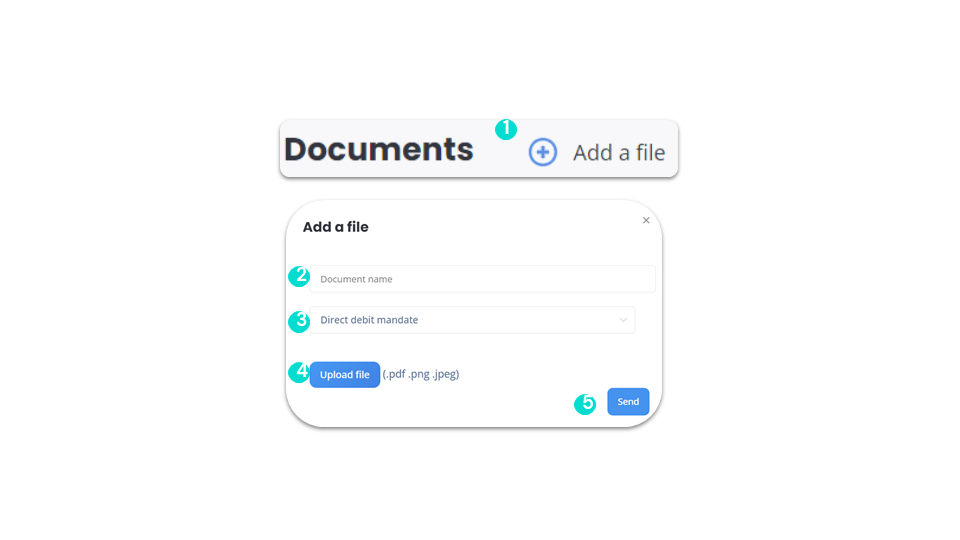
smart business advancedYou can access all the documents available for your file in the “Documents” section.
You can add as many documents as you like (format: .pdf, .png or .jpeg):
Billing
Credit card
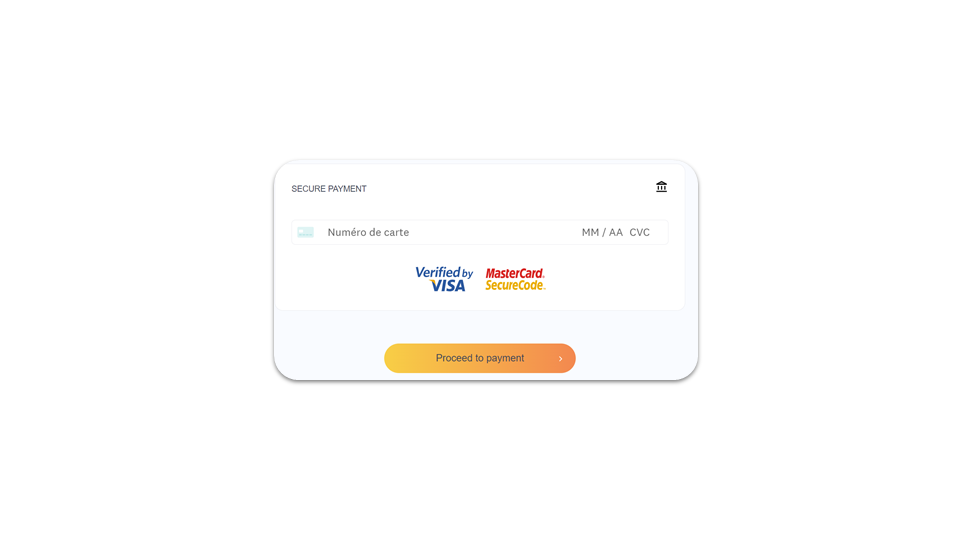
smart business advancedGo to https://dashboard.ringover.com/billing.
Click on the “Modify” or “Add credit card” button below your payment method. You will be redirected to a secure page where you can update your payment method.
Good to know:
💡 For an immediate purchase of credits, you’ll need to enter a credit card.
💡 Prepaid cards are not authorized.
Billing
Download and filter your invoices
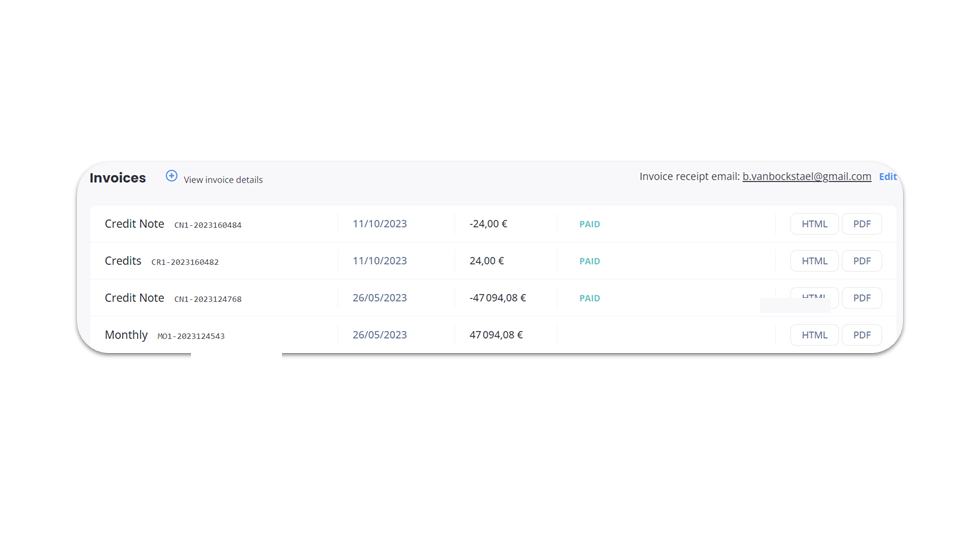
smart business advanced- In the “Invoices” section, you’ll find all your purchases (monthly installments and credit purchases) and be able to download your invoices (in HTML and PDF format).
- The invoices for your monthly payments are detailed invoices: you’ll be able to see all your calls, the numbers called, the time and date of the calls, the duration, and the Ringover number used for each call.
- All invoices are issued in the name of the Ringover account creator.
Billing
Filter your invoices
smart business advanced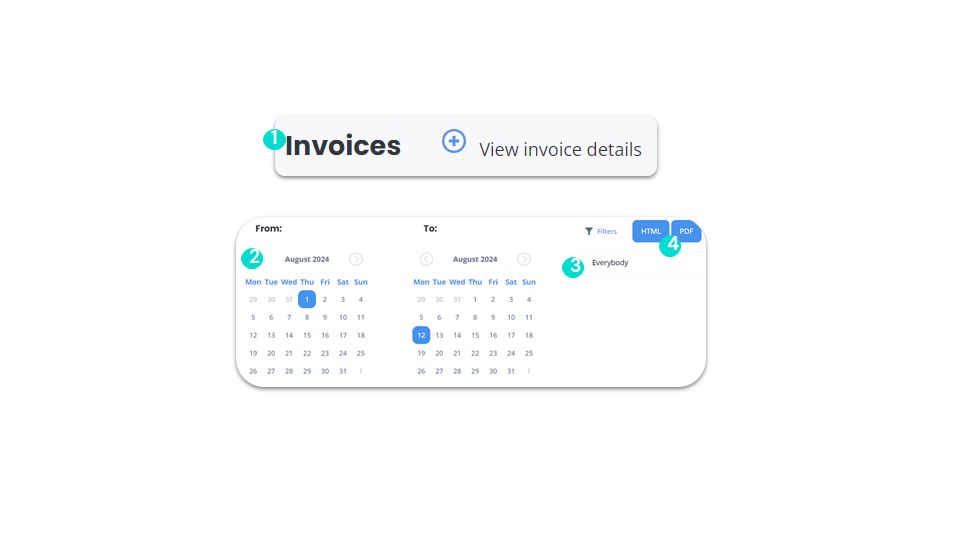
Billing
View your next invoices
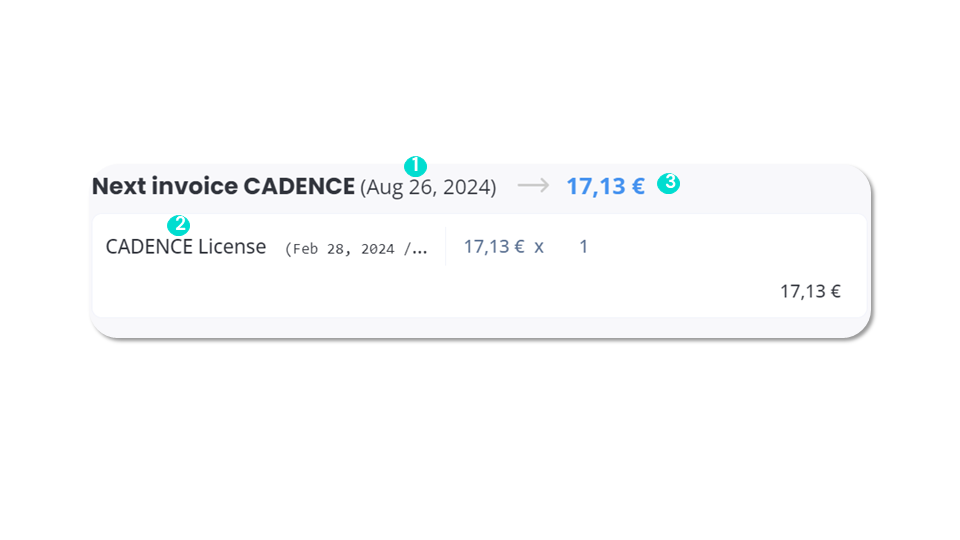
smart business advancedFrom the “Next invoice” section, you can view your next invoice.
Billing
Understanding your billing (1)
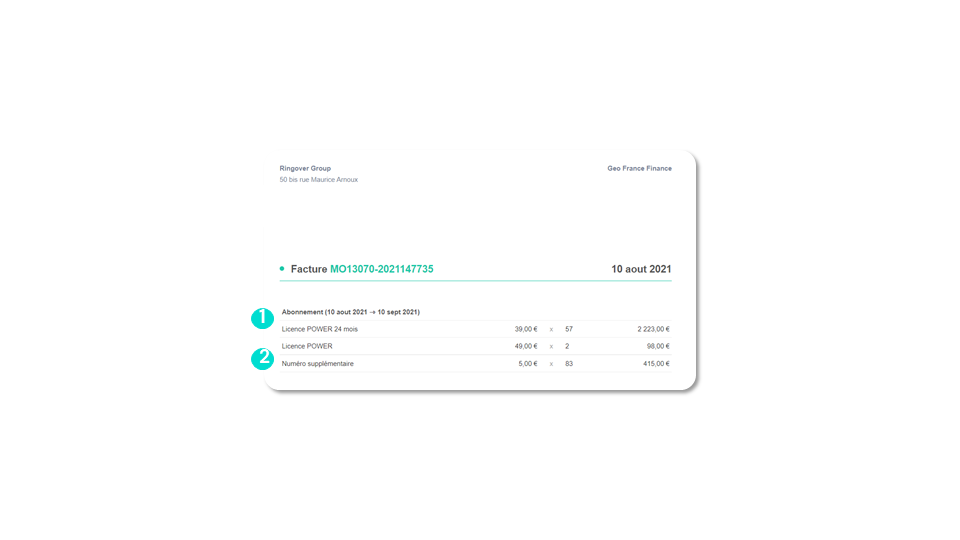
smart business advancedPrepayment
- Interactive Voice Response (IVR).
- A conference call.
- A second direct line.
Billing
Understanding your billing (2)
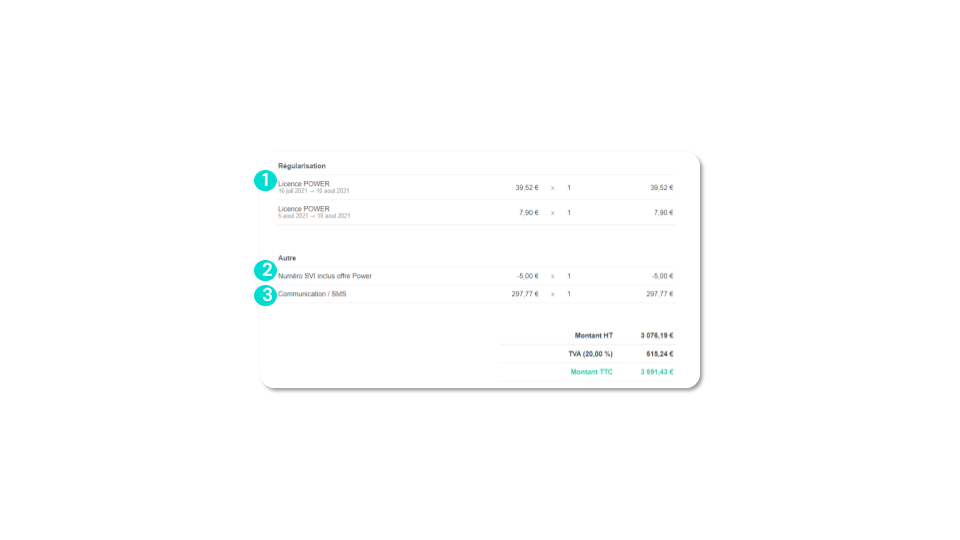
smart business advancedPost-payment
- Sending text messages (click here to find out more).
- Calling special numbers.
- Calls to out-of-package destinations.
- External redirections (to other operators).
Set the duration of your data storage
Set the duration of your data storage
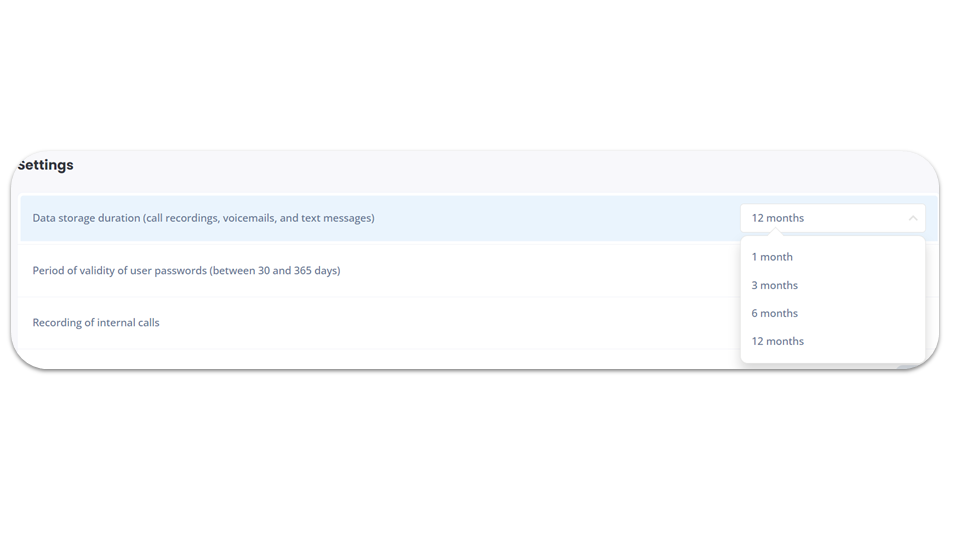
smart business advancedGo to your Ringover account settings , then to “Other” and choose the storage duration:
Marketplace
Marketplace
smart business advanced💡 The marketplace is a feature that enables companies to integrate various tools and services into their Ringover account. At any given time, a company can only have one active integration for each category: CRM, Recruiting and Service Desk.
💡 CRM integration enables companies to optimize their CRM processes and access important customer data in a centralized location. This can help improve communication and organization within the company and, ultimately, deliver better customer experiences.
Marketplace
Products
smart business advancedIn the “Product” section of the Marketplace, you’ll find:

Marketplace
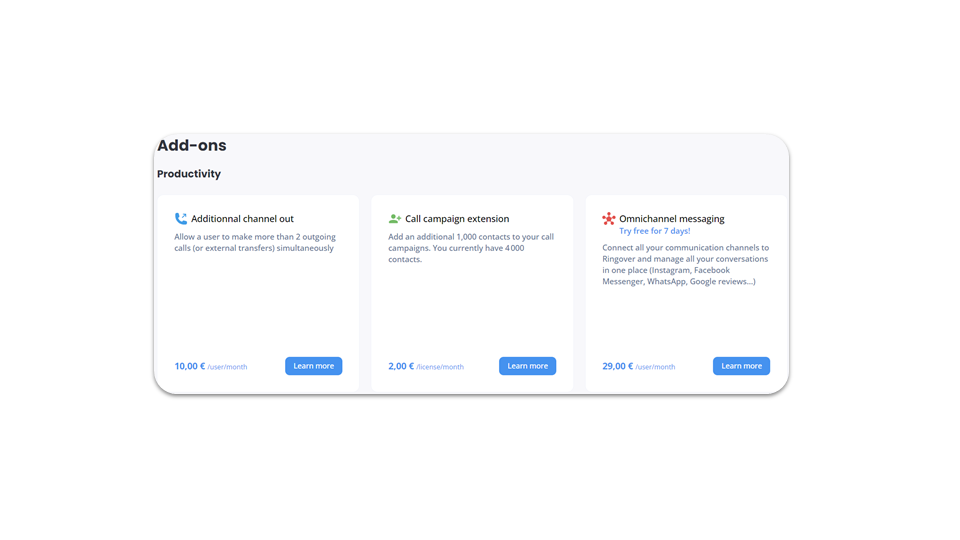
Add-ons
business advancedAn Add-on is an extension designed for Ringover that extends its capabilities beyond the basic functions, enabling a greater variety of features and options.
Prerequisite: Add-ons can only be activated by account administrators and/or superadministrators. We will now show you the various Add-ons that Ringover offers:
Marketplace
Additional outgoing channel
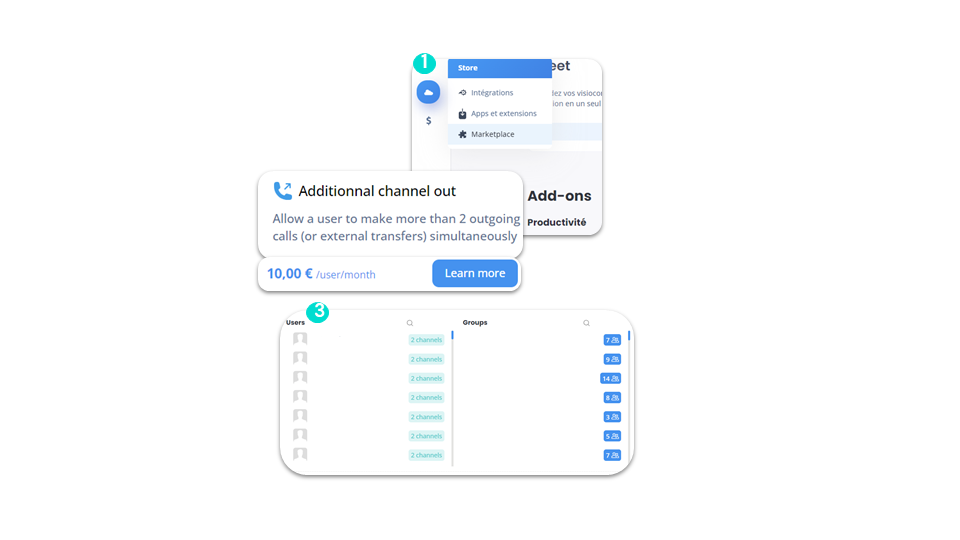
smart business advancedThis Add-on allows the user to make more than 2 outgoing calls (or external transfers) simultaneously.
Prerequisite: This Add-on can only be activated by account administrators and/or superadministrators. To activate this Add-on:
Marketplace
Call campaign extension
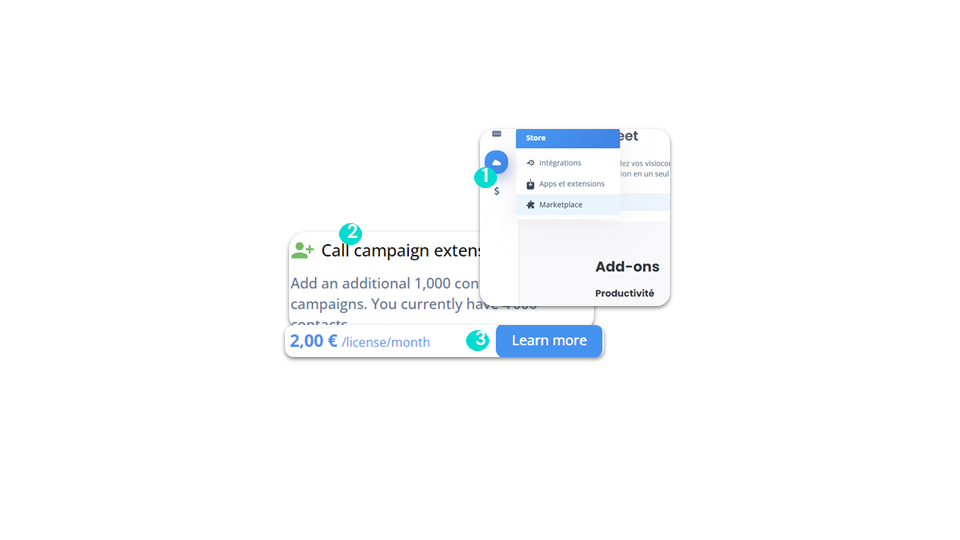
smart business advancedAllows you to add a list of 1000 additional contacts to your call campaigns.
⚠️ This is billed per user. By accepting the purchase, the price of the additional channel will be added to your invoice.
Marketplace
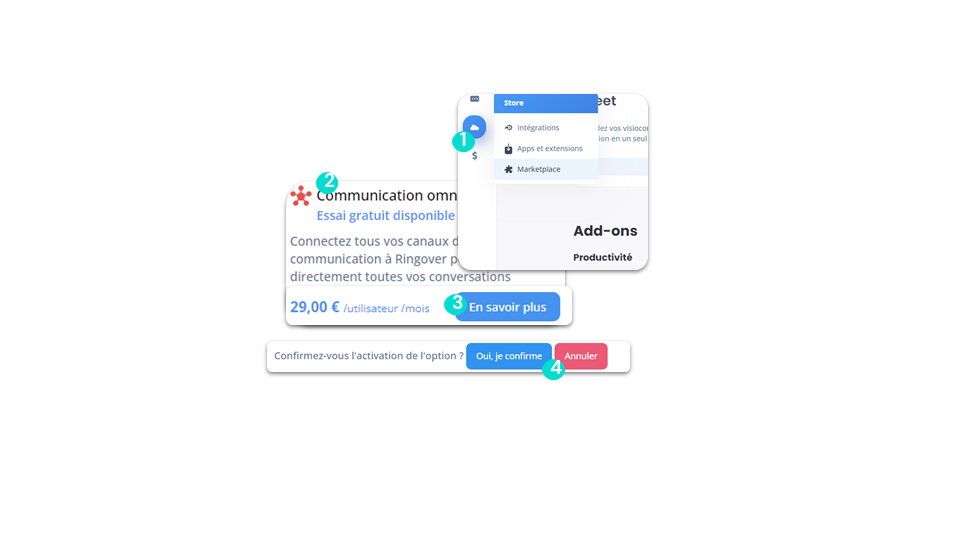
Omnichannel Communication
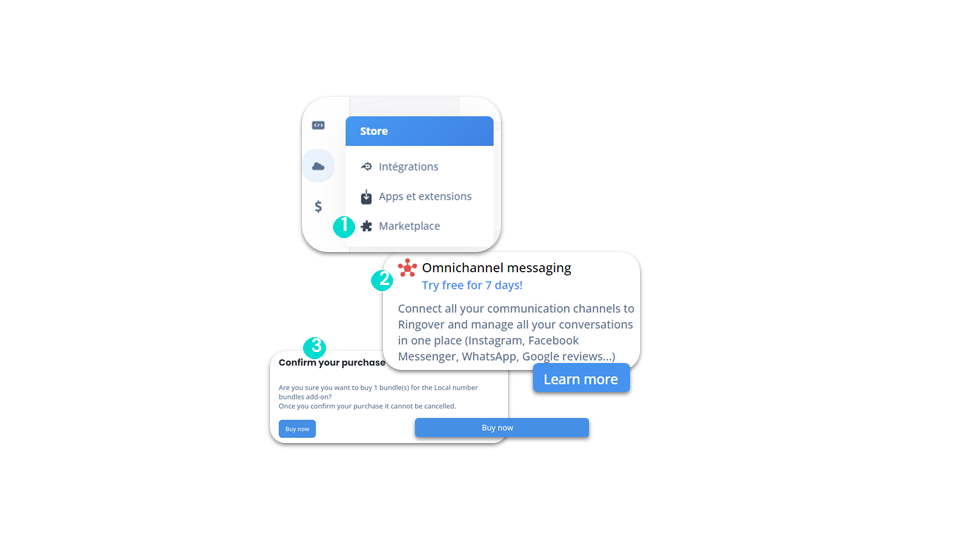
advancedThis Add-on lets you connect different communication channels to Ringover, saving time by centralizing everything on a single platform.
To activate this Add-on:
⚠️ The Omnichannel Communication Add-on is billed per license that benefits from it. By accepting the purchase, the price of the Add-on will be added to your invoice.
Integrate Ringover with your business tools
Integrate Ringover with your business tools
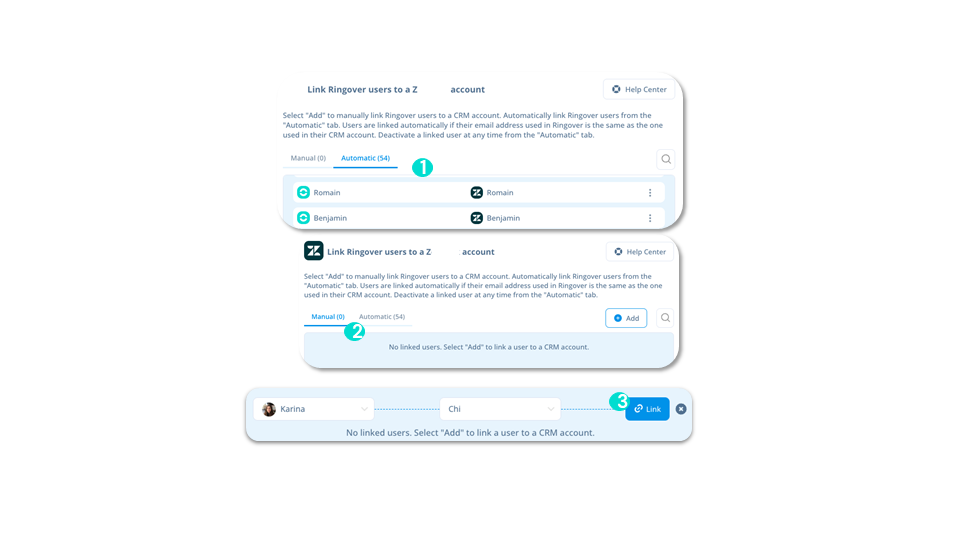
business advancedTo access the integrations, go to the “Store” section of your dashboard.
There are two types of link in Ringover:
To go further, please visit our help center: Link Ringover users with their CRM accounts
Integrate Ringover with your business tools
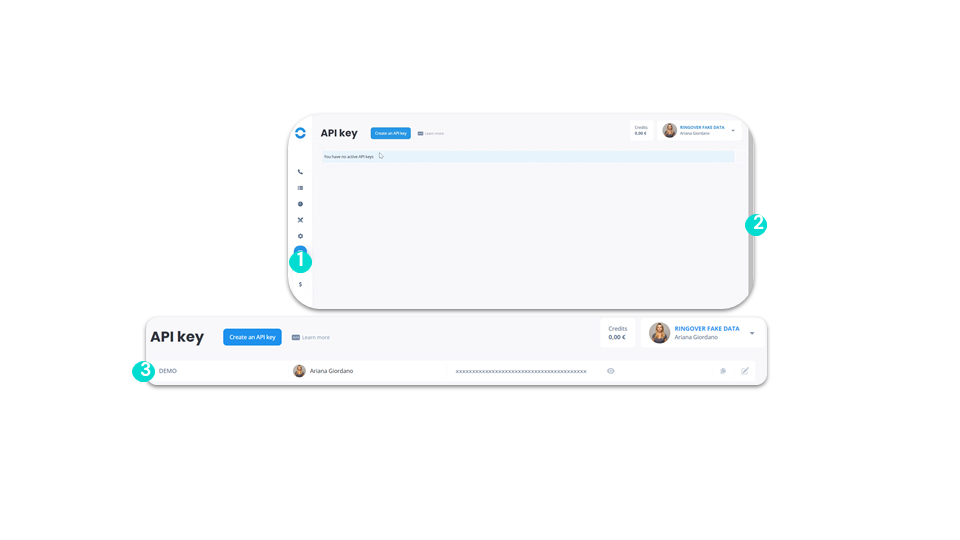
Use our API
business advancedThe Ringover Call API lets you retrieve information on your calls, contacts, users and standards, so you can integrate them into your business tools.
Integrate Ringover with your business tools
API & Webhook
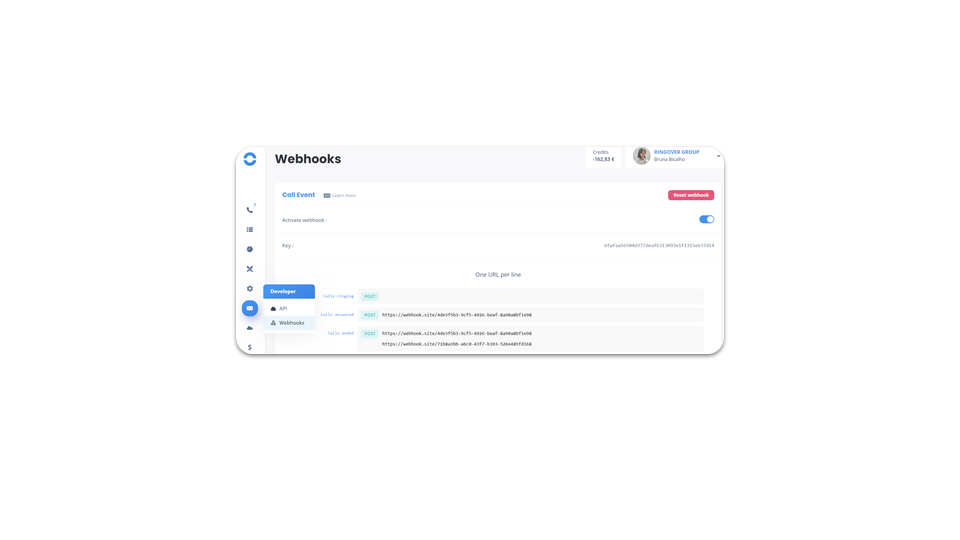
business advancedFrom your Ringover Dashboard, in the Wehbook section, you can enter URLs enabling you to retrieve information that we send via Webhooks. CTI integration with our Webhooks enables you to trigger actions on Ringover events (incoming calls, missed calls, answering machine messages, etc).
Warning: To display a CTI (CRM or Software Development Kit) on Safari, go to your Safari settings:
Safari => Settings => Privacy => Uncheck “Prevent cross-site tracking”
For more information, visit: https://developer.ringover.com/#tag/webhook.
